IAM/ICM to IHU Retrofit
My step by step tutorial on retrofitting an IHU in your pre IHU/Sensus P3.
I've seen a few posts on how to retrofit an IHU in our older P3 cars going around different forums, some of which have been the inspiration and help behind this try. I'd like to shout out a few sources and people who've helped, the wiring diagram which I ended up creating/using/mixing up is the back bone of this project, the sources to create mine were the following:
*You can also see my comment asking for a reference material on RetrofitP3!
As you can see however, both sources have their weaknesses, you have 0 reference for materials. The Swedespeed post in my opinion is barely legible without RetrofitP3 as a reference and a few cables don't match here either.
So I used both, as well as some prior knowledge from working on wiring harnesses for work to find the materials myself, thus not having to rely on finding IHU's with cut cables or parting out connectors from broken devices like the person on Swedespeed did.
So for those who only came here for a wiring guide, here you go:
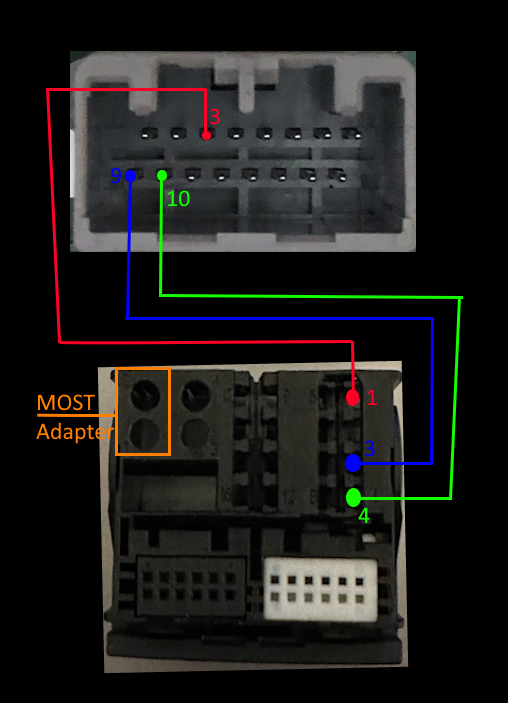
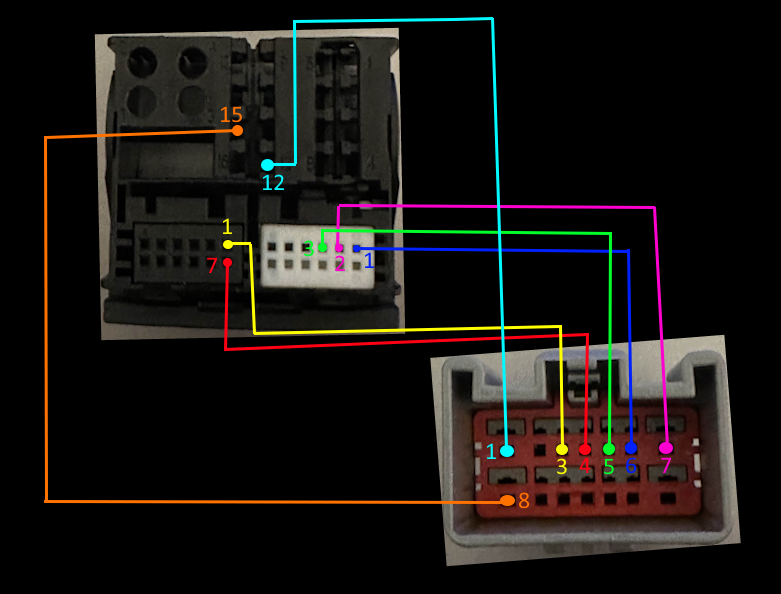
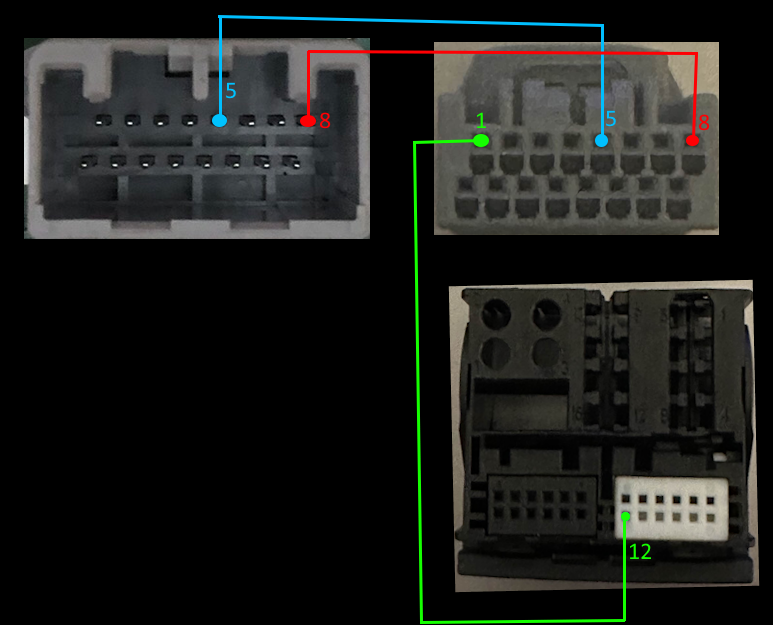
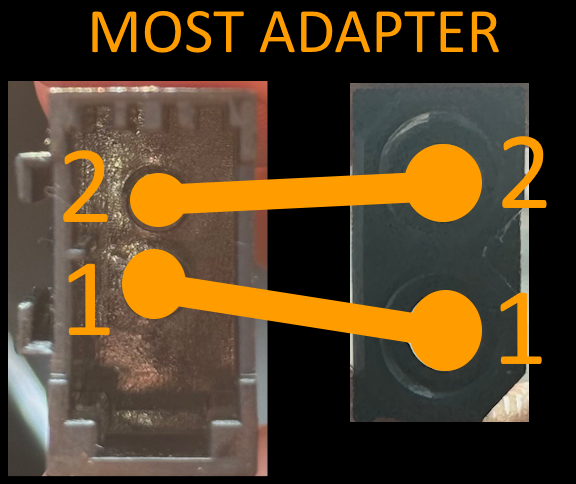
Wiring diagrams
Parts list (name, amount, part number):
I would order extra of each part in-case something breaks on you!
Quad lock:
- Quad lock Housing, x1, 1241765-2
- 12 Pos Housing, x2, 1394048-1
- 12 Pos Cap, x1, 1-1355524-3
- 12 Pos Cap, x1, 2-1355524-3
- 8 Pos housing, x1, 1355526-2
- Crimp Terminal, x6, 968074-2
- Crimp Terminal, x6, 5-965906-1
MOST Adapter:
- Quad plug housing, x1, 1-1355531-1
- Opposite end of the cars plug, x1, 1-1394916-2
- Re-used the fiber optic cables from the left over Amazon loops
ICM Plug:
- MOST bypass loop, x2
- Female plug, x1, MX34016SF1
- Male plug, x1, MX34016PF1
- Male crimp terminals, x5, M34P75C4F2
- Female crimp terminals, x3, M34S75C4F1
IAM Plug:
Other Parts:
- IHU, 1x, VO 31421121AA
- Display, 1x, VO 31382065
- CAM Button (if applicable), 1x, VO 31288201
- NAV Button, 1x, VO 30782887
- Internet Button, 1x, VO 31384347
- IHU to Display/ICM LVDS cable (Only if it's missing), x1, VO 31328610
- 0.75mm2 cables for wiring
- Felt tape
NOTE! The LVDS cable may already be there, for the pre-IHU vehicle's this cable was used for the Navigation on IAM model: 2.1 Level 3. Some vehicle's which have lower level IAM's will still have this cable but hidden behind the panel which holds the CCM panel. To find it you'll have to remove the IAM/stereo and try to fish it out, it usually has a foam bag around the connector on both ends and is pre-routed all the way up to the display. Check for it before ordering a new cable as it can be expensive!!
Tools I used:
- P3Tool for programming
- Crimping tool from Würth
- Wire stripping pliers
- Some pliers to help make the crimps smaller for the smaller terminals
I was unable to find the same crimp pliers on the Würth US web page, but thats at least something to reference when looking for other crimp pliers.
Finding the correct IHU:
Now, I'm fortunate enough to own an S60 and I say that because for the people who own a V70/S80/XC60 the process for getting the IHU to work is a bit more tedious. You have to find a "correct" IHU if you want it working properly. As for other models - I was speaking with Henke, the creator of the RetrofitP3 post and we both came to the conclusion that the part numbers shouldn't really matter.
If you've got a V70/S80/XC60 however, Henke's article goes through in great detail how he managed to find the perfect IHU and could work as a guide for you too! So please make sure to check out his post too!
The actual work:
I wont go into much detail about the creation of the wiring harness, everything you need to know is in the images above. You can also refer to Henke's post as well as the Swedespeed post if there's anything you need to cross-reference, however once you've completed the wiring harness and made sure that it works the way it should - I'd use some electrical or felt tape around the harness to protect it before fully installing it in your car!
Dissasembly:
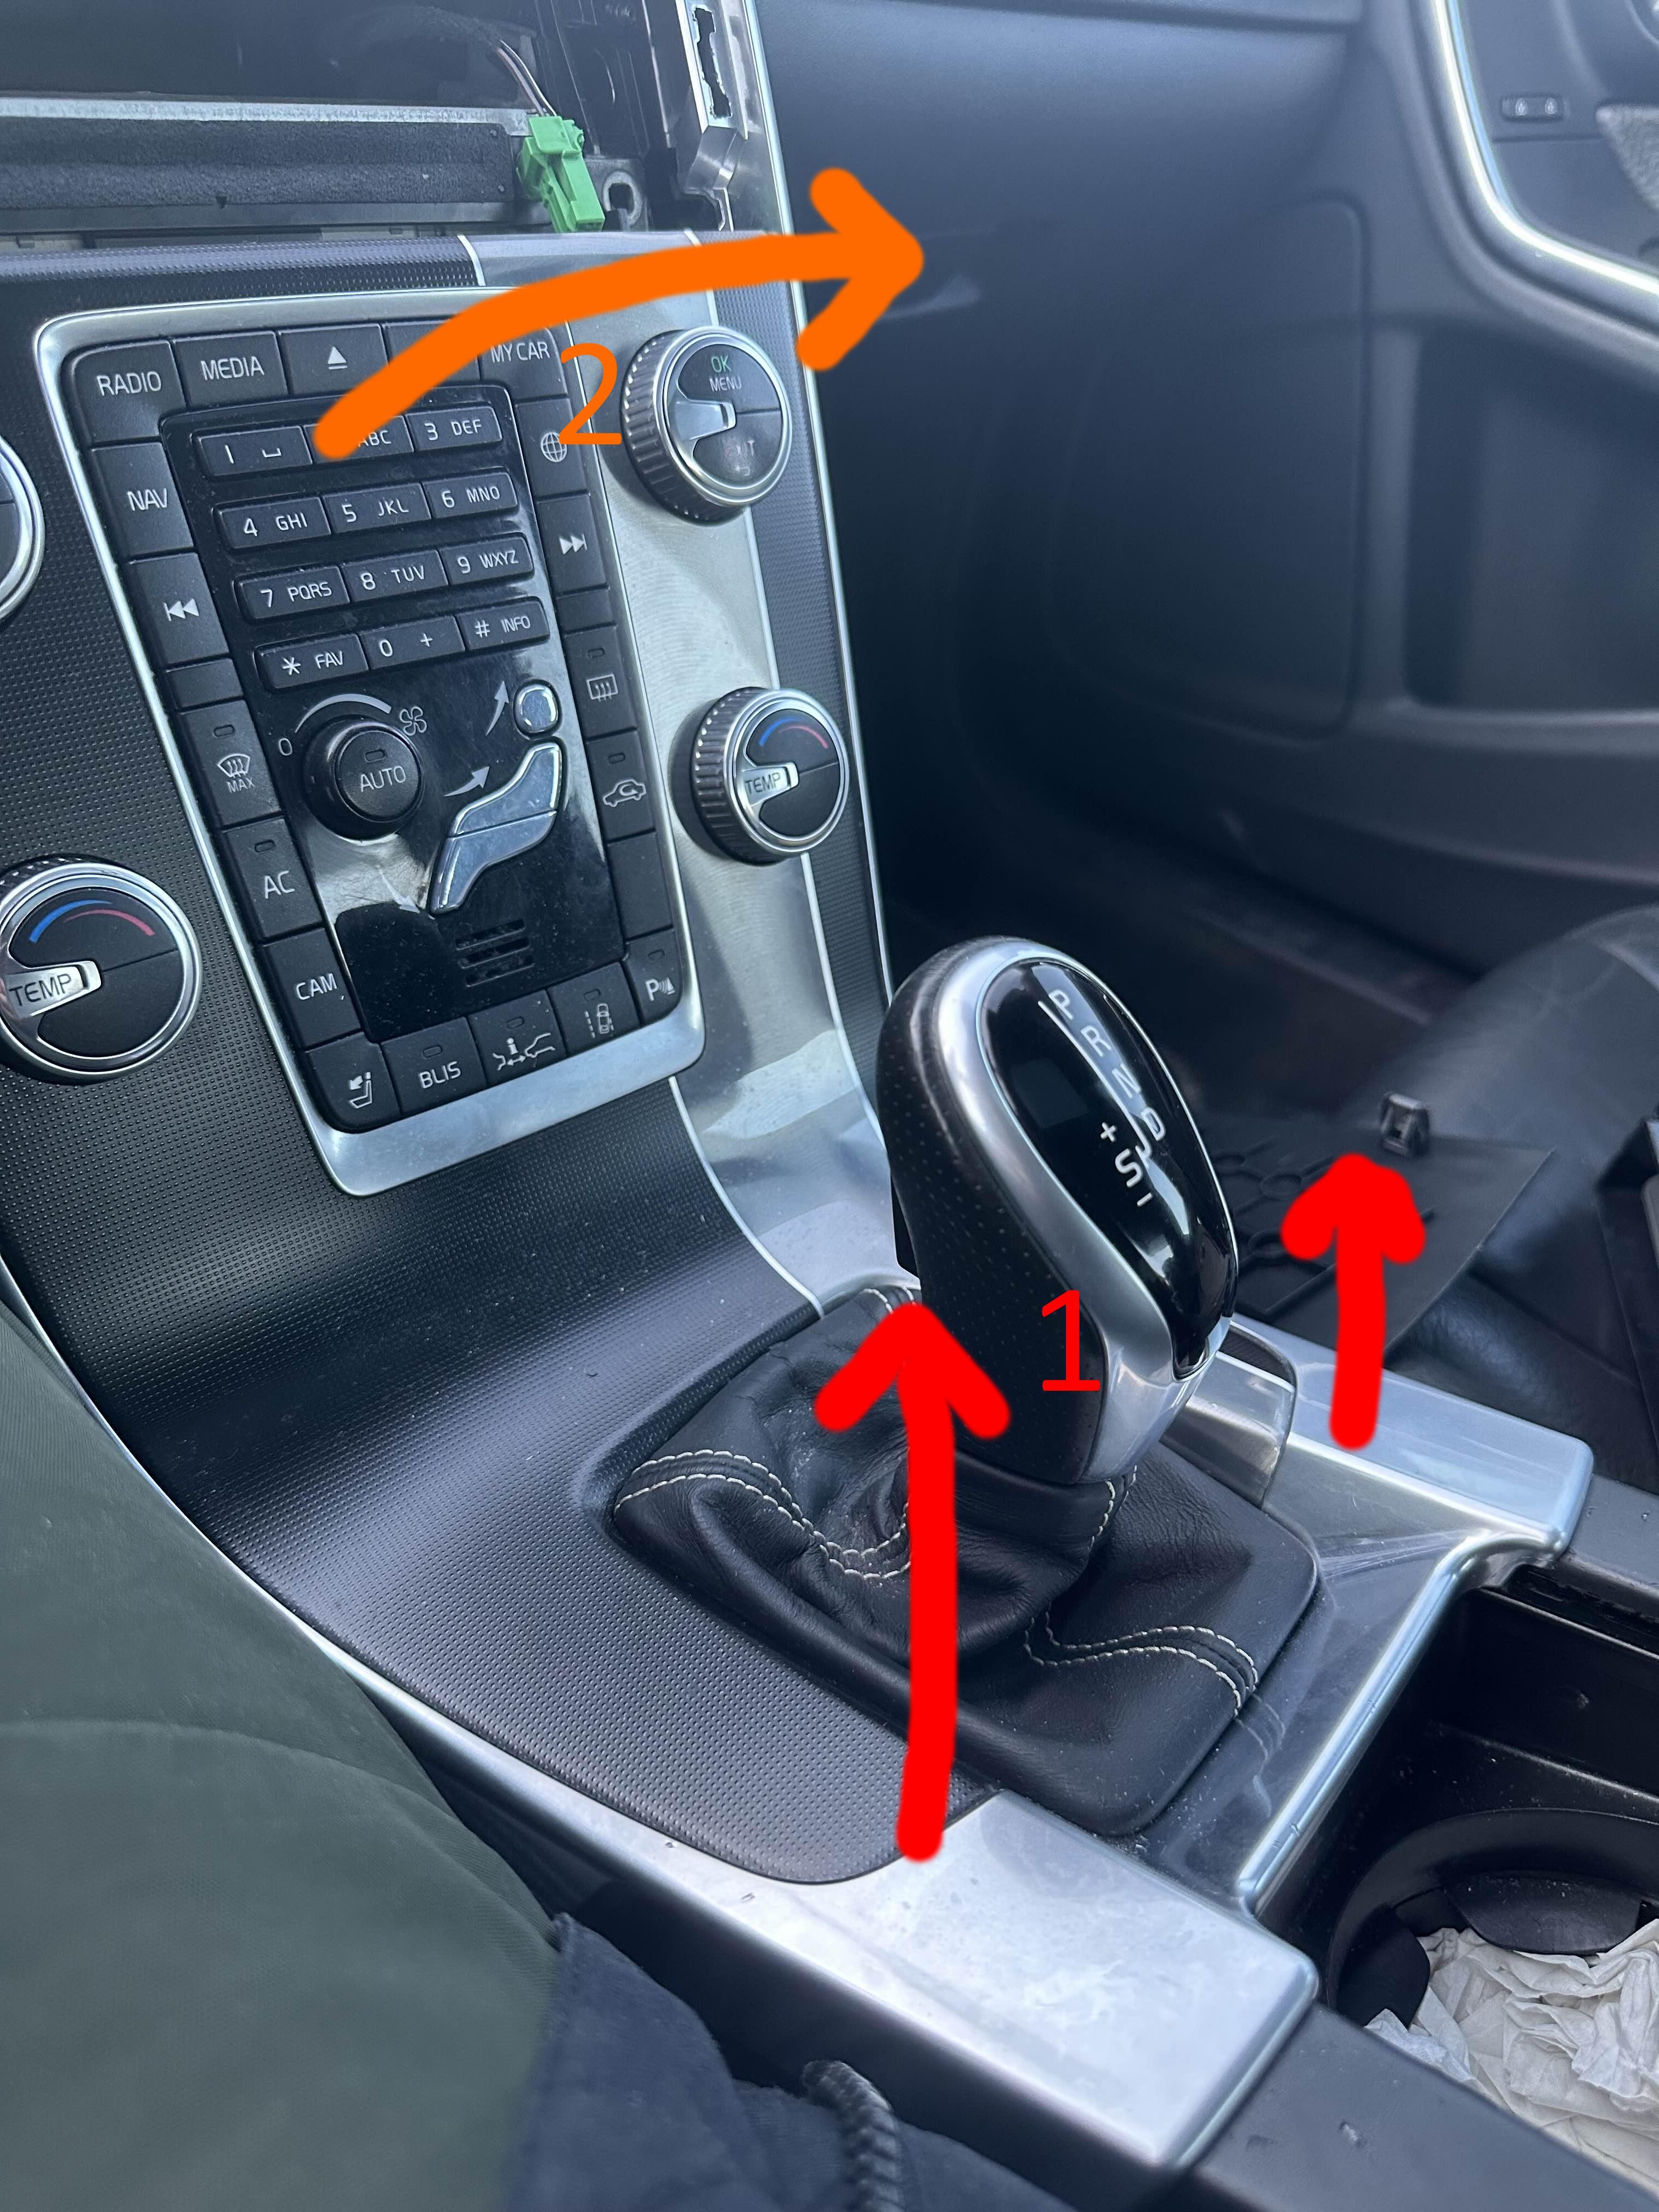
Start by removing the transmission tunnel consoles passenger side panel as such:
Images
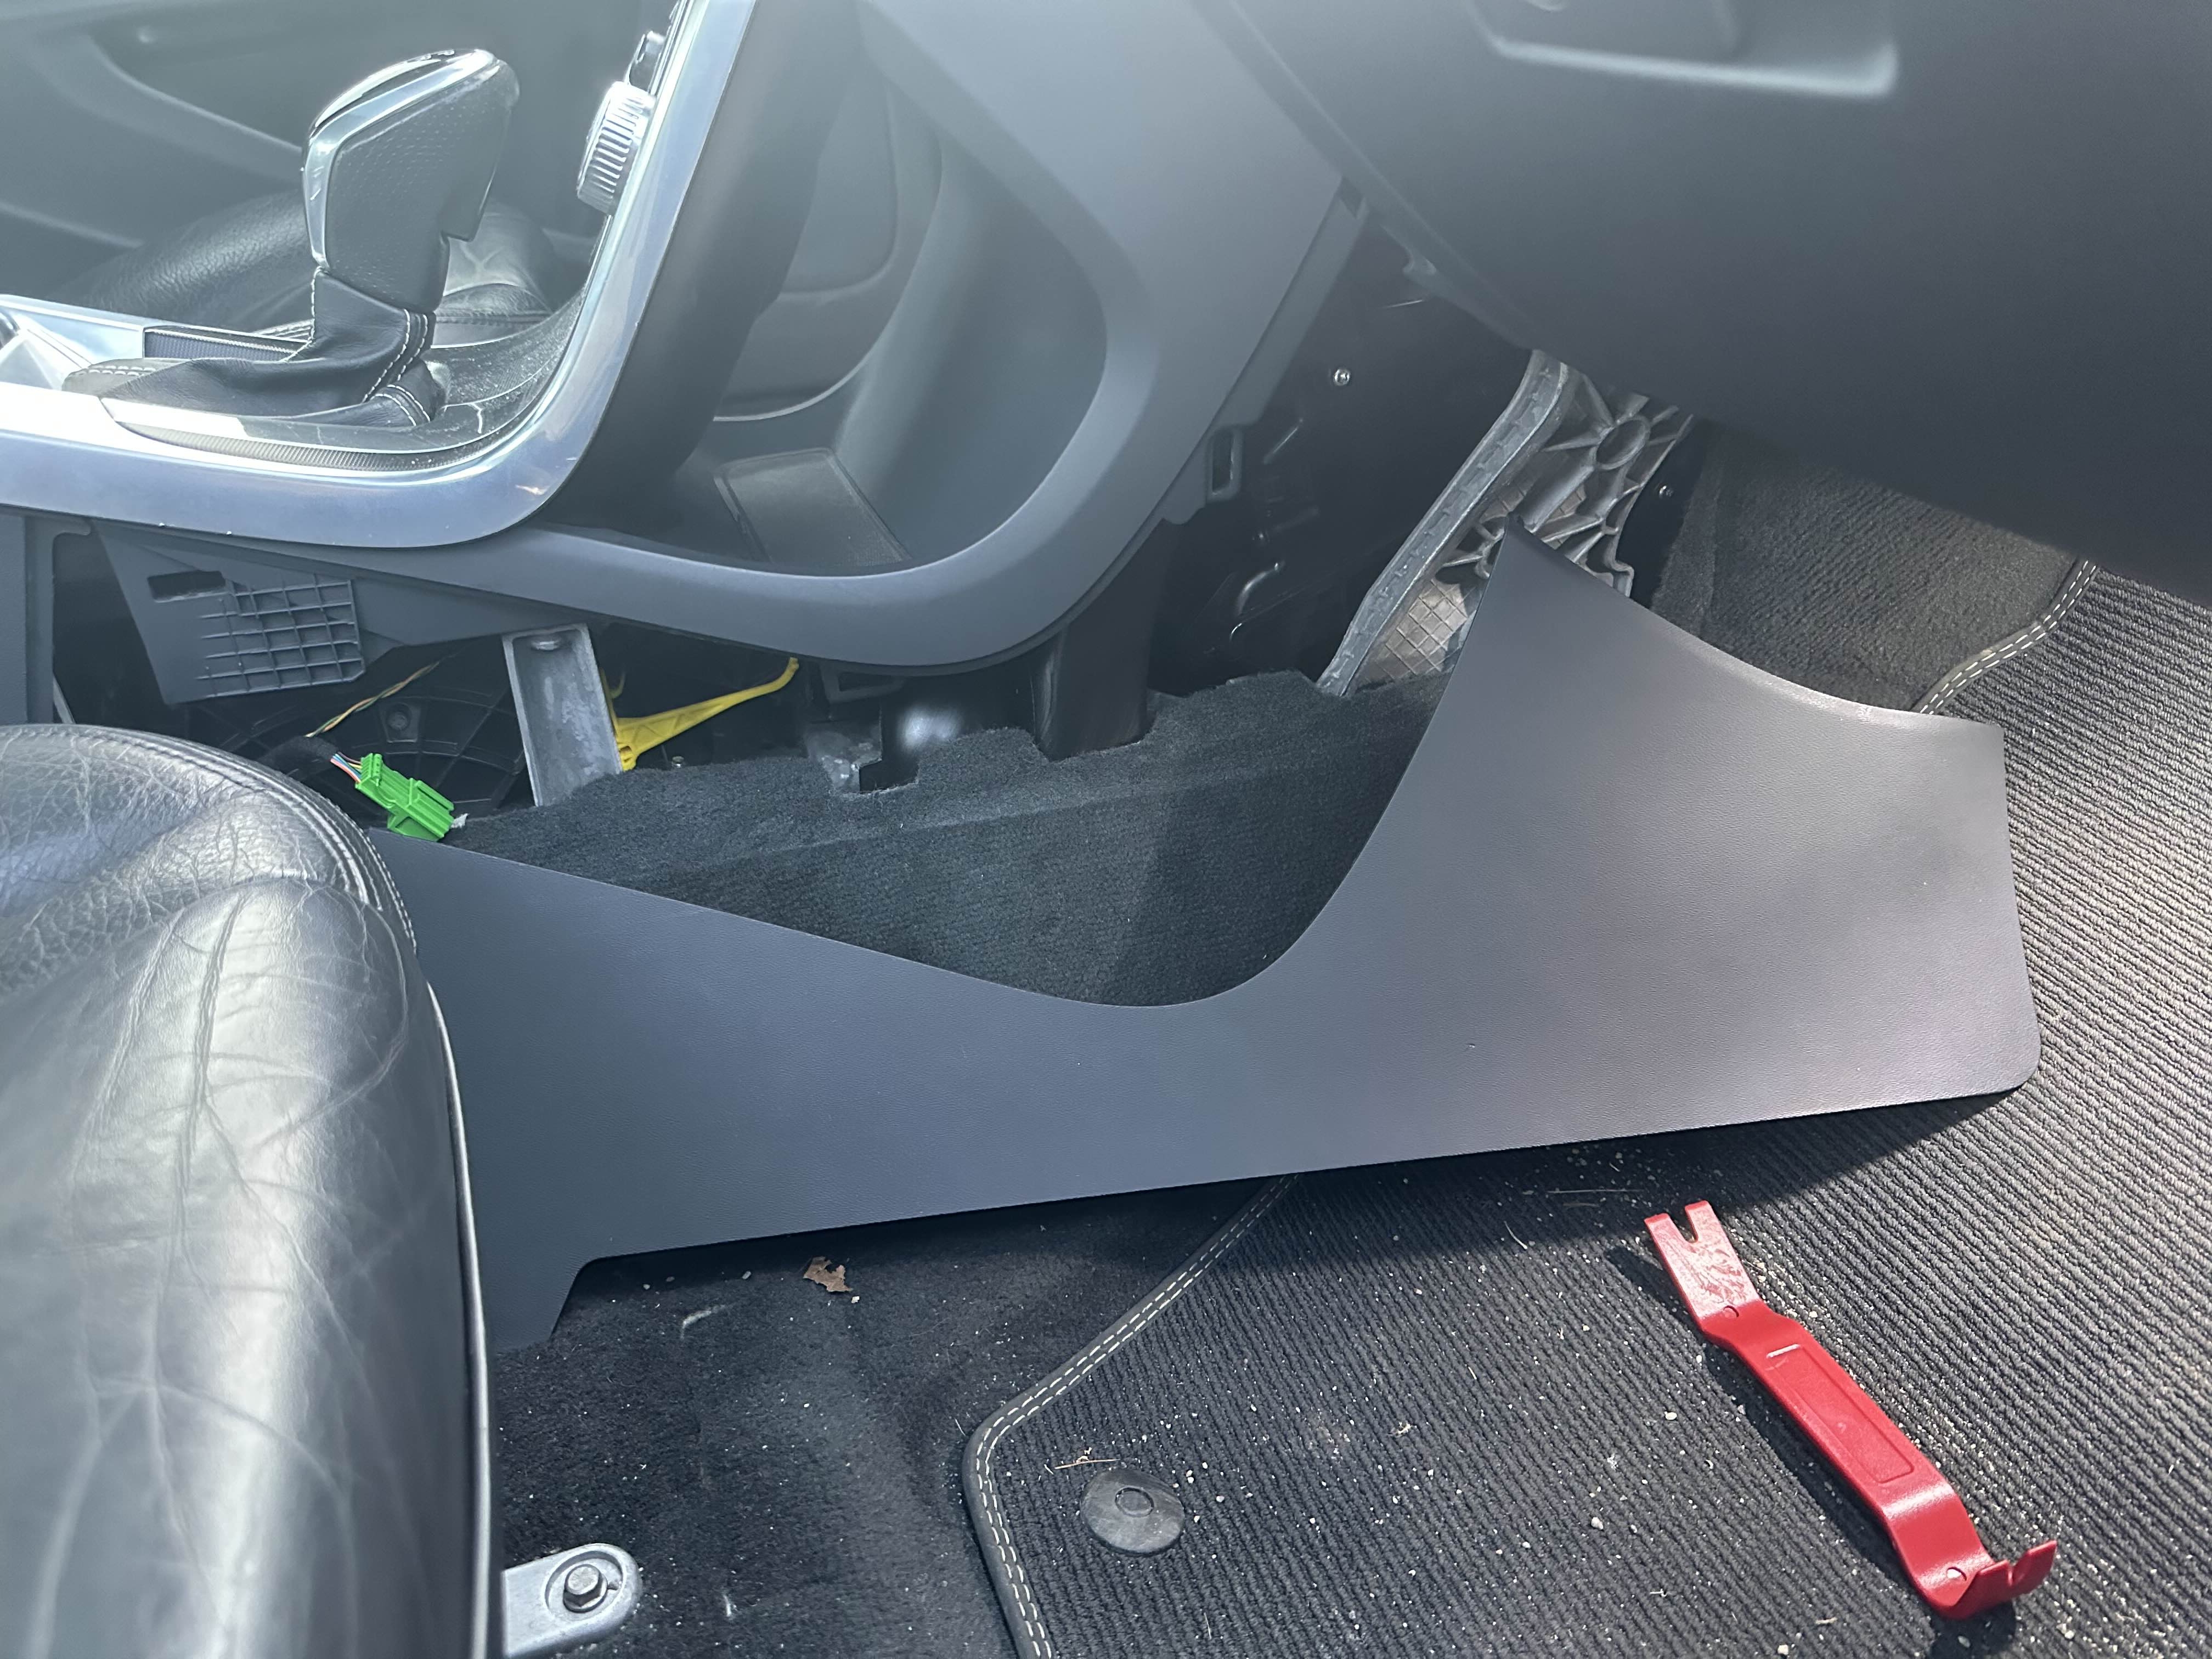
*The panel just pulls off, I slid my fingers in and under the panel and pulled and went along the trim until it fell out.
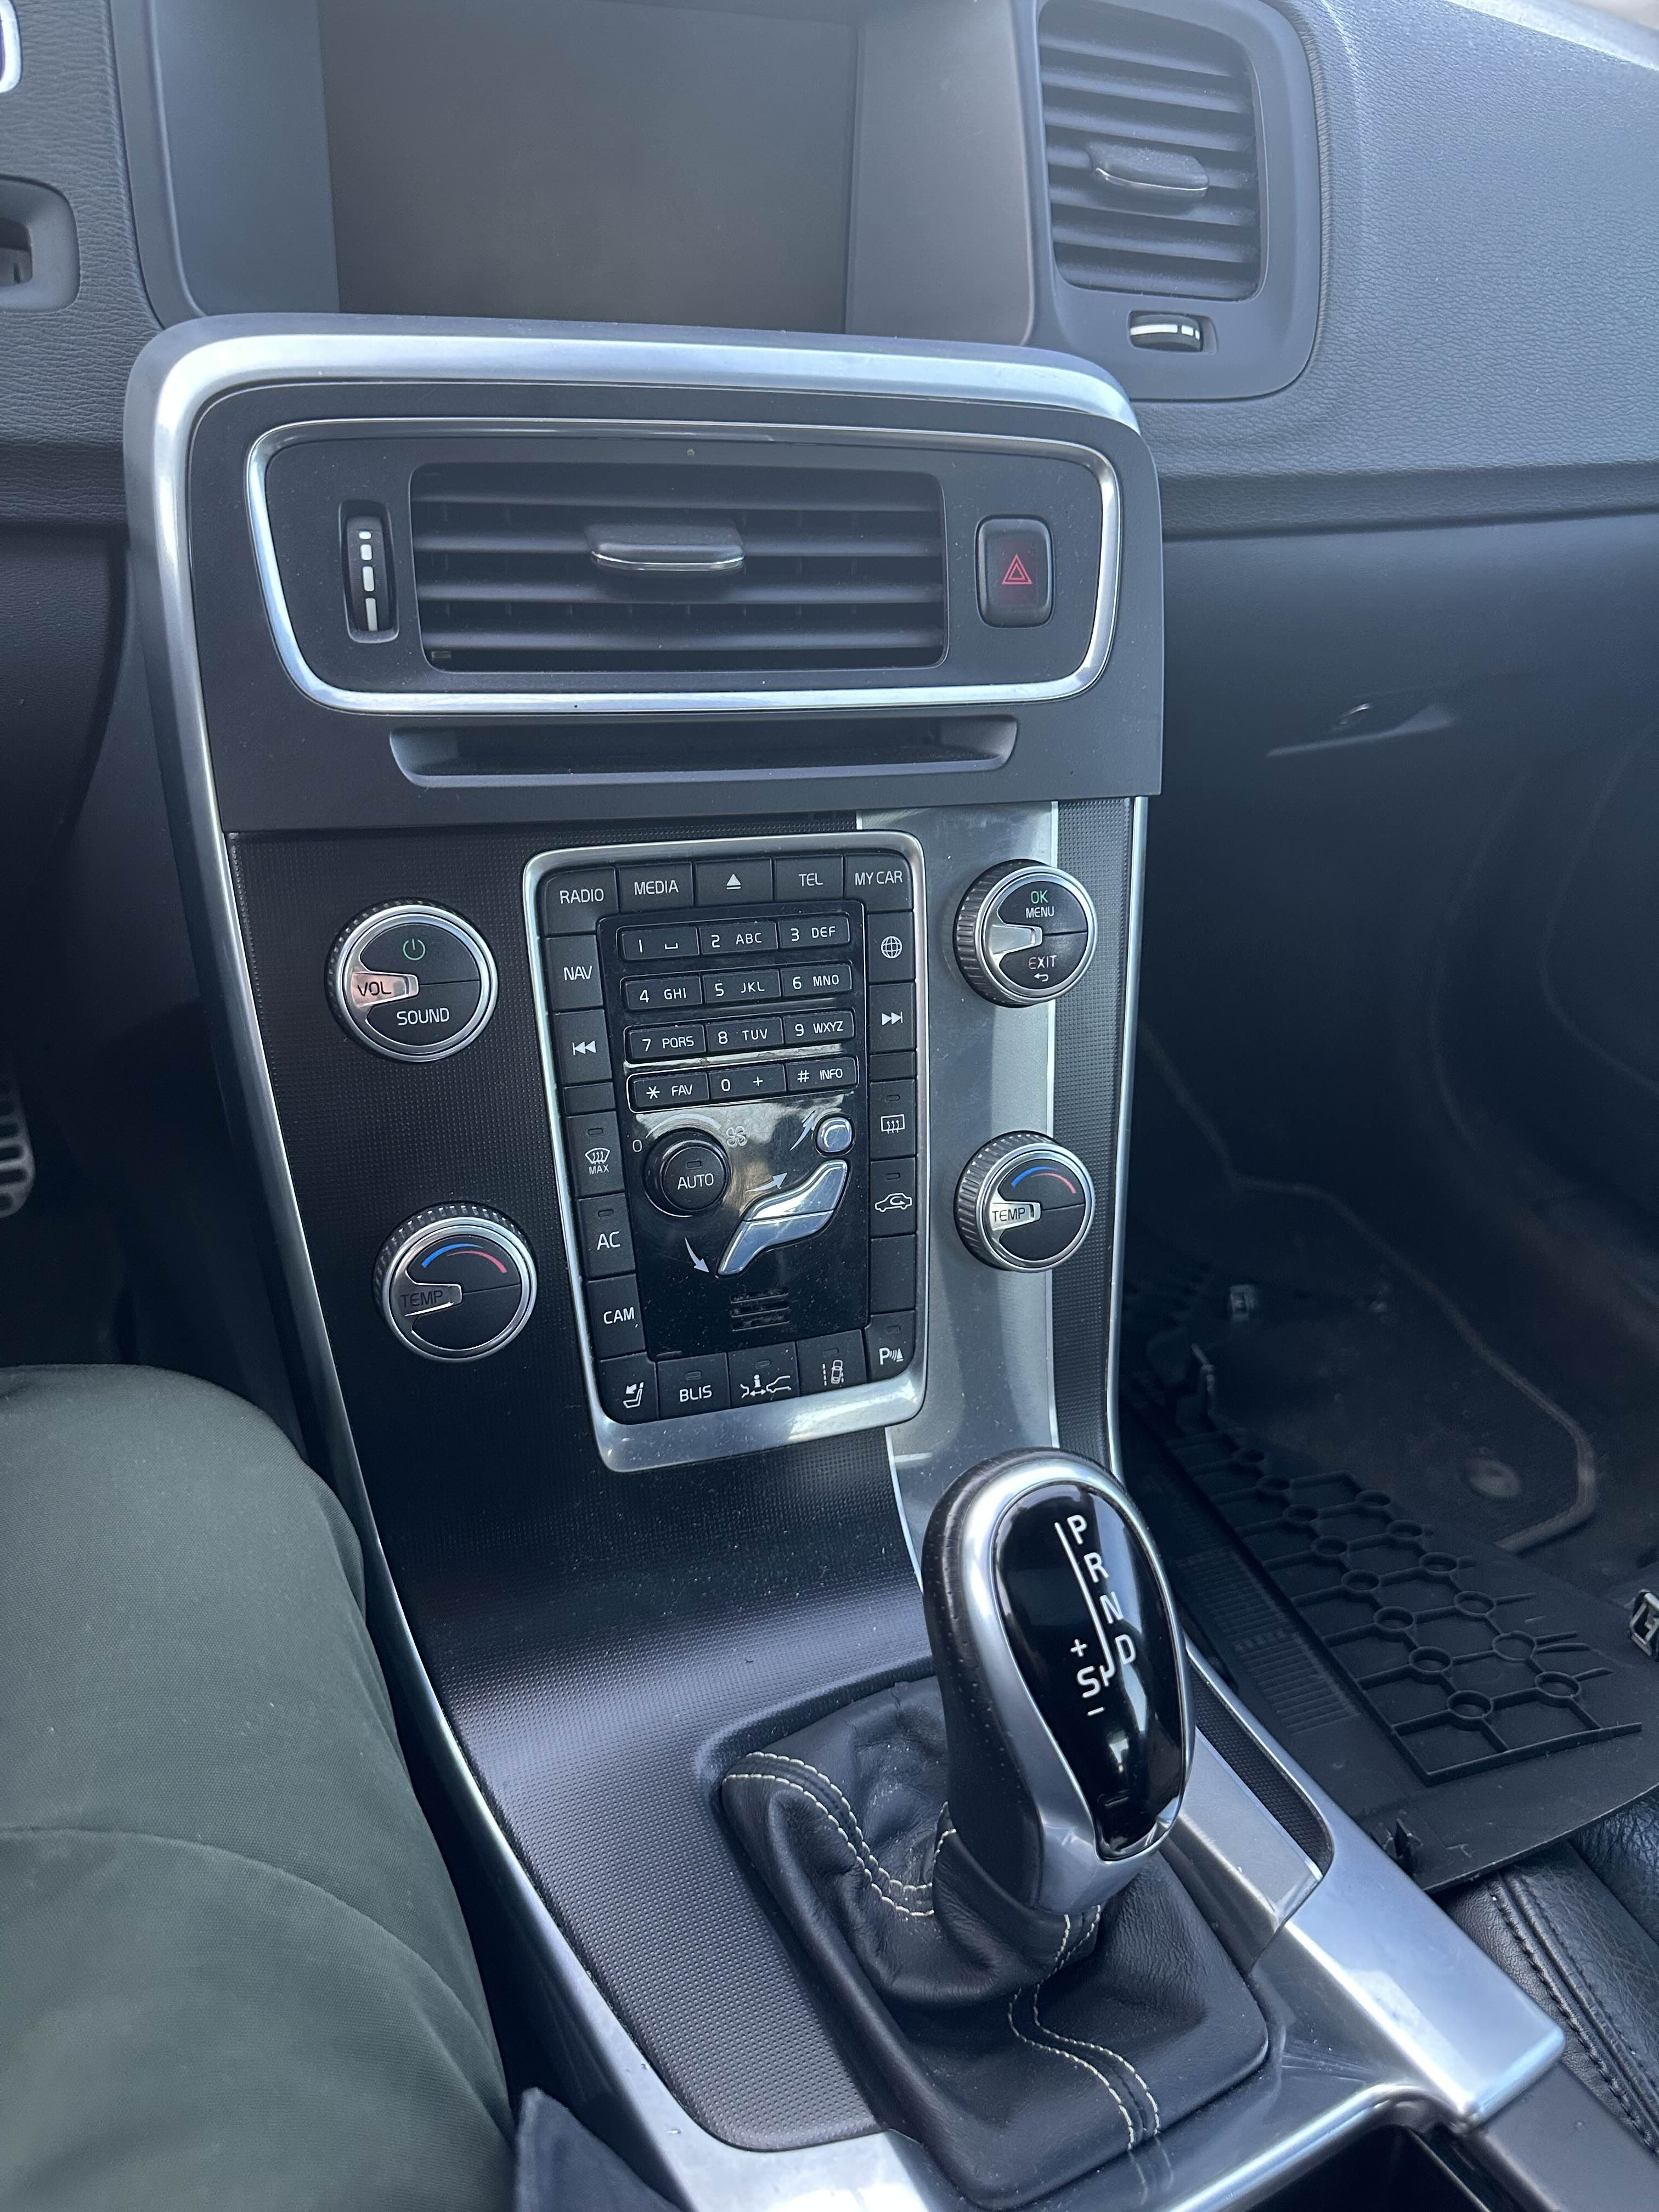
Then press downwards on the yellow lever to unlock the gear shift and pull it all the way down to Drive.
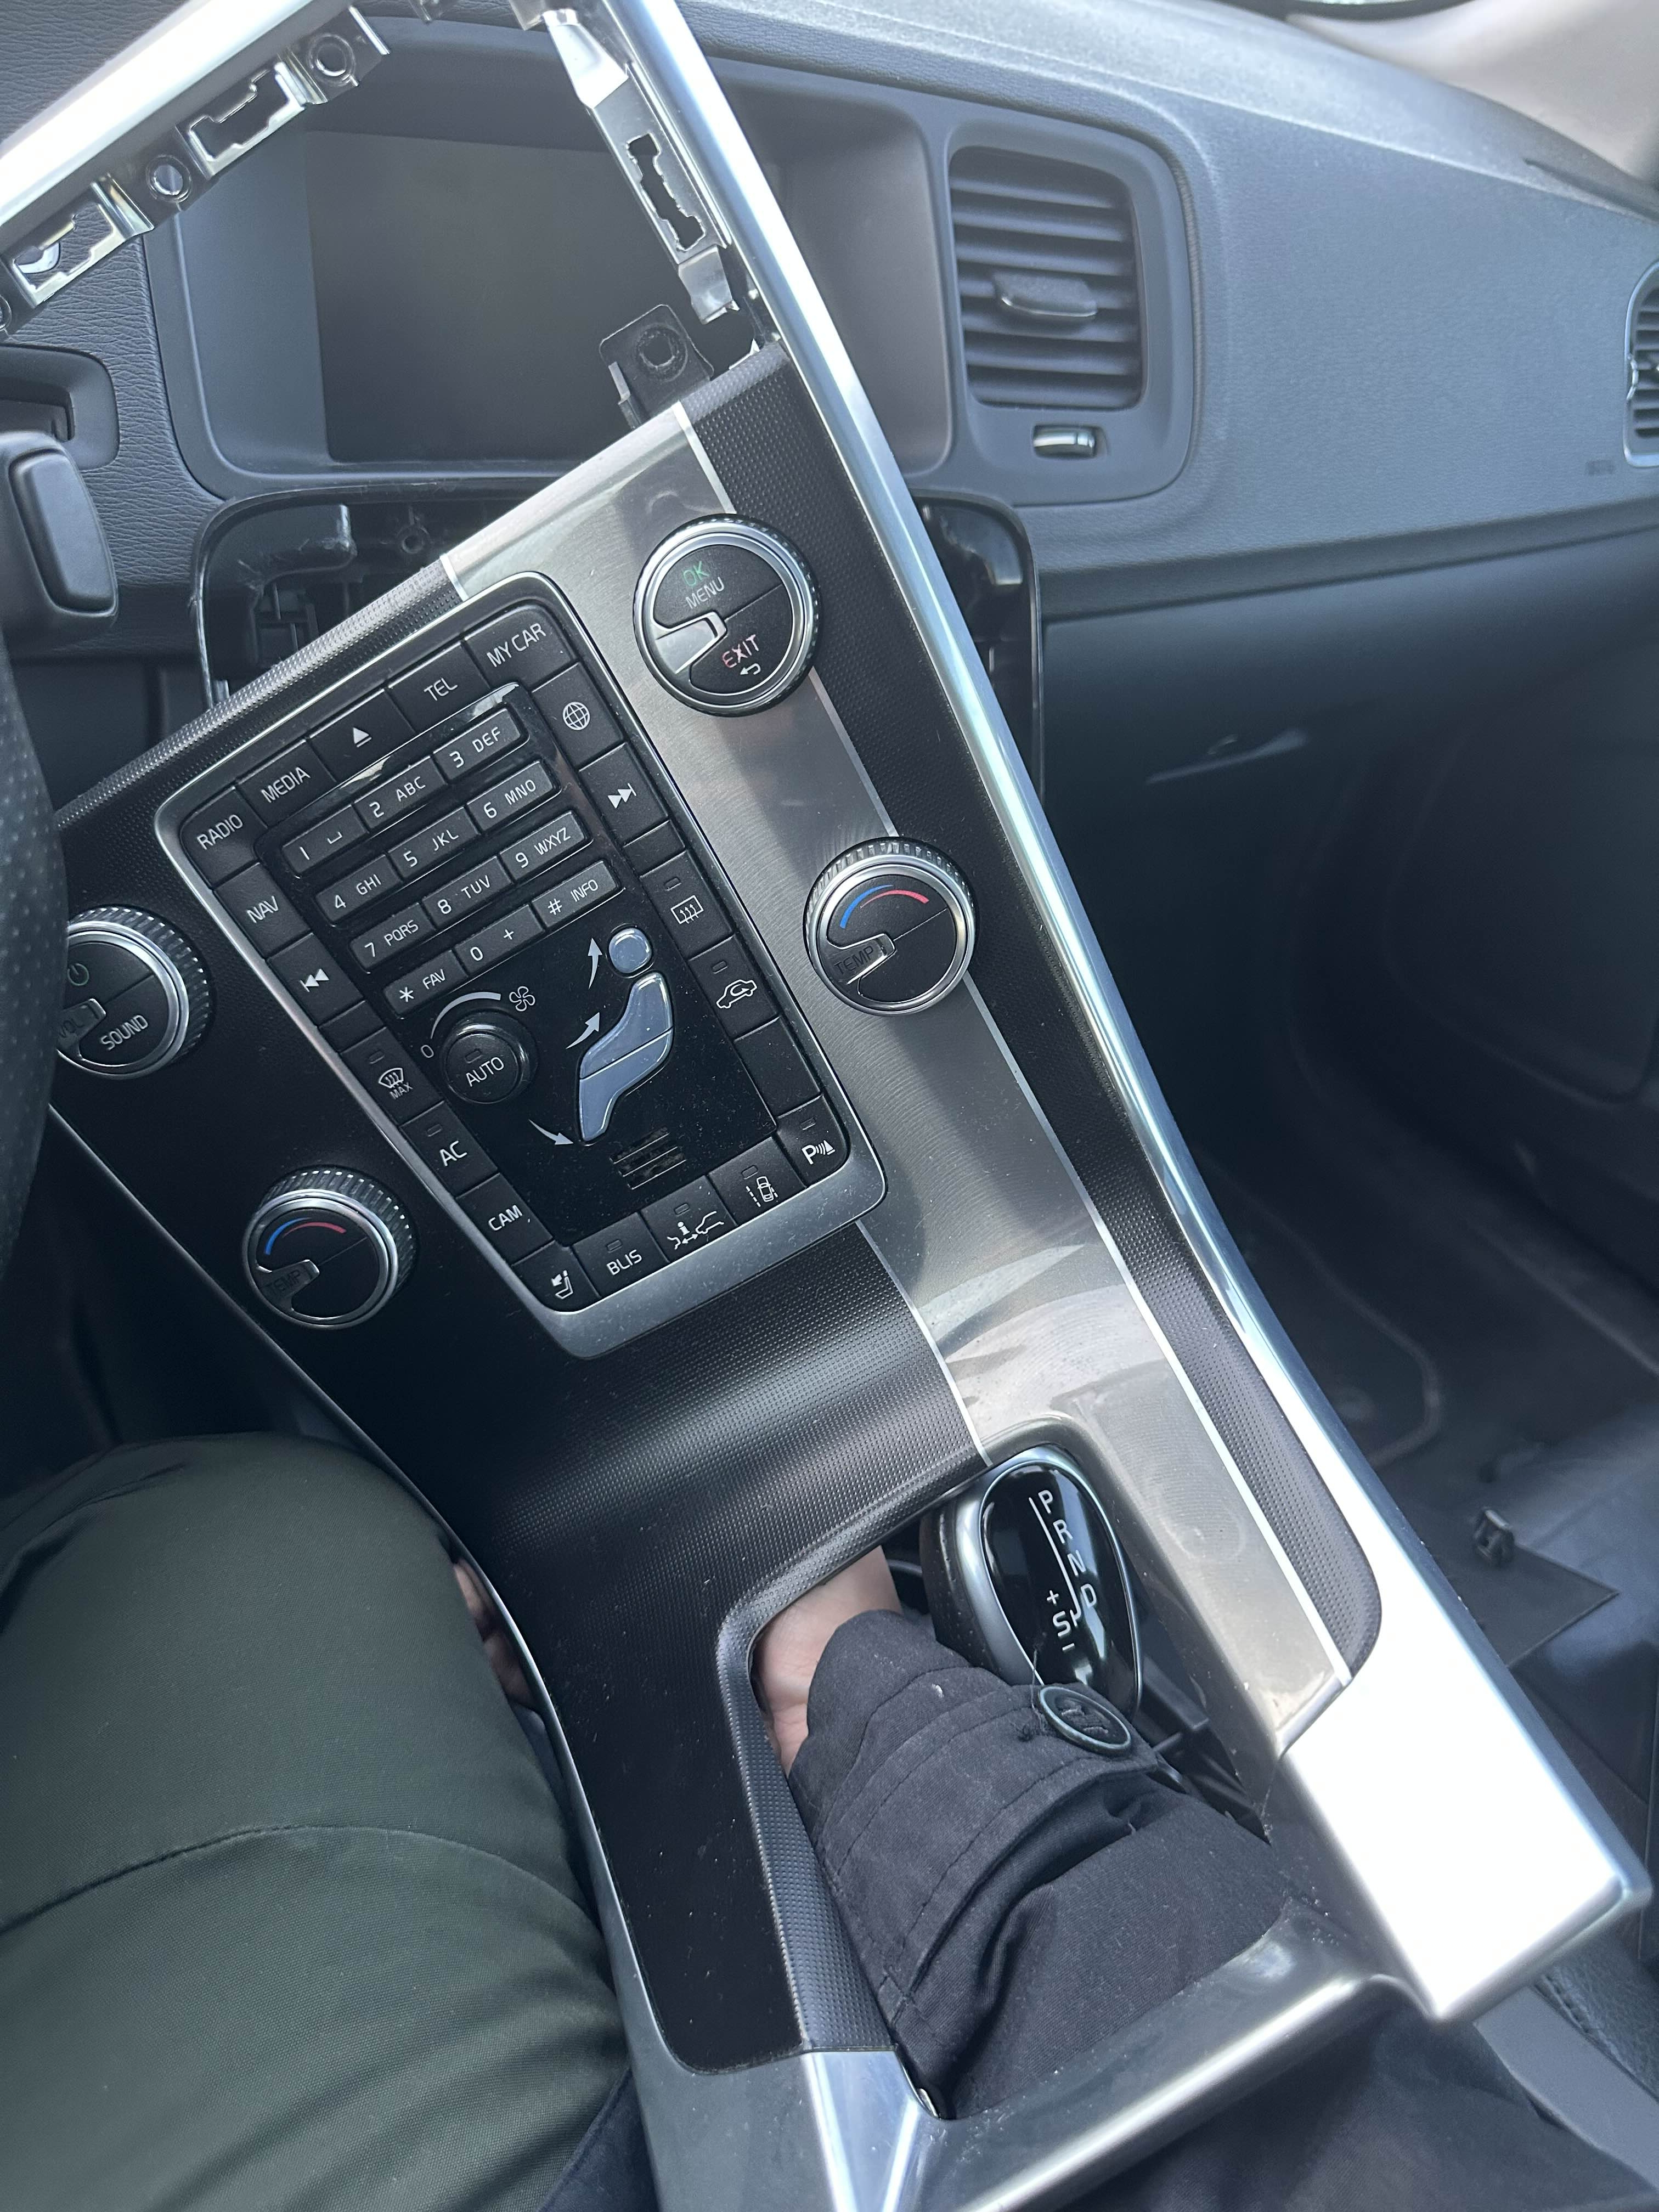
With a plastic pry tool, go around the center trim that houses the air duct and warning lights switch, starting from the bottom corner closest to the driver. Then remove the trim, being cautious of the cable which goes to the switch, unplug it and remove the trim fully. Put it to the side:
Images
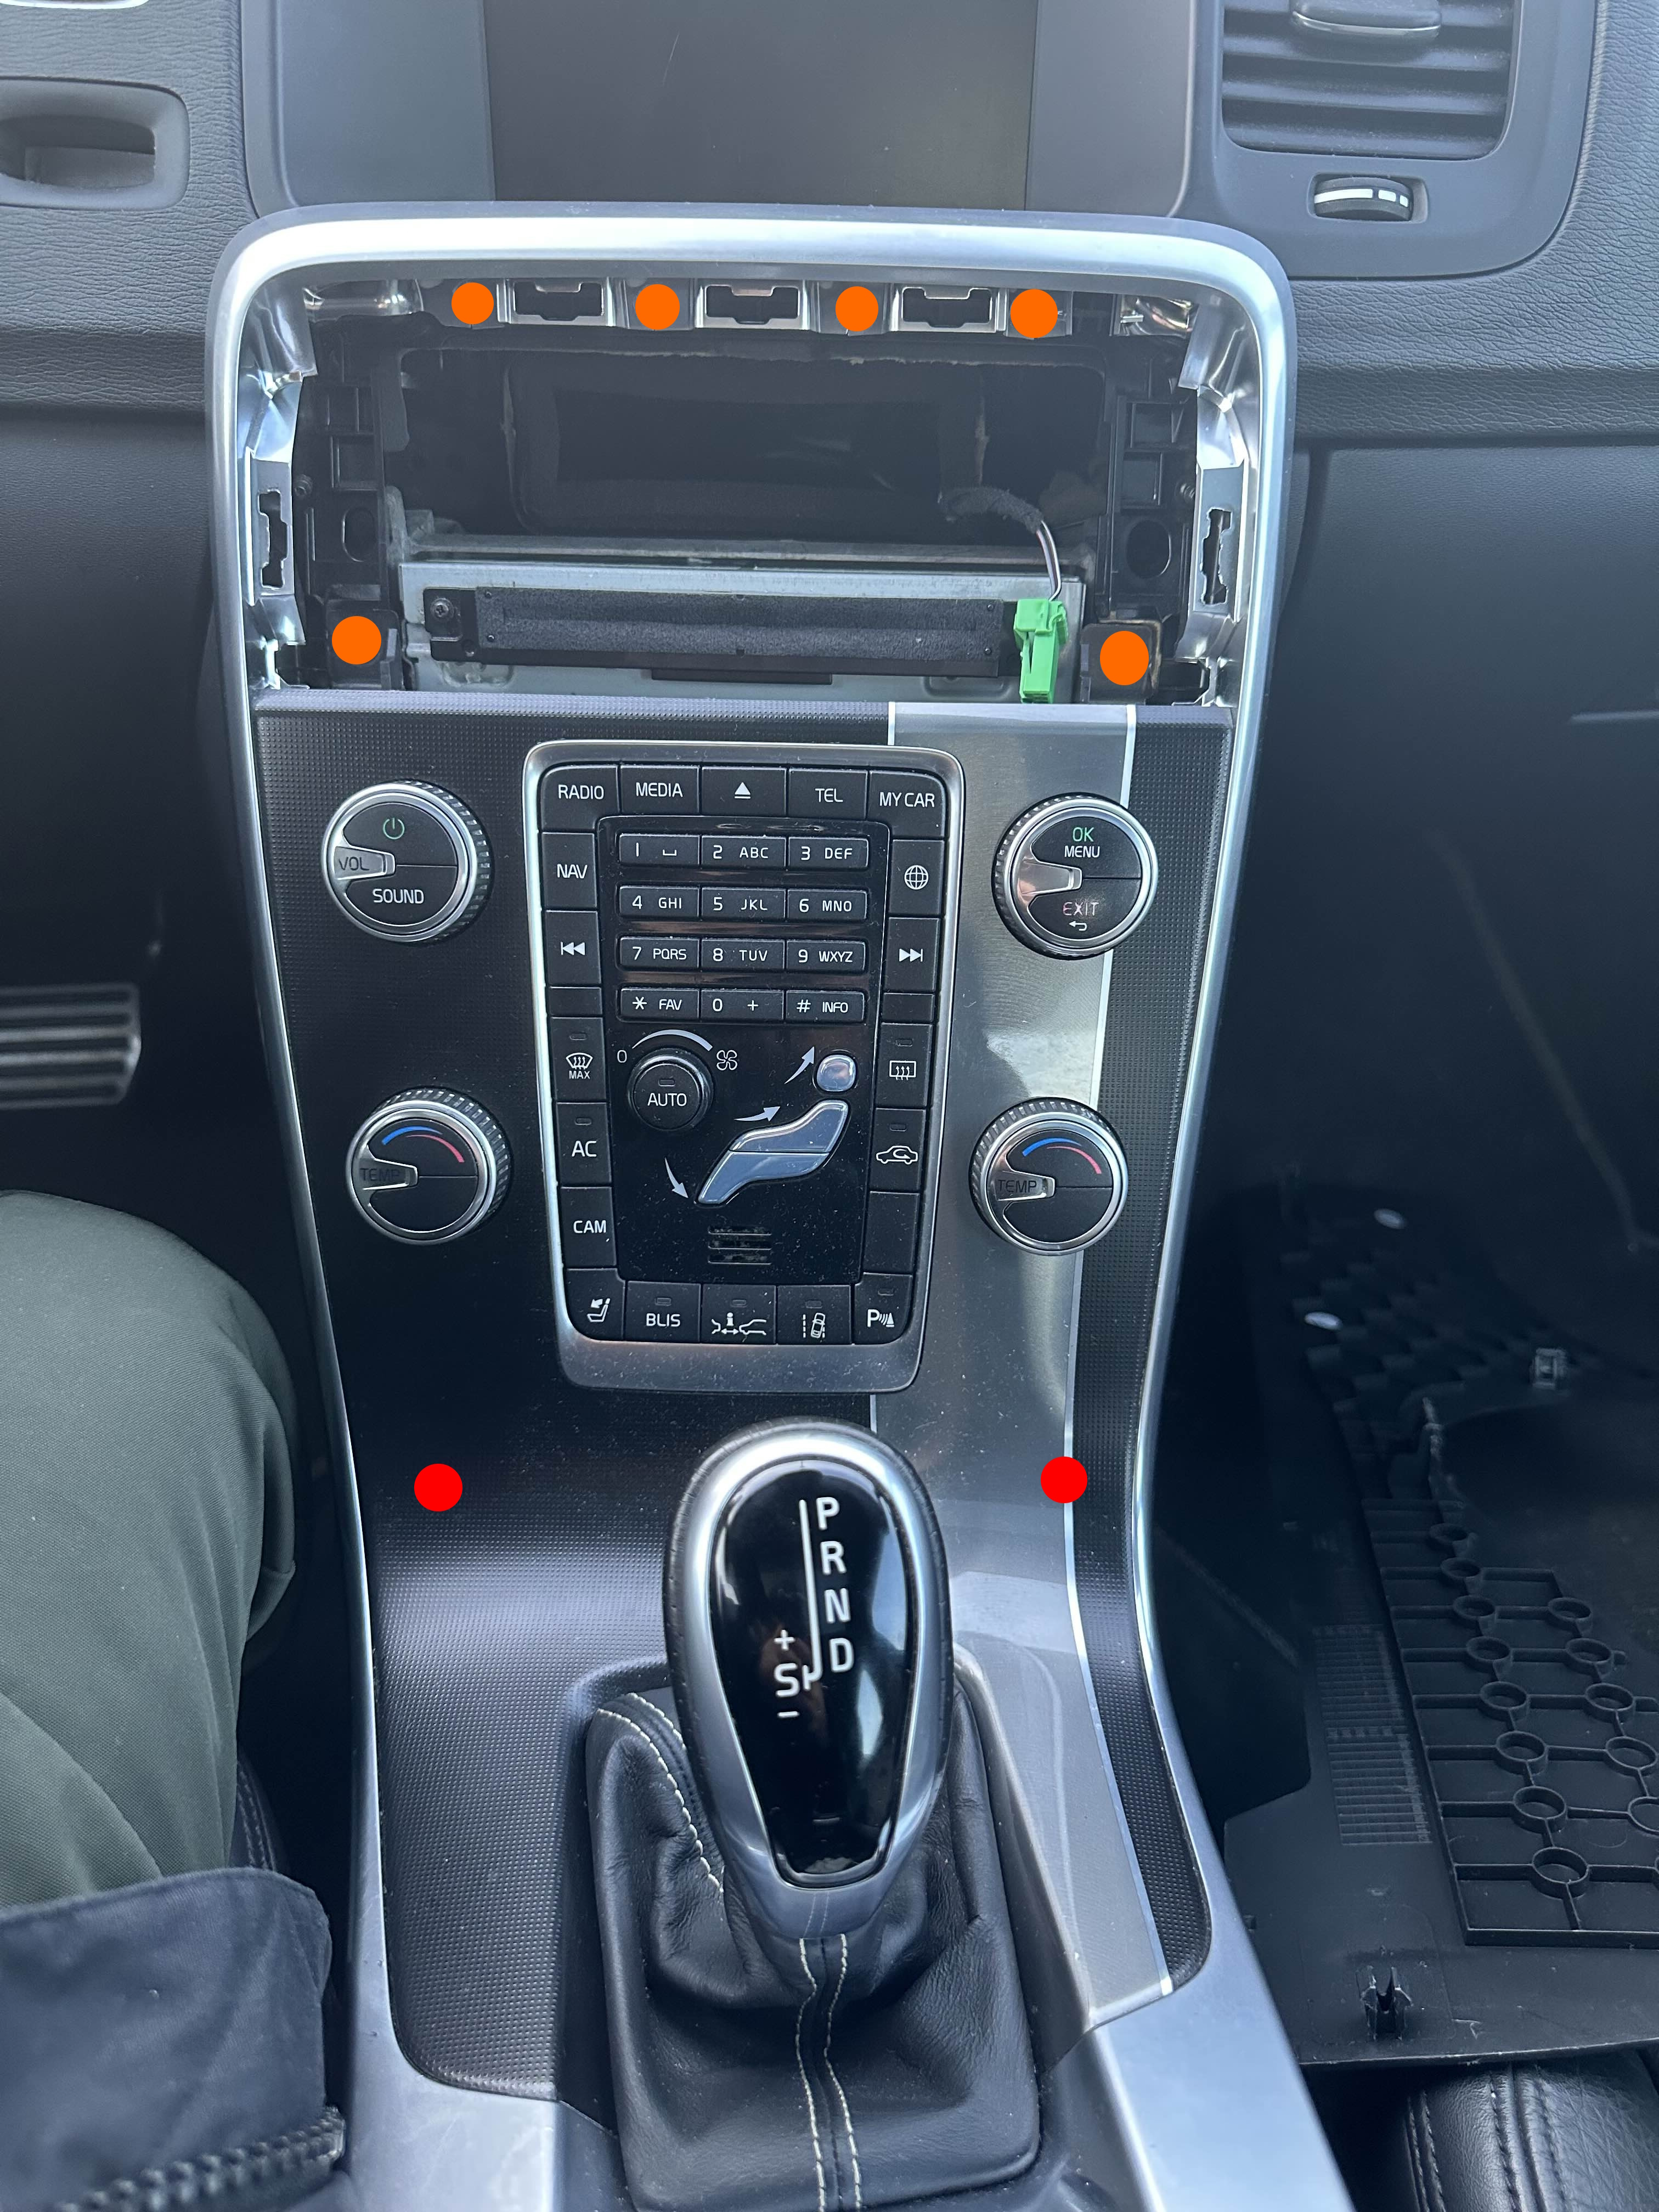
Unscrew the following screws, orange being the ones visible from the front and red being screws that are accessible from the back.
Images
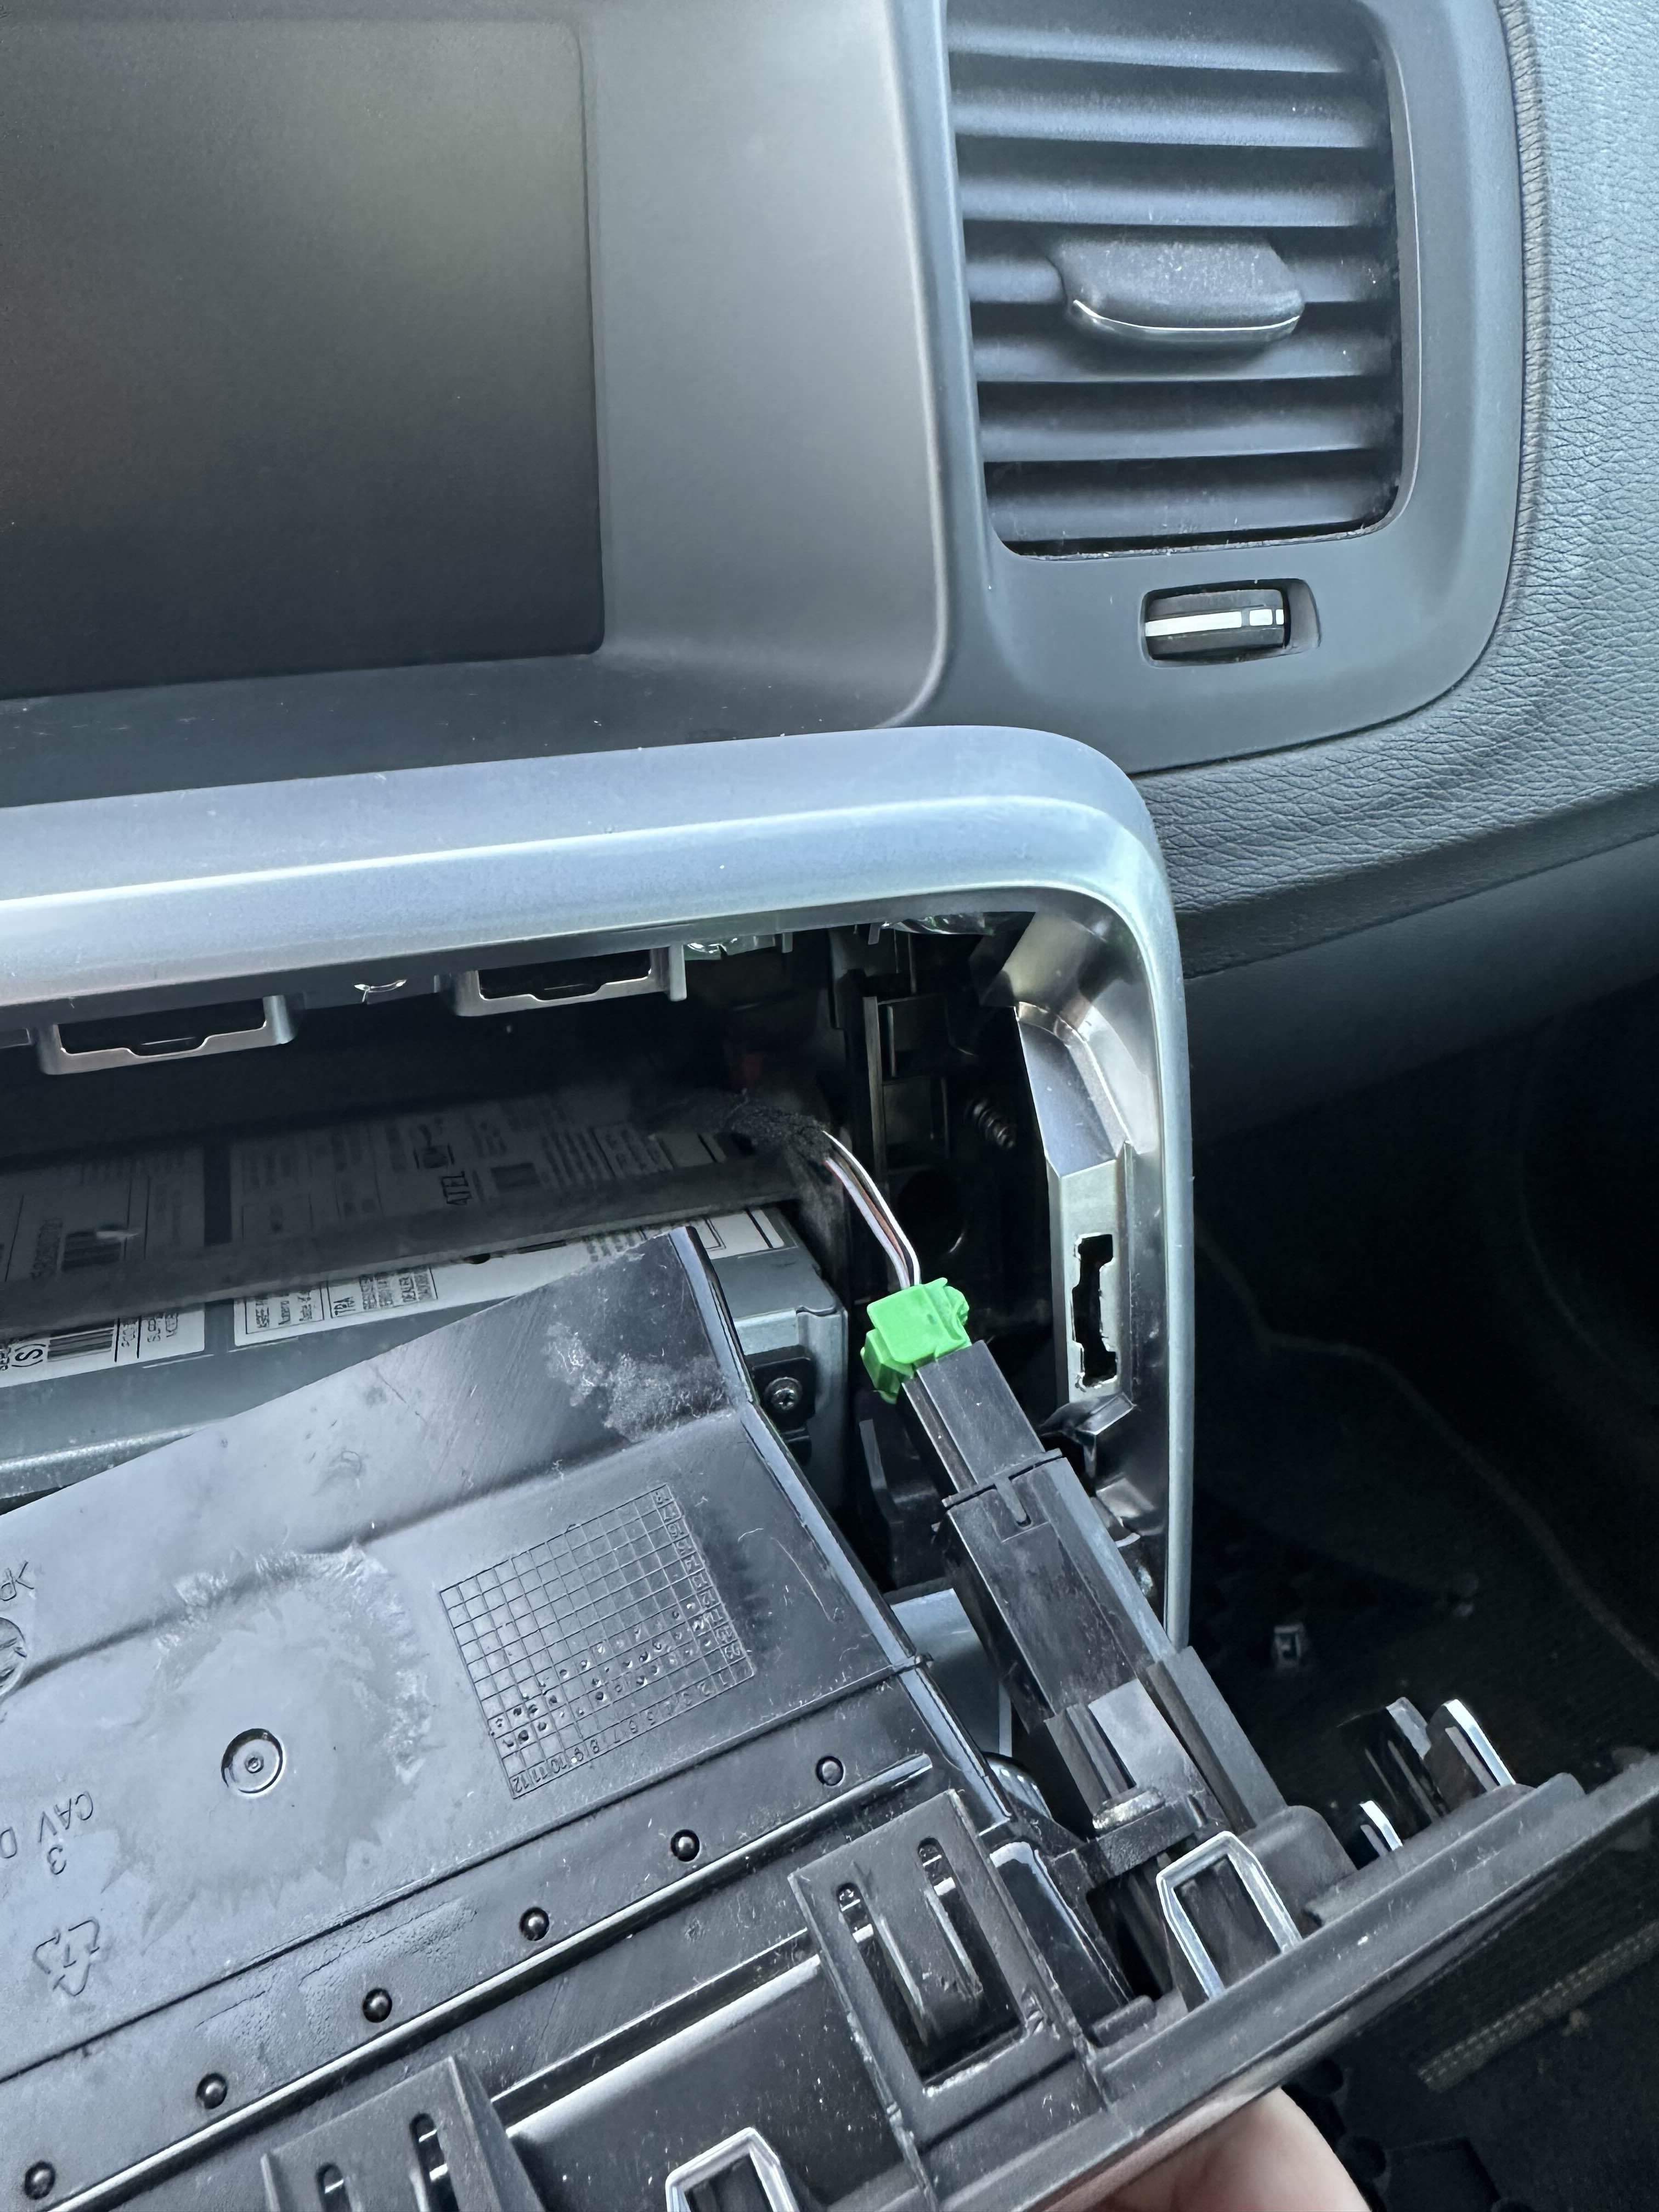
Pull up and out to remove the panel, move it to the side, over the gear shift and towards the driver to get easy access to the connector for the CCM panel. Disconnect it and put the trim piece to the side.
Images
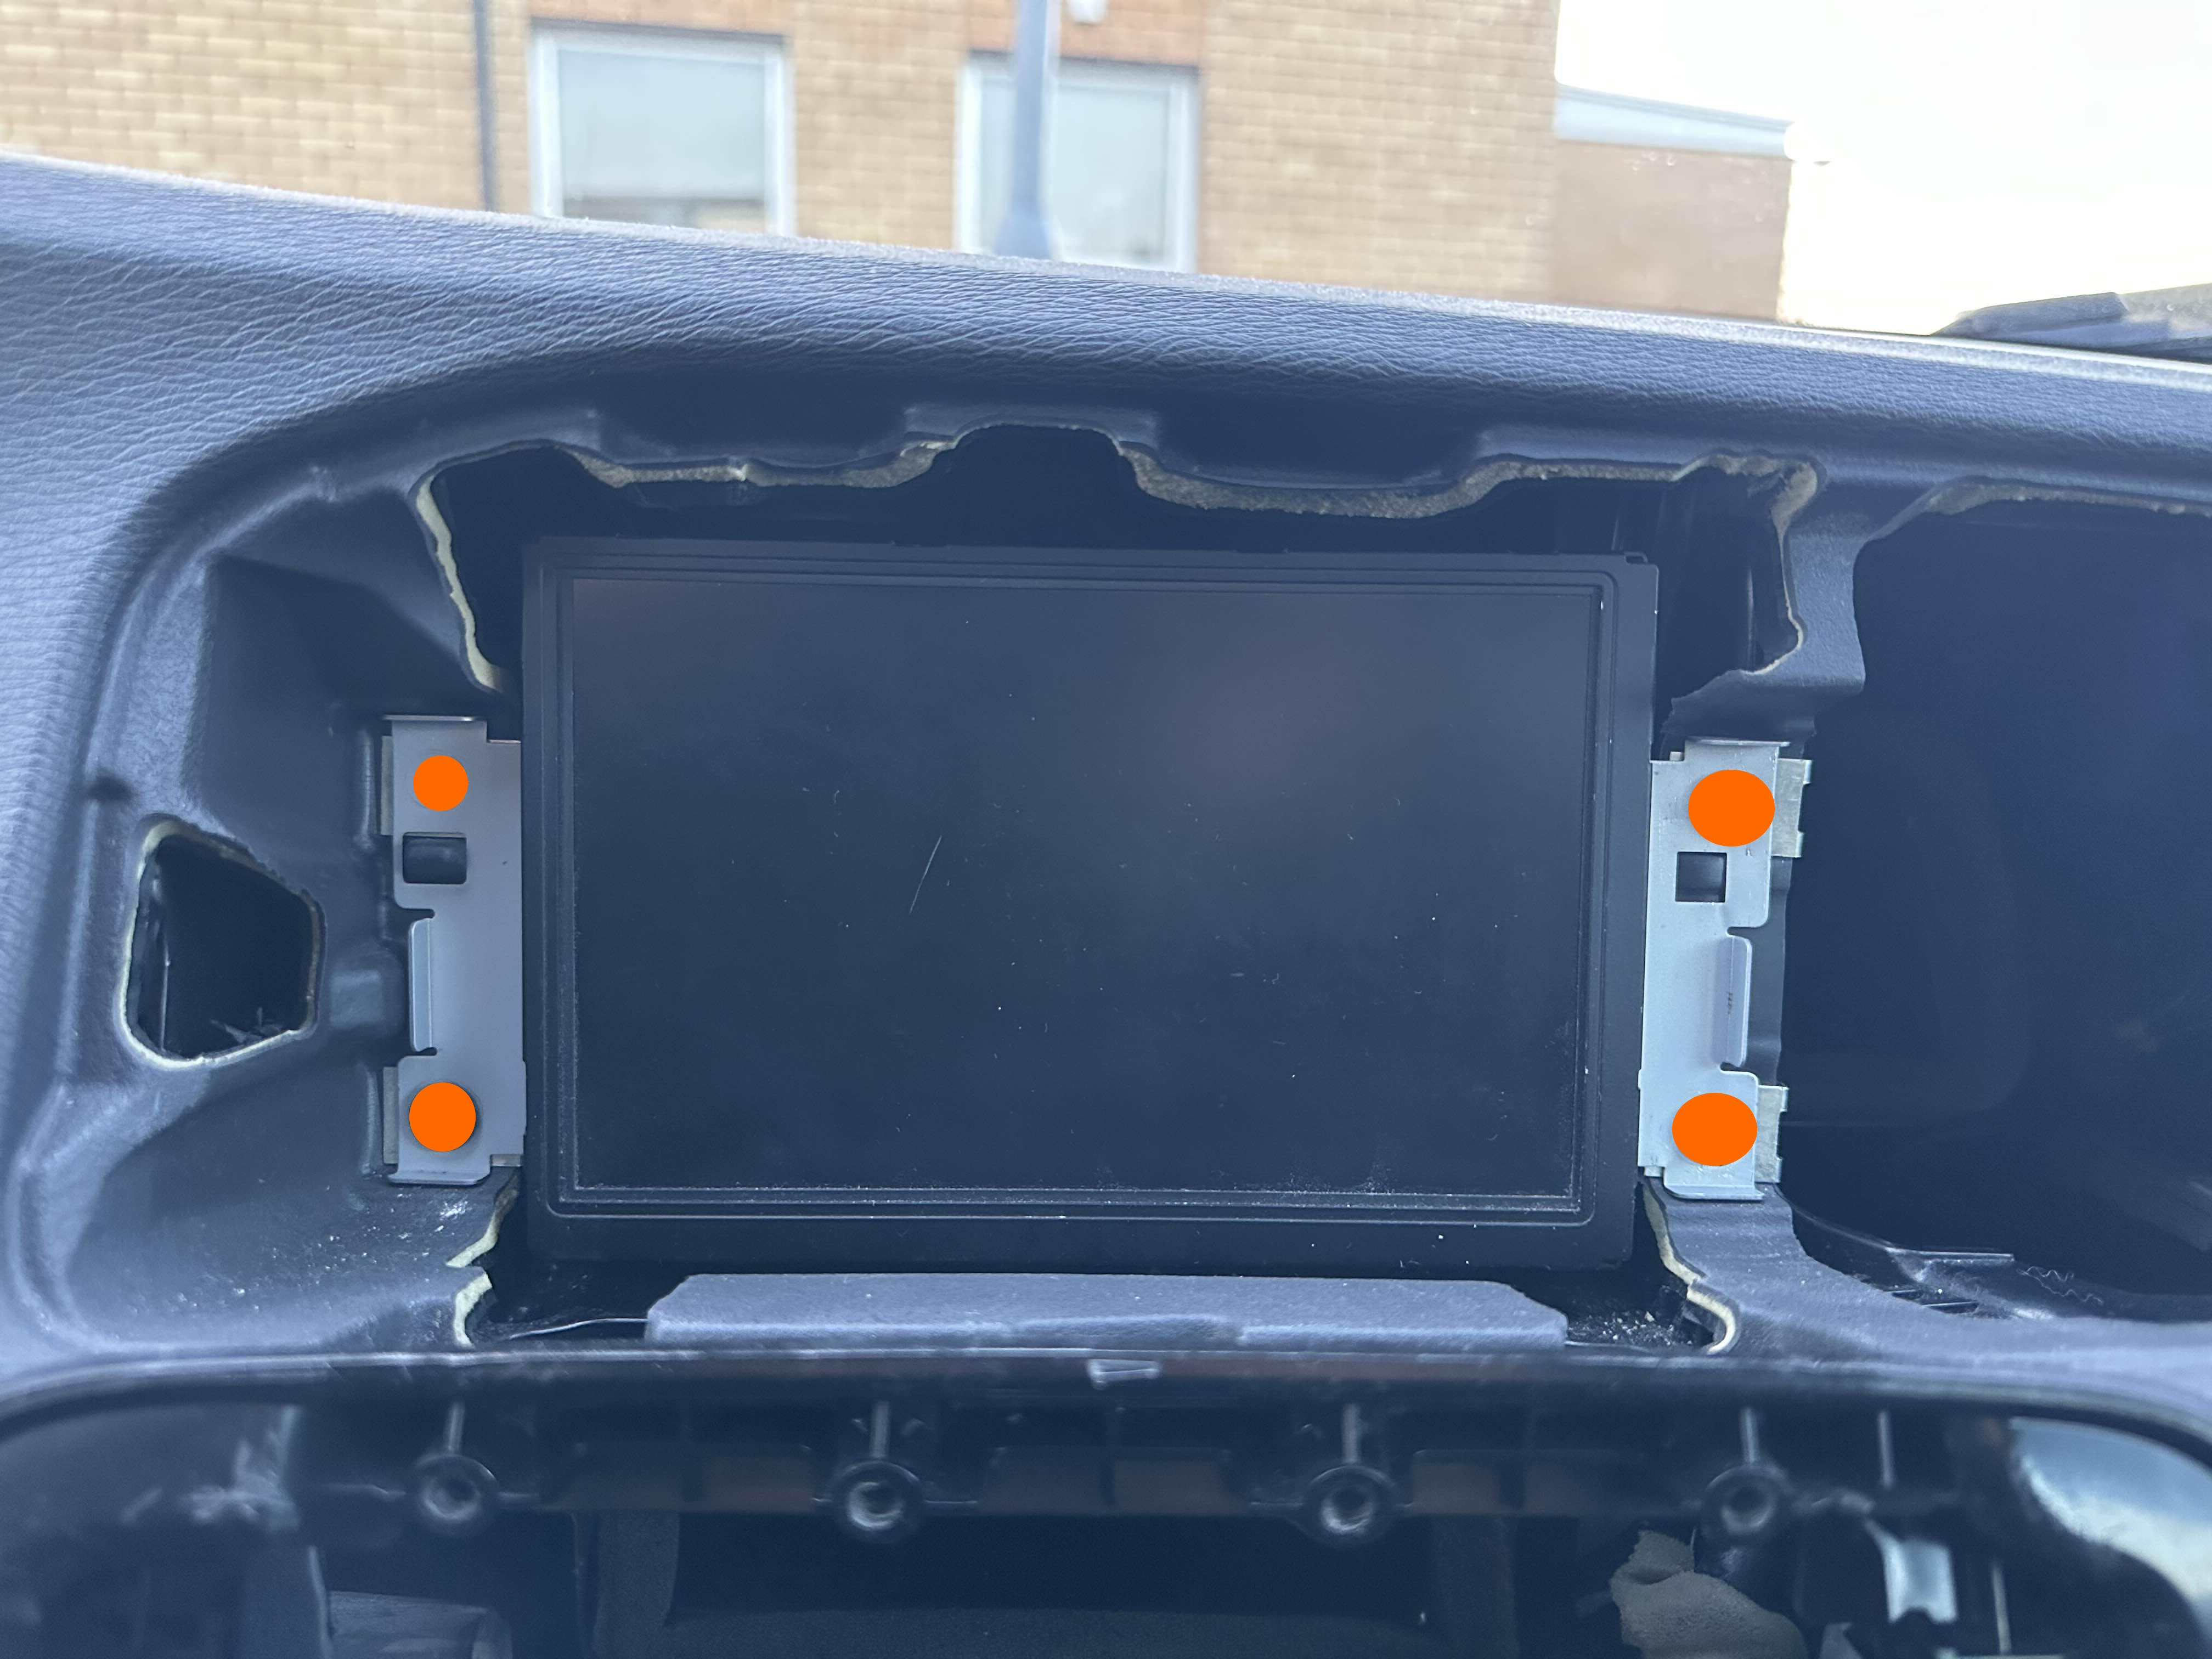
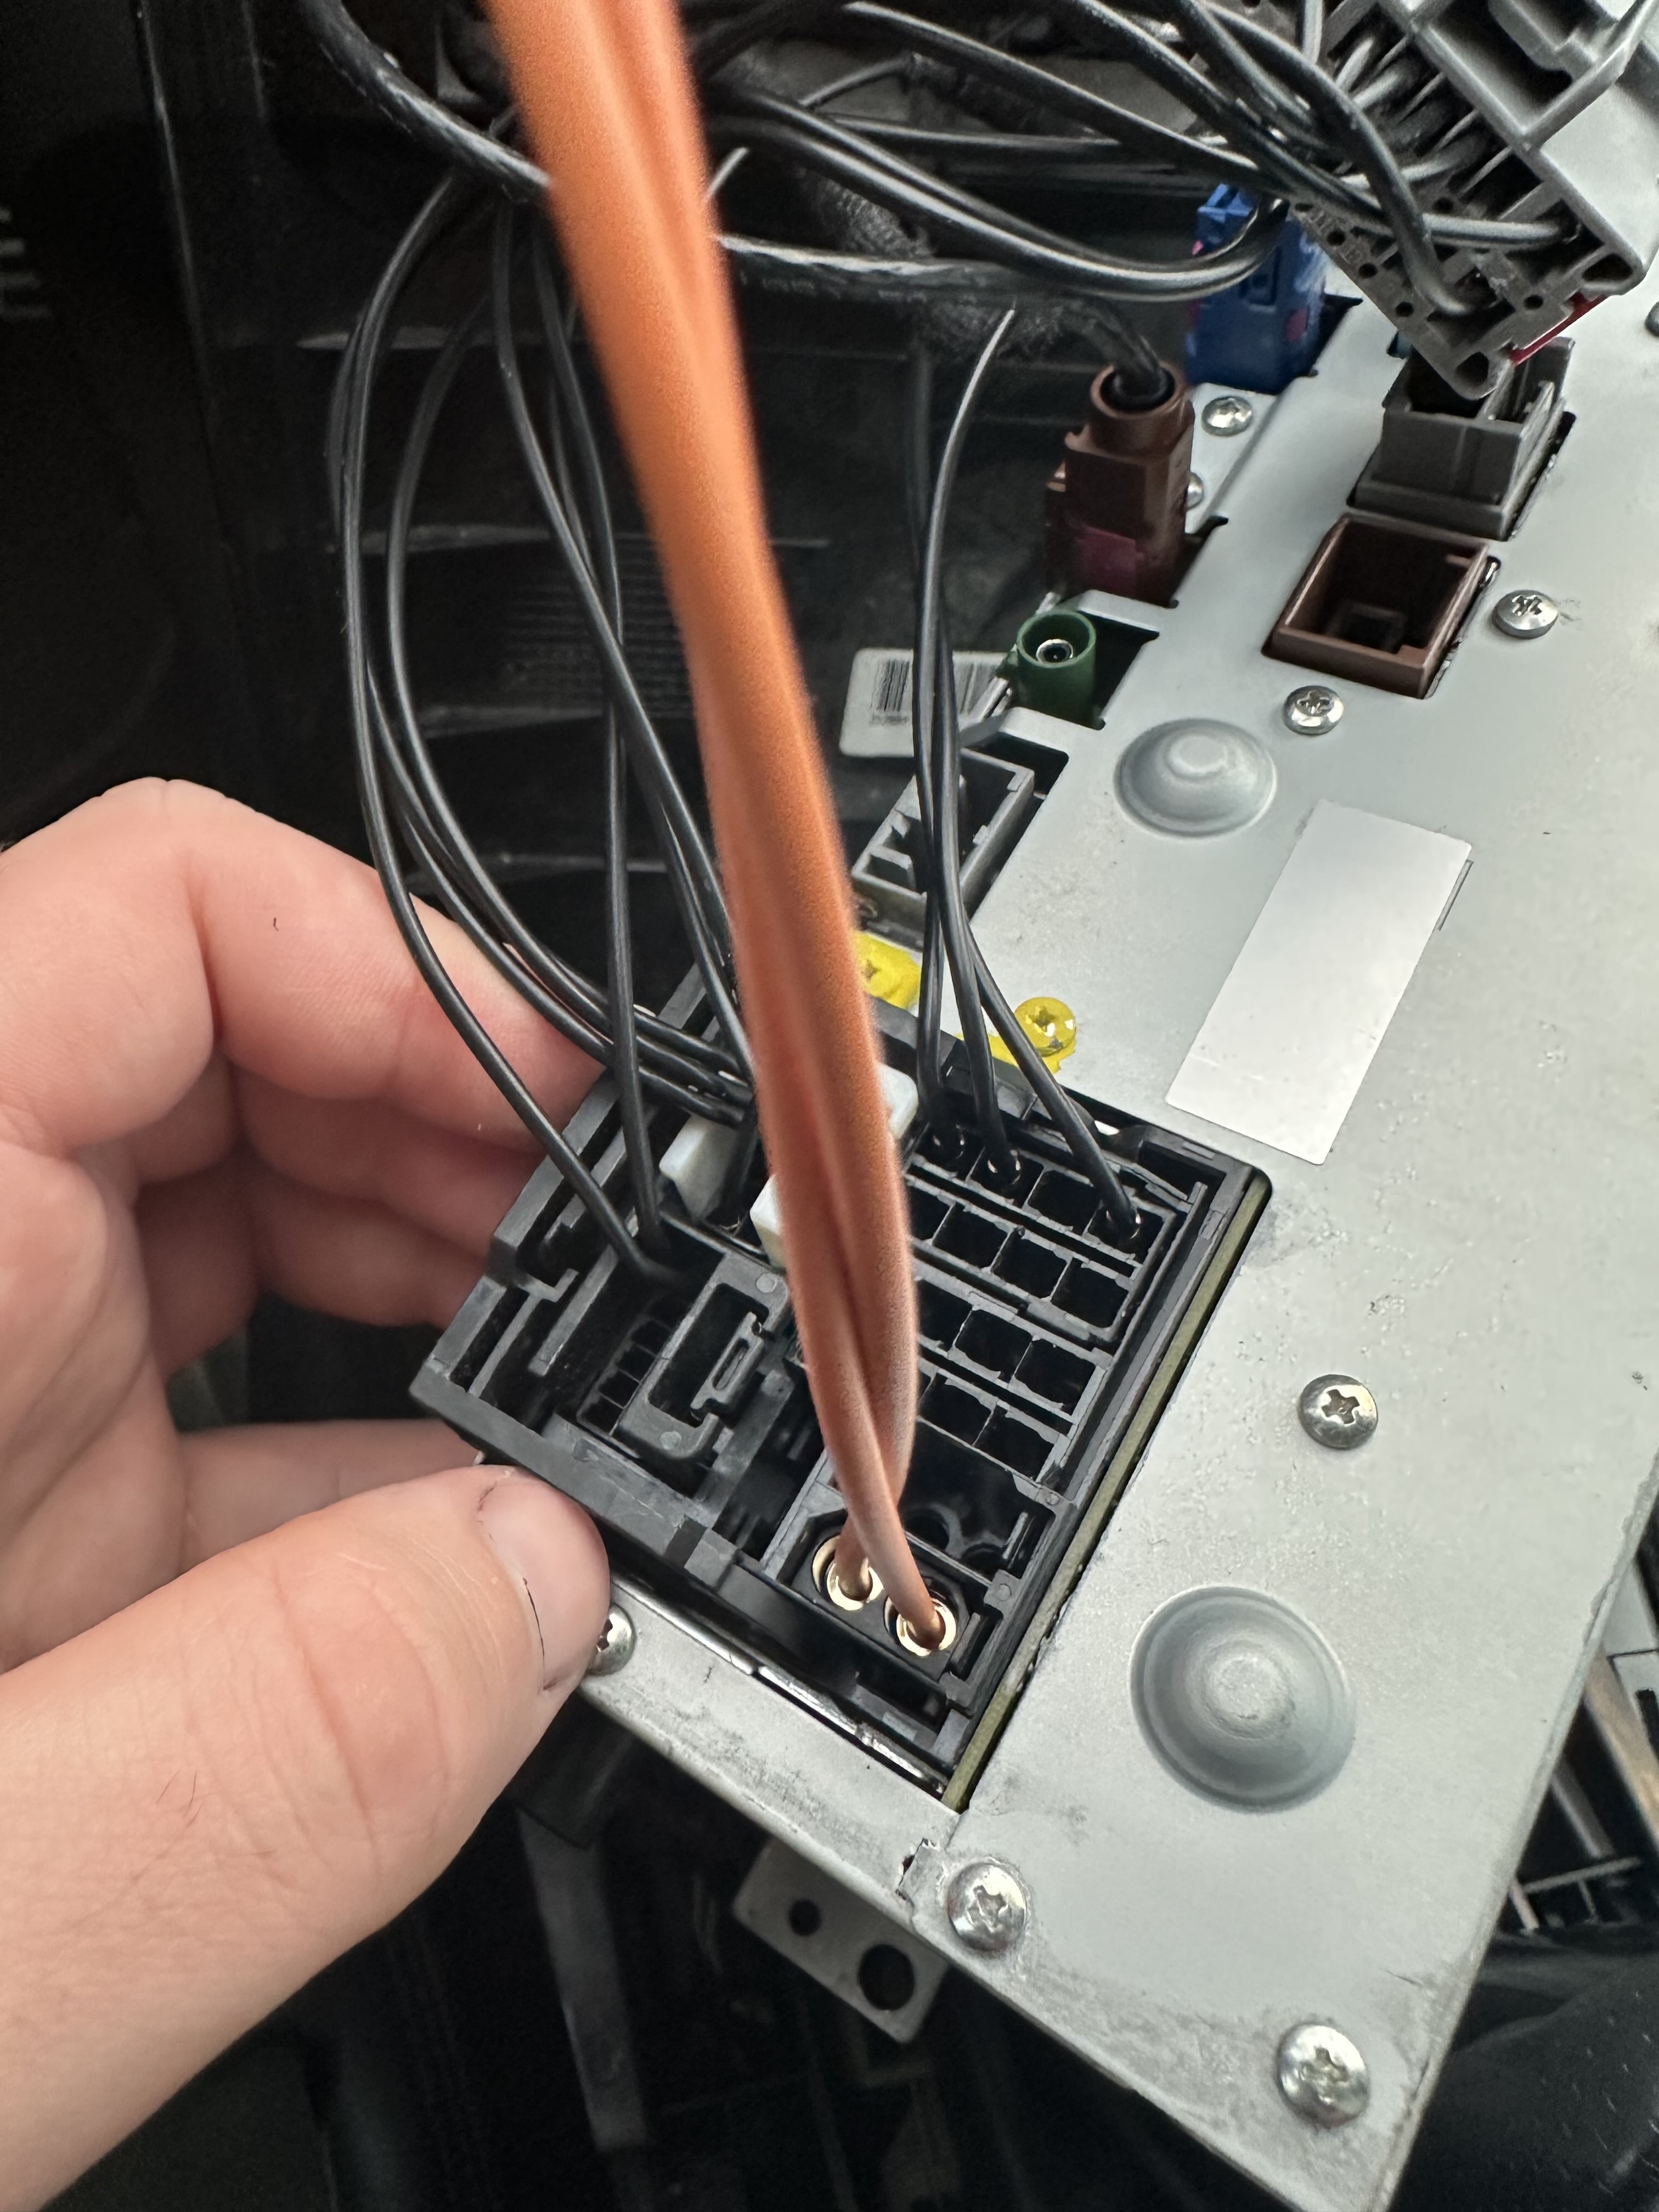
Unscrew the two screws (marked in orange) holding the IAM in place, slide the IAM out of it's place and disconnect any connectors.
Images
This part won't be reused.
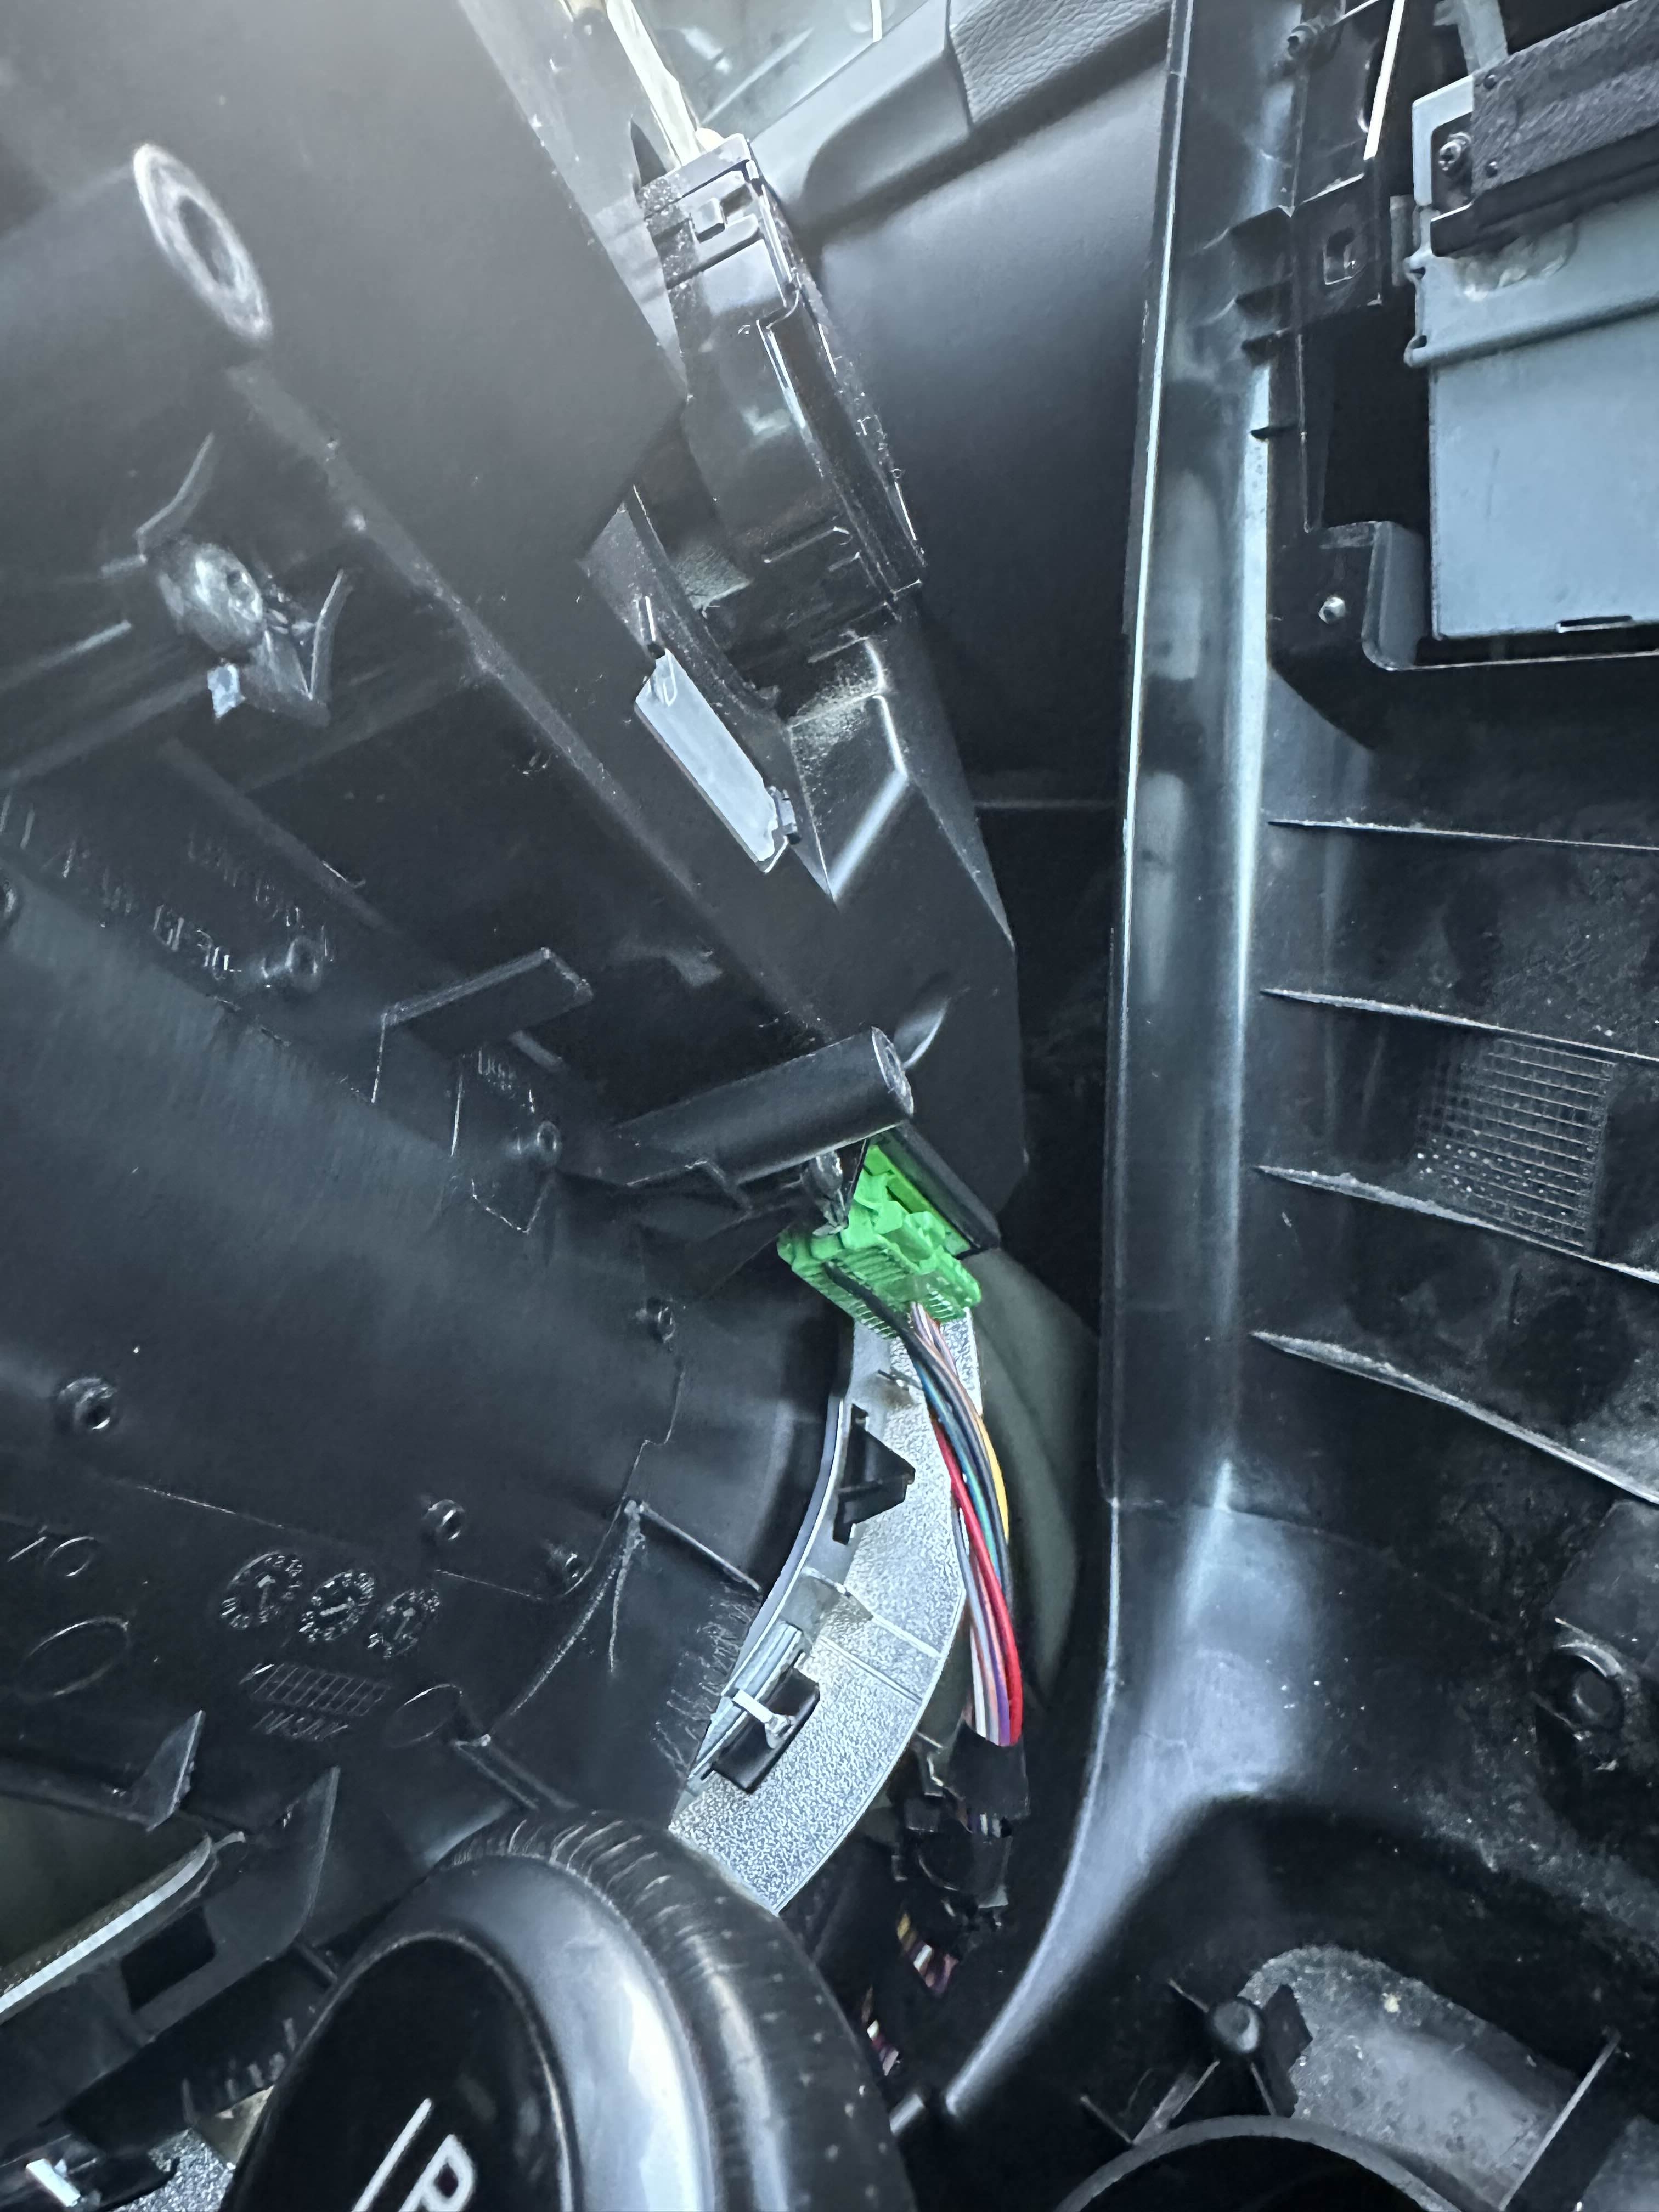
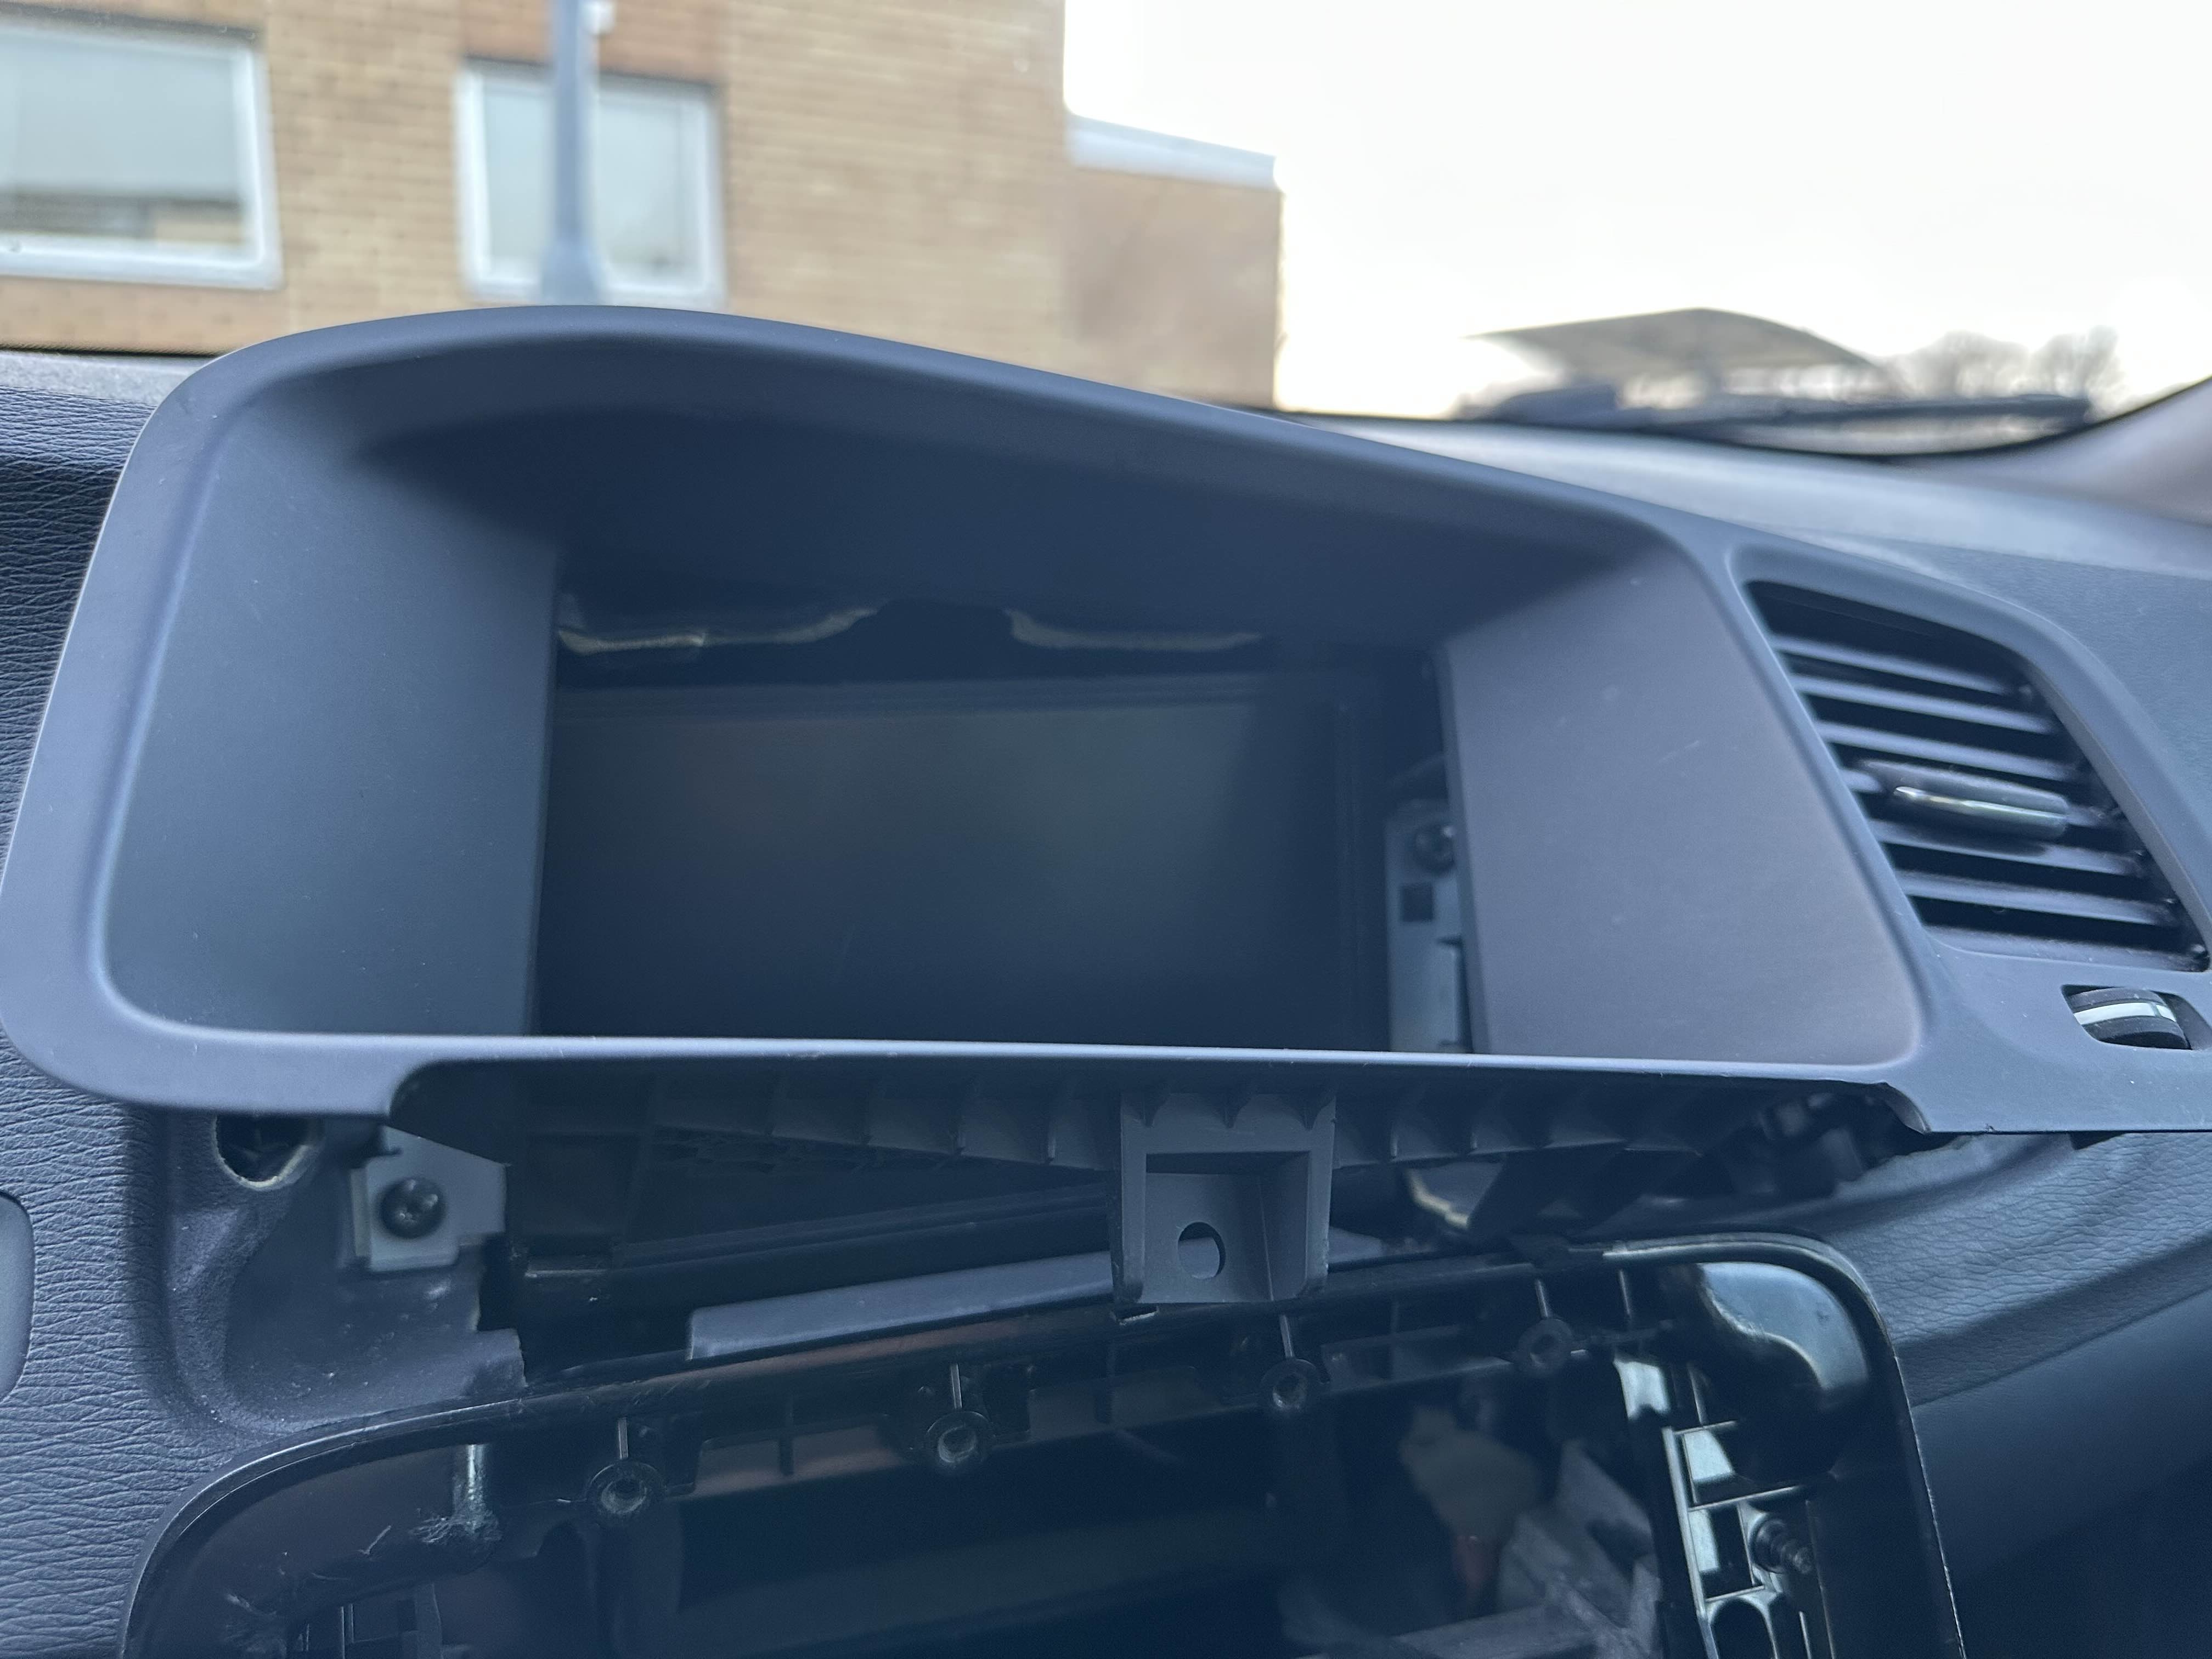
To remove the panel that sits over the ICM, use a plastic pry tool as to not damage any panels and slide it under and in the panel as such:
Images
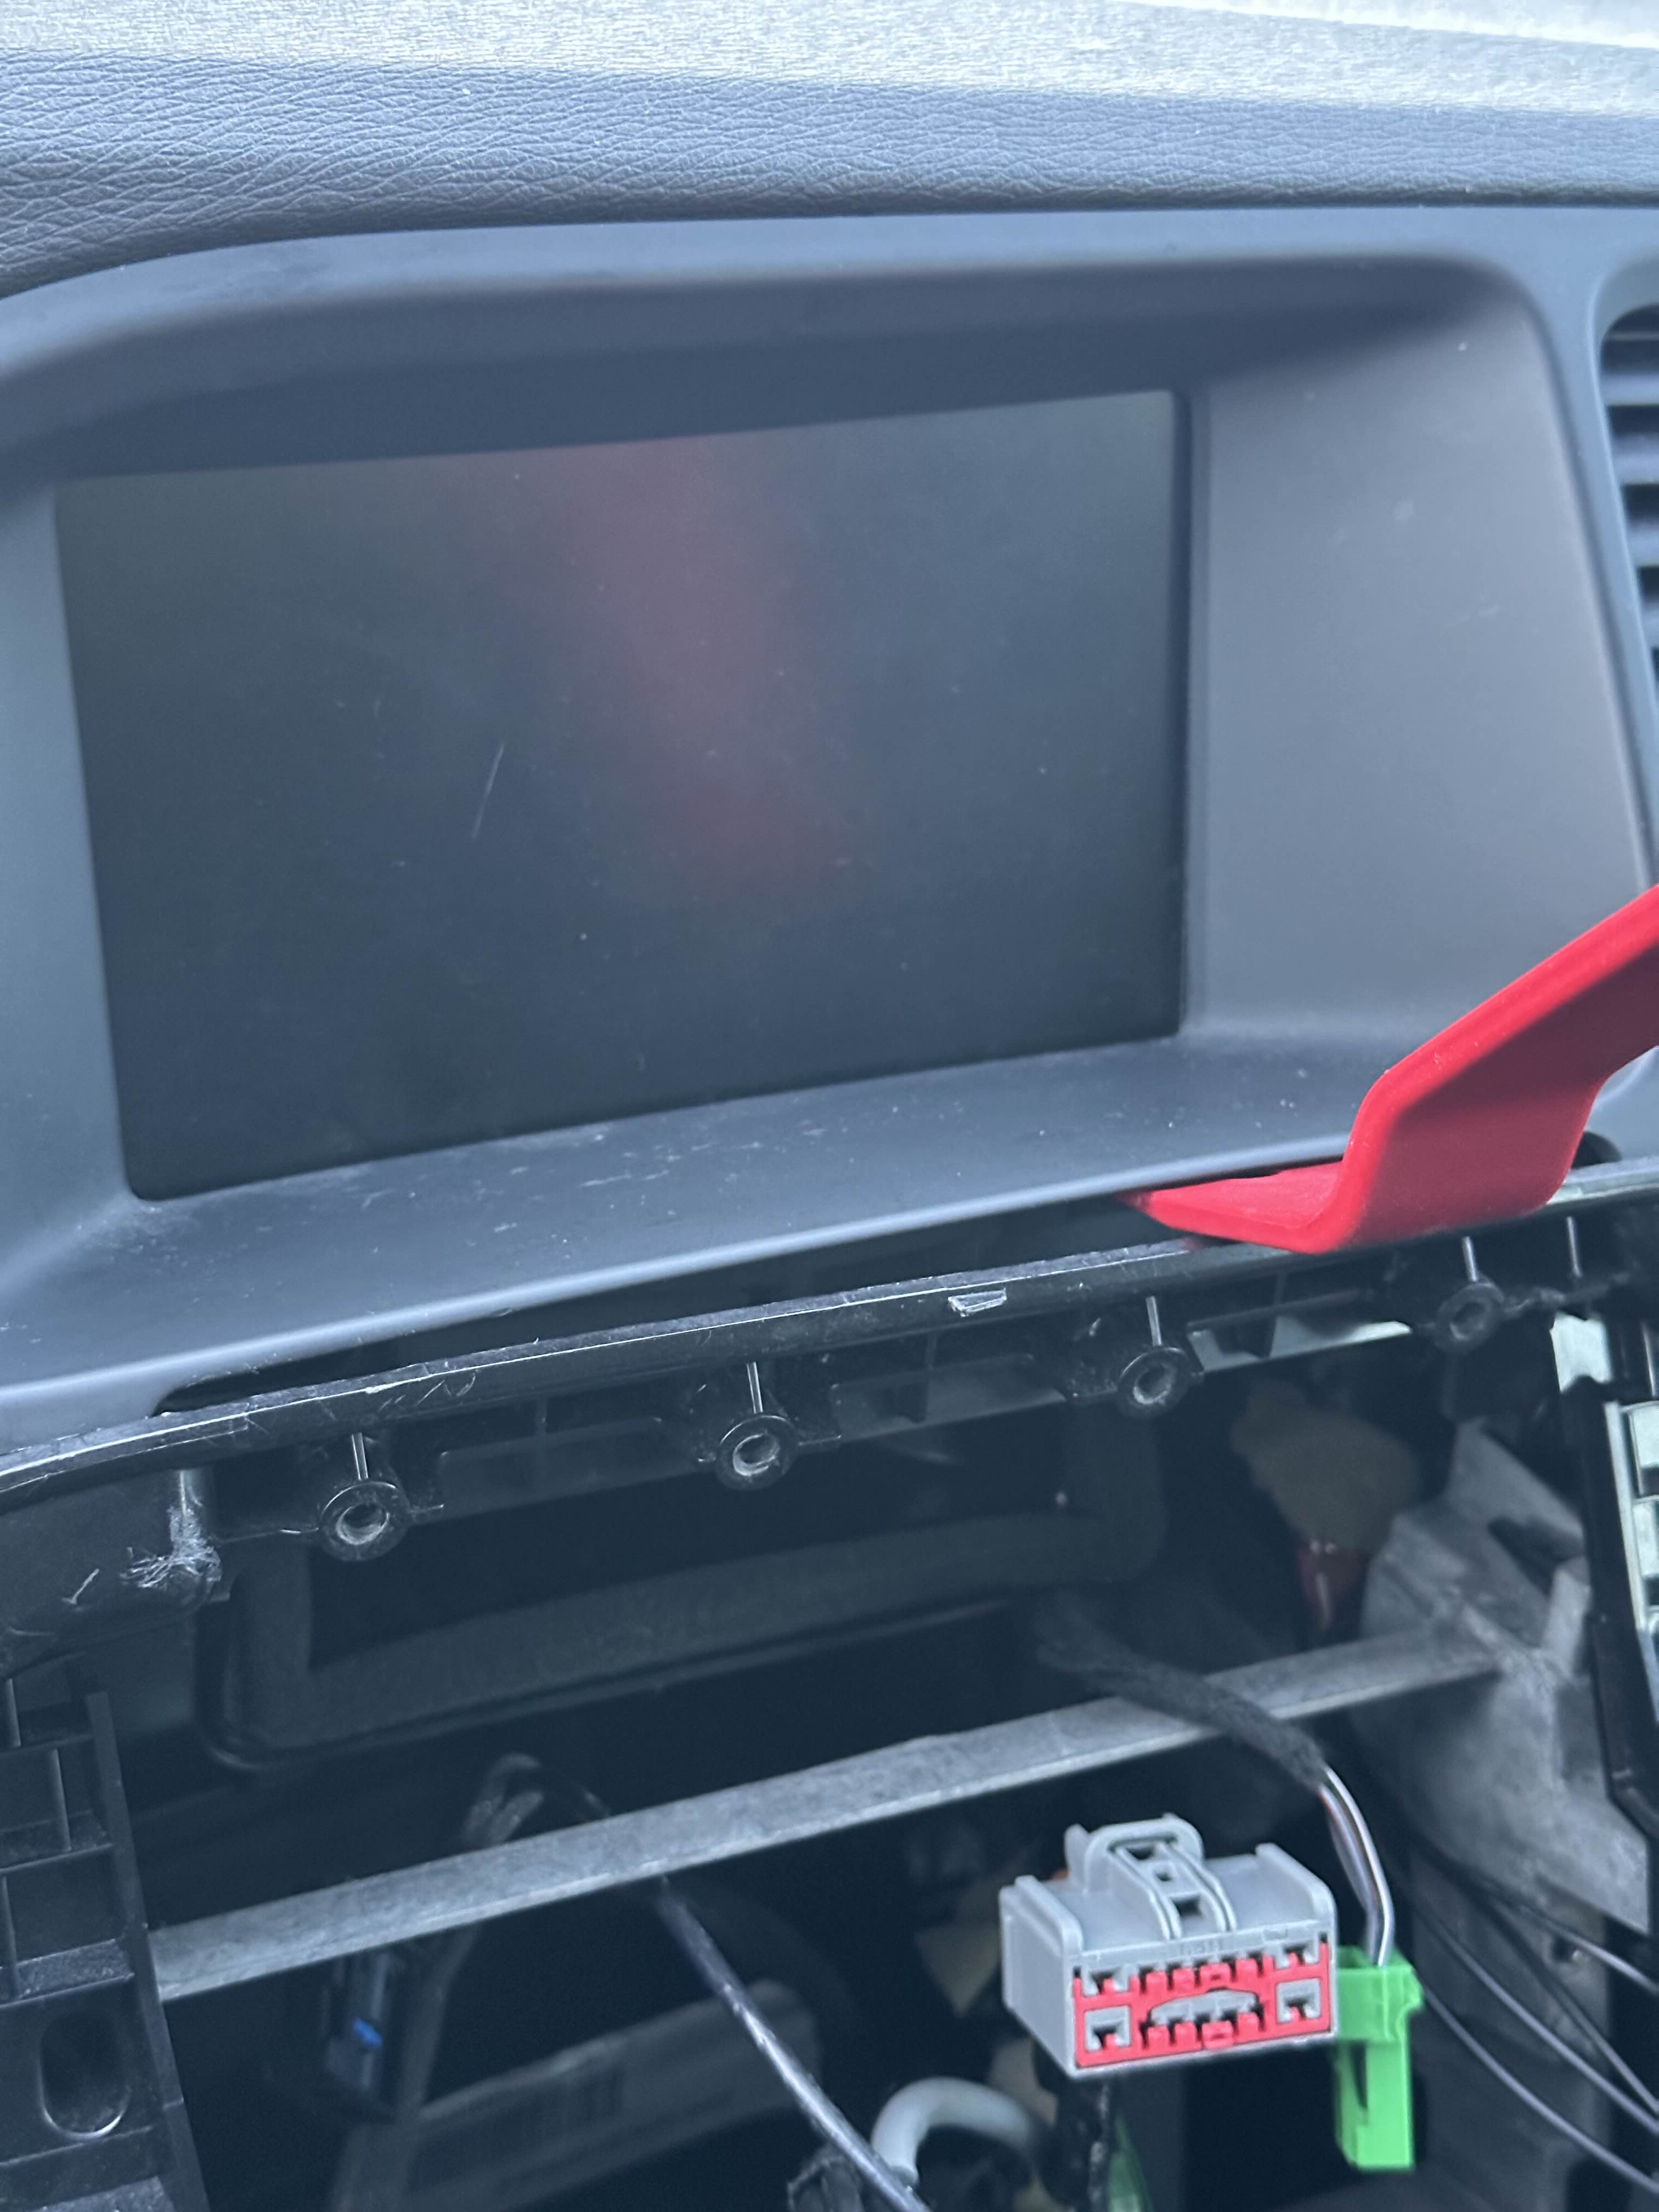
Pry the edges of the panel, including the portruding piece in the center over the edge of the panel which holds the CCM trim in place as such.
This was very finicky and took a lot of work, I'd suggest working your way around the trim until you manage to get it out as you don't want to damage any plastic pieces from bending them too much!
Images
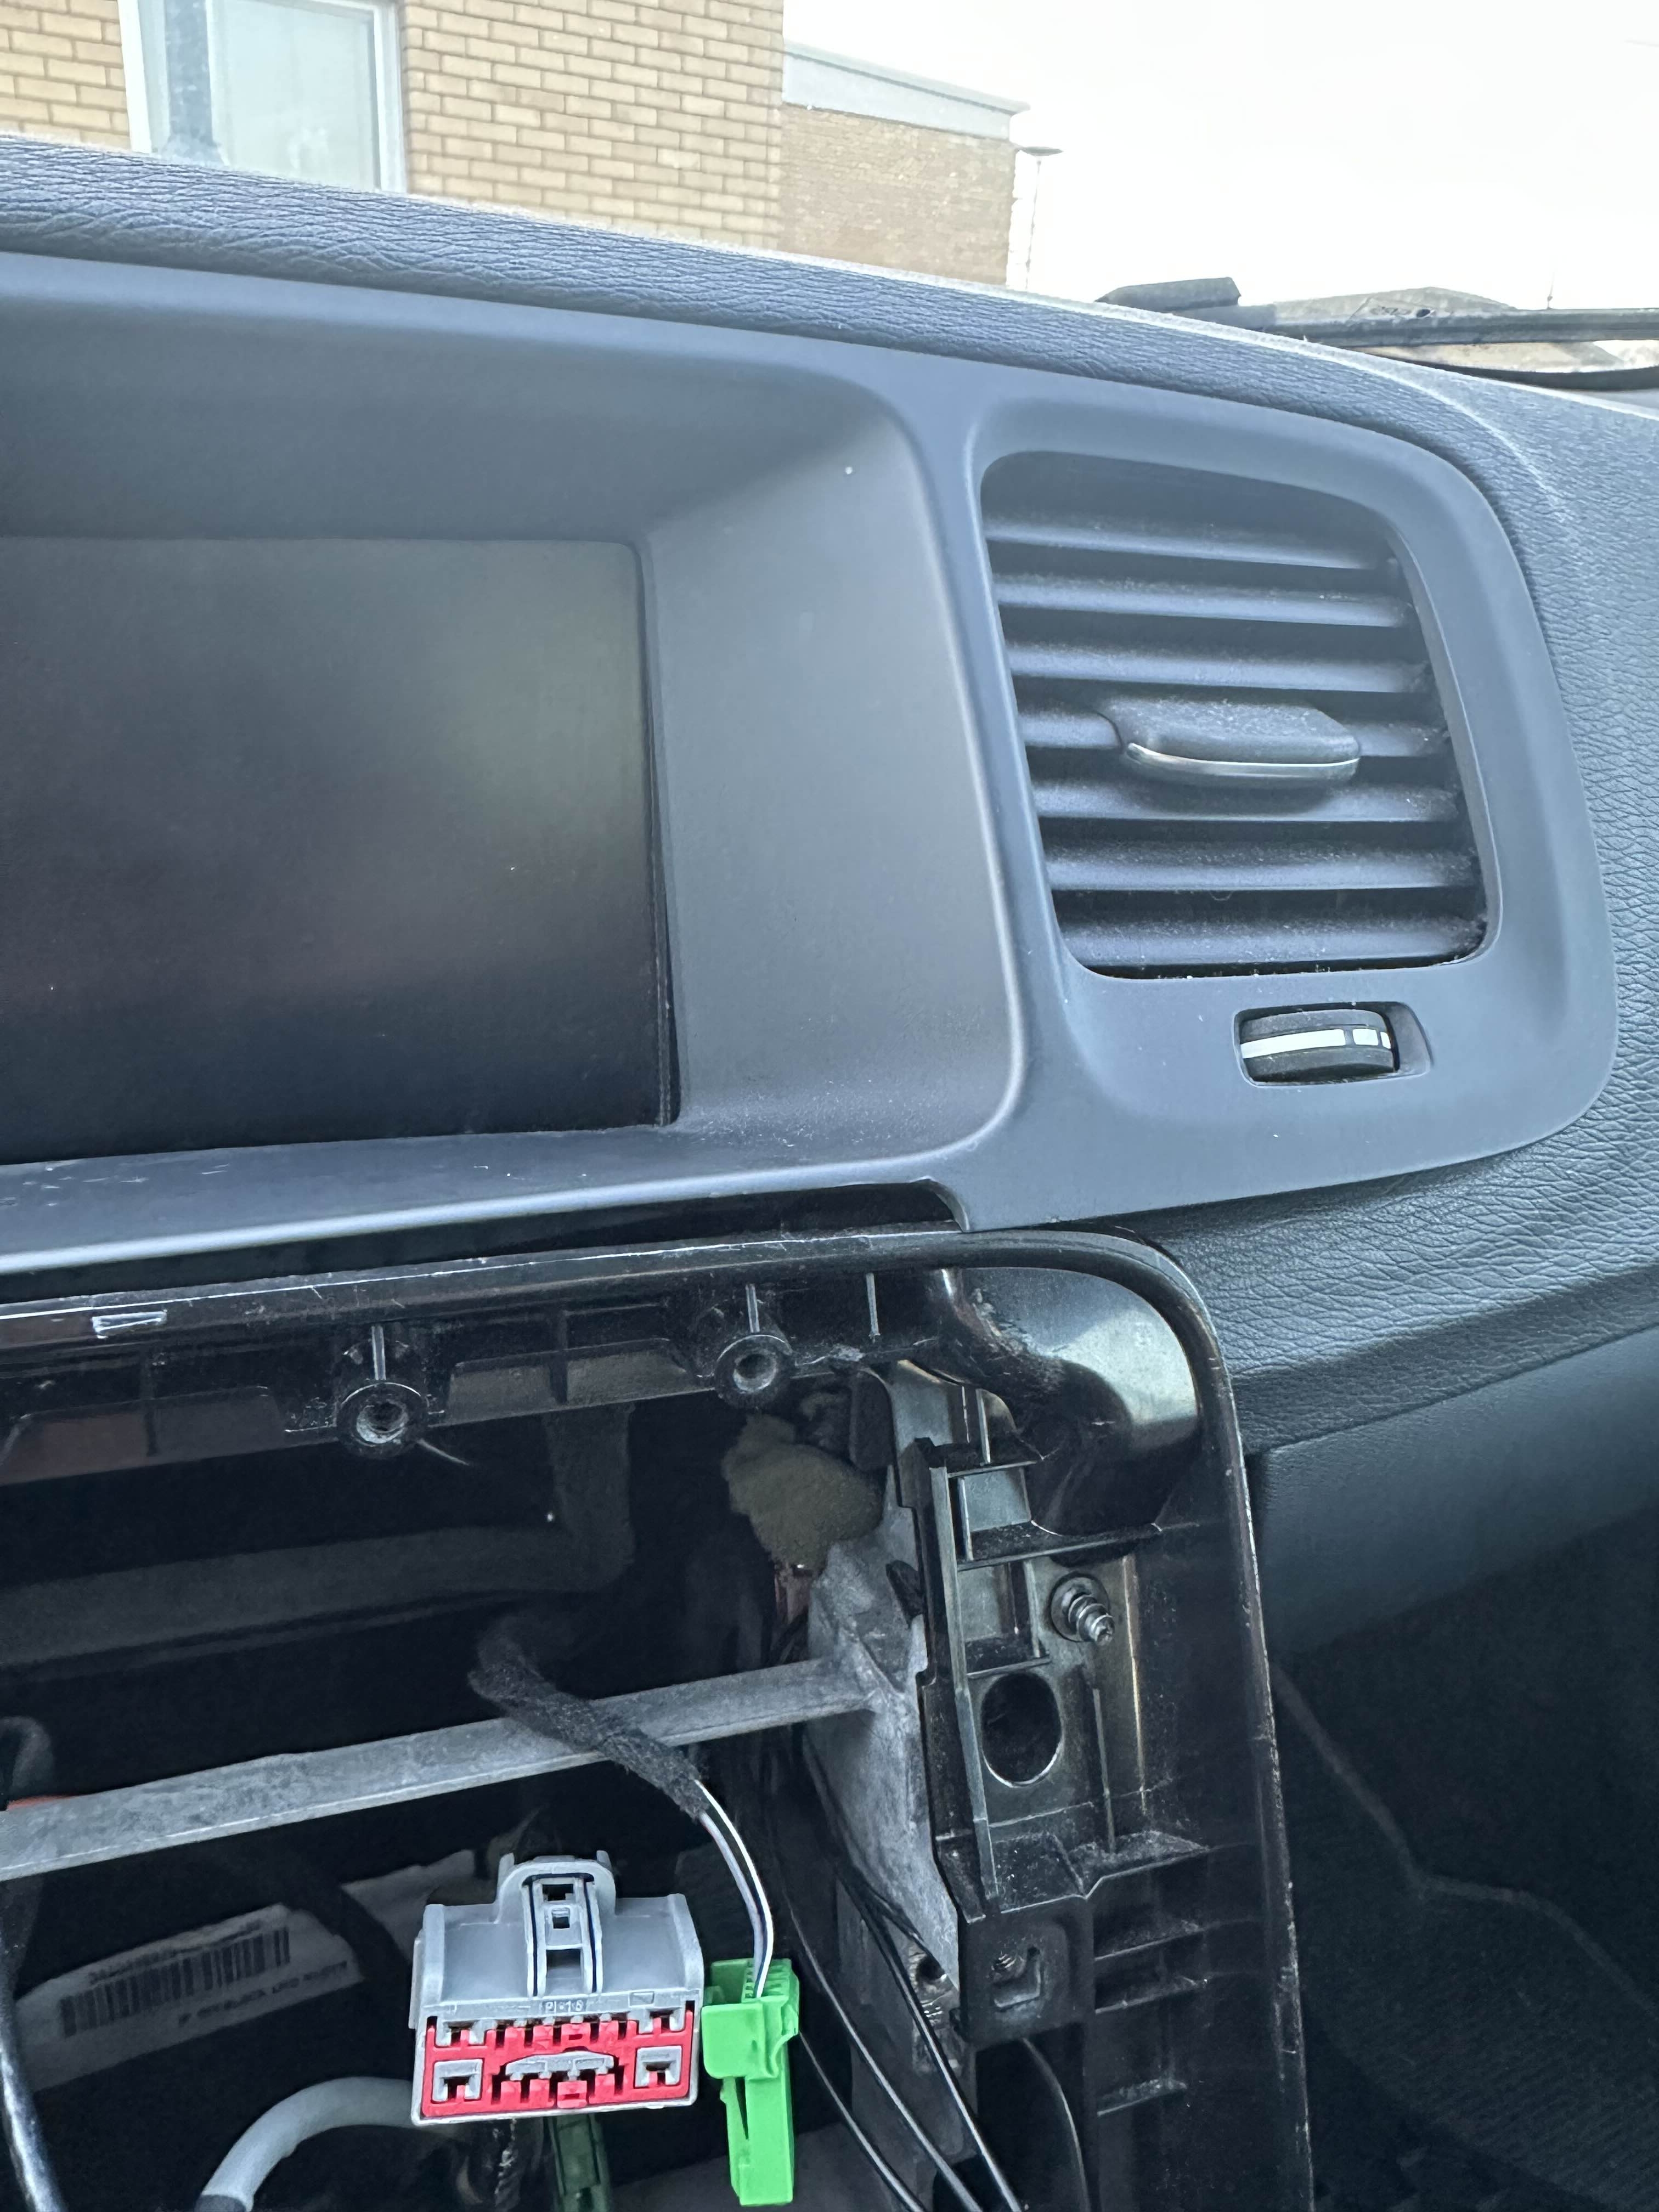
Place the trim piece to the side.
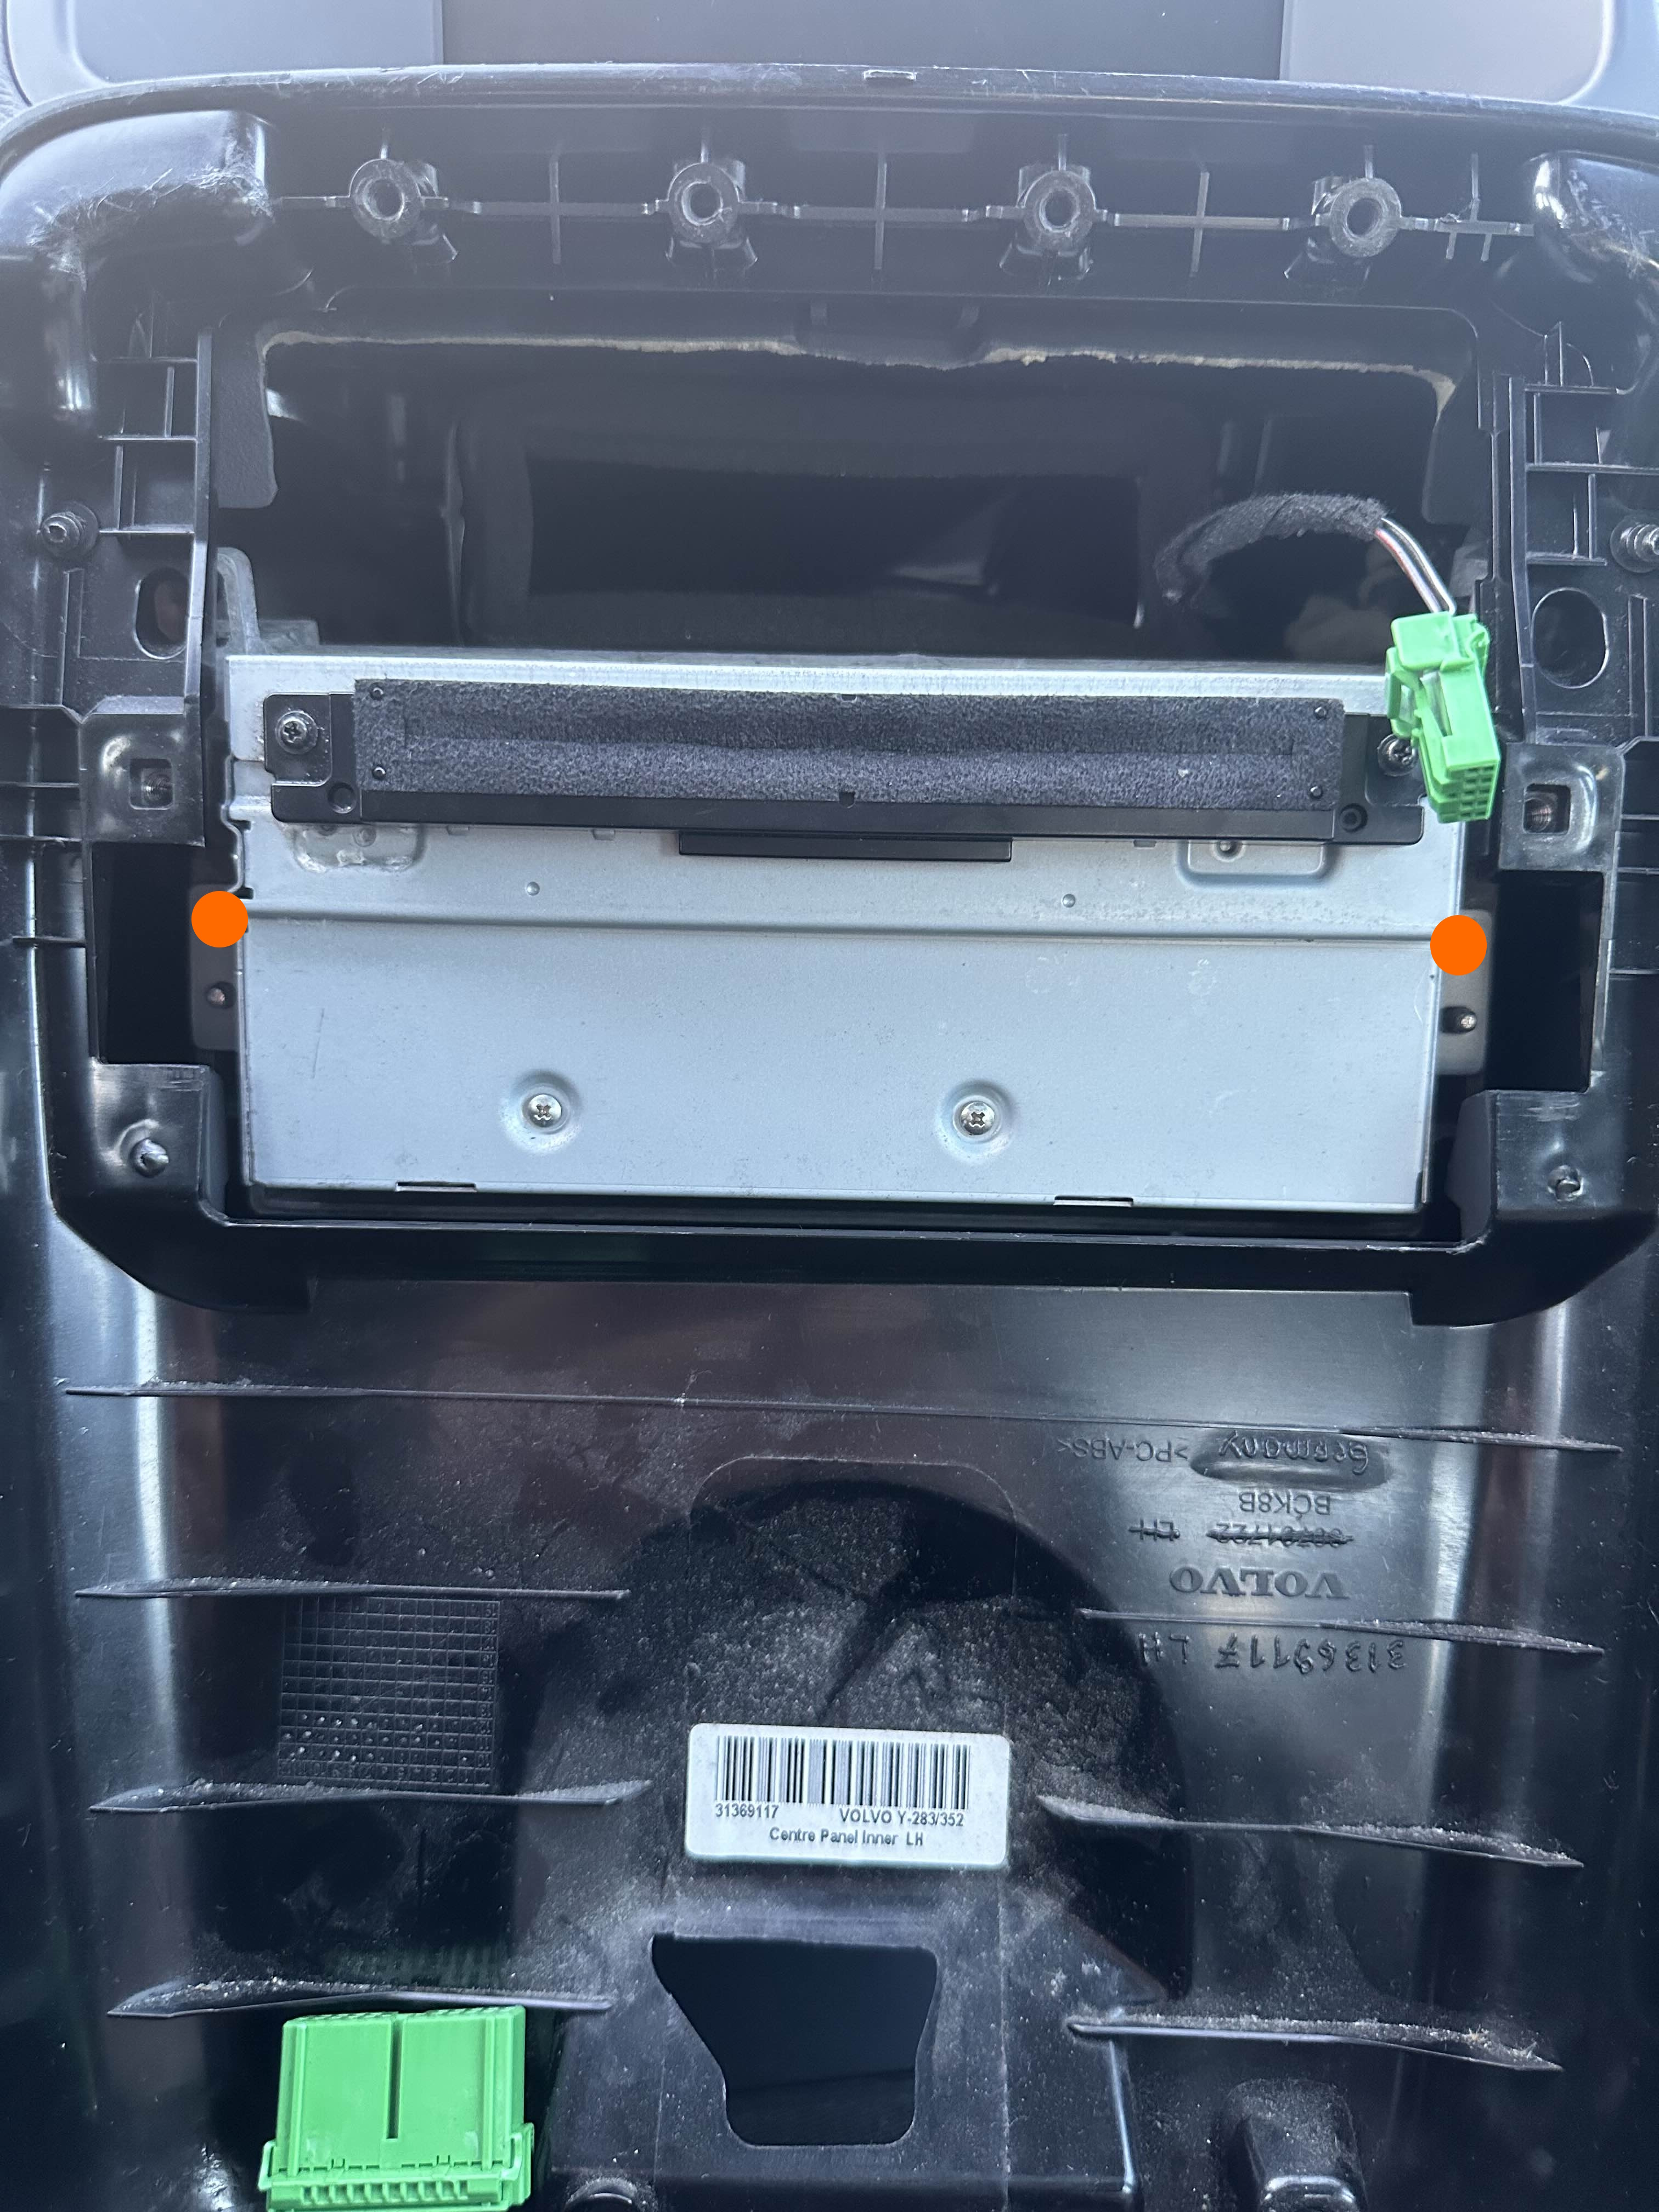
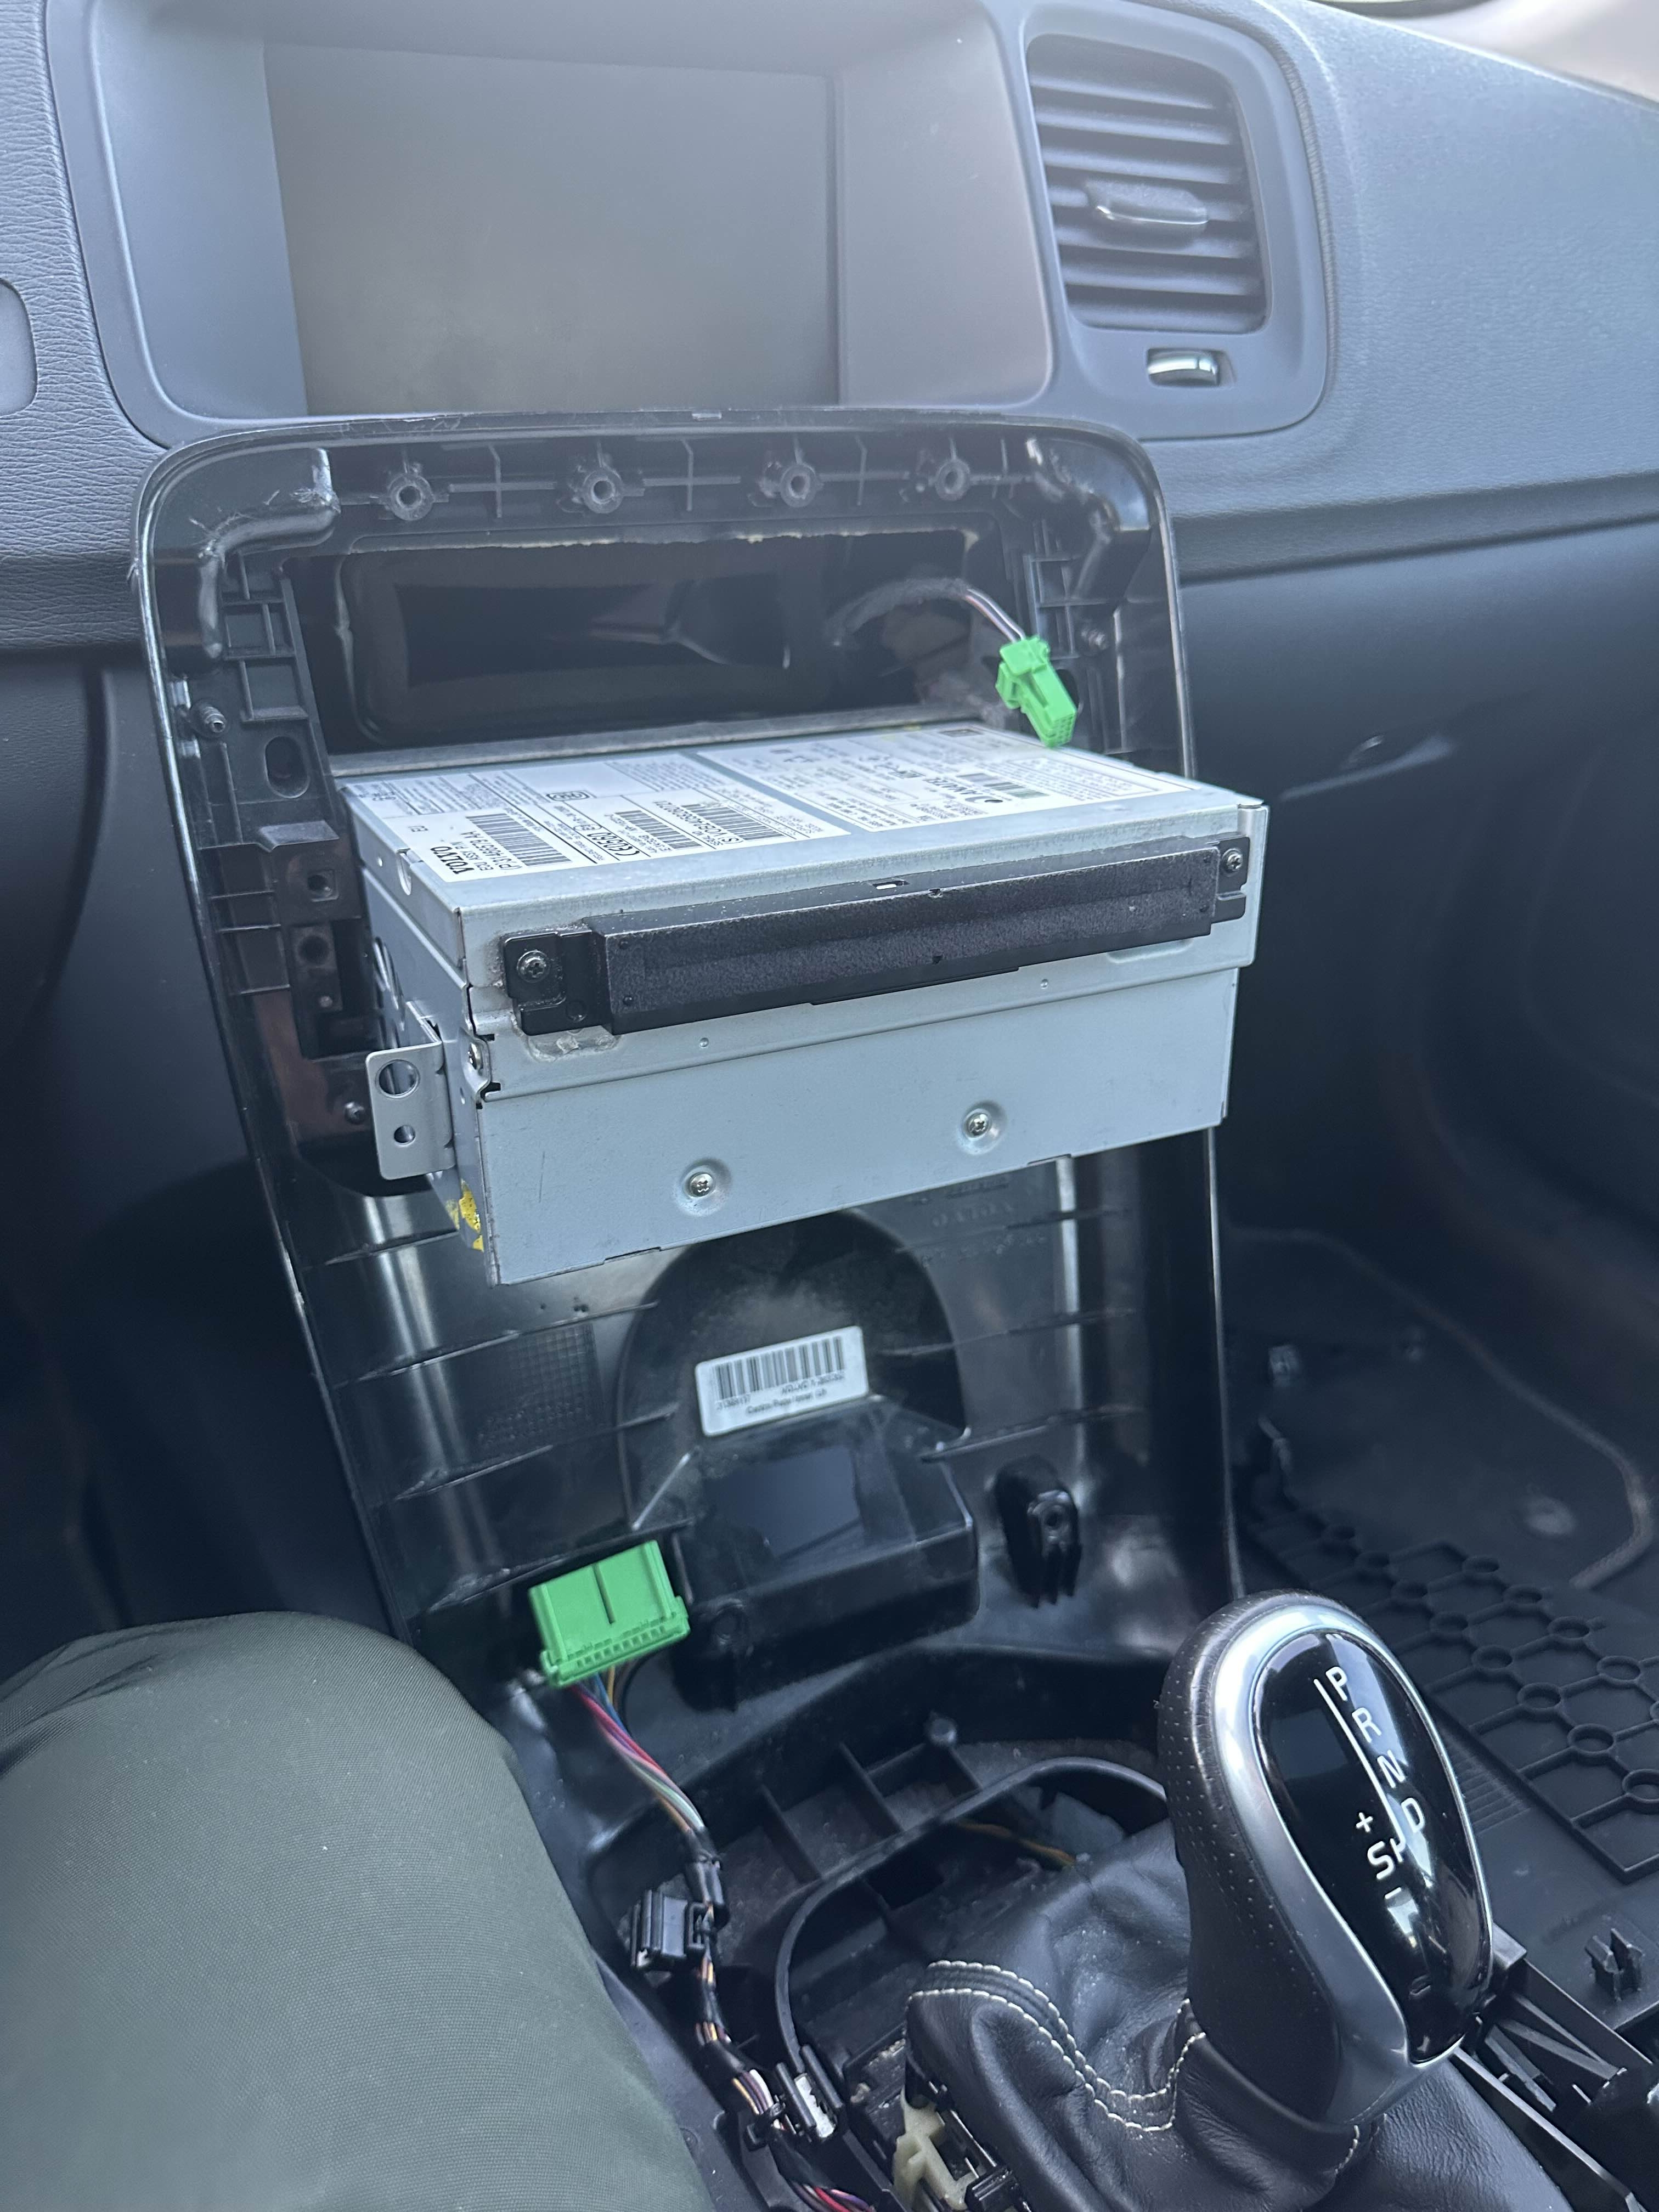
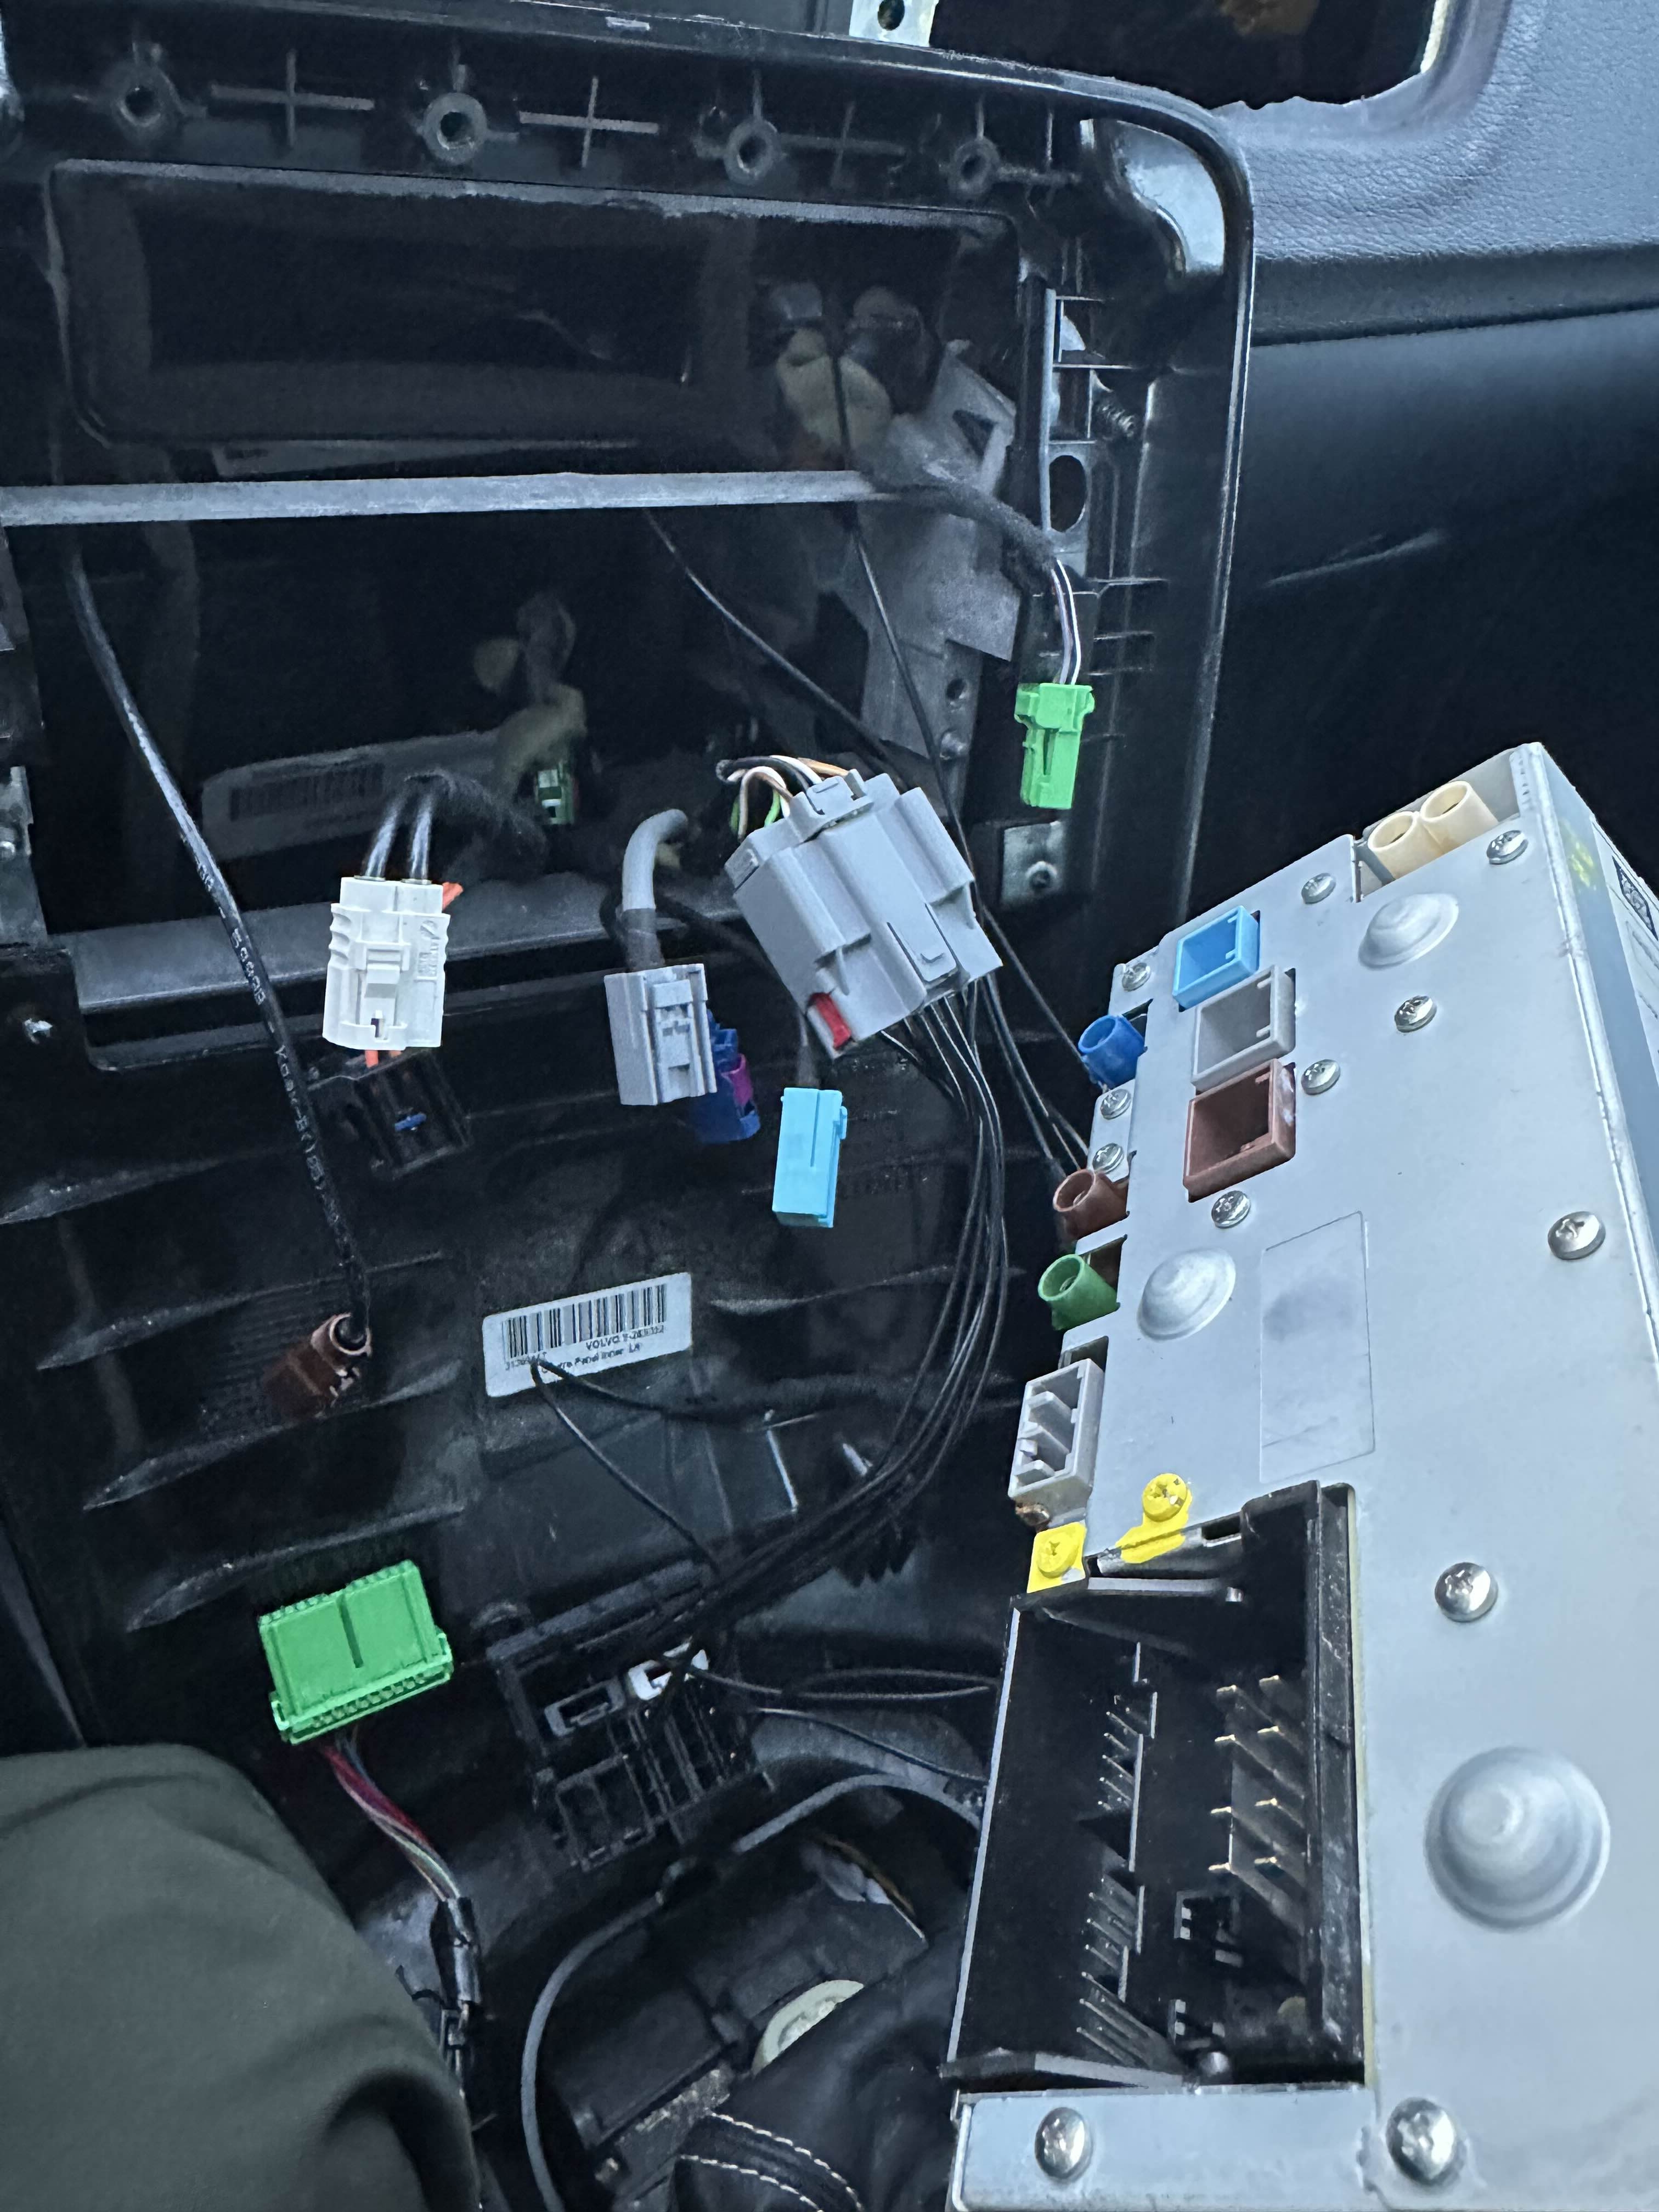
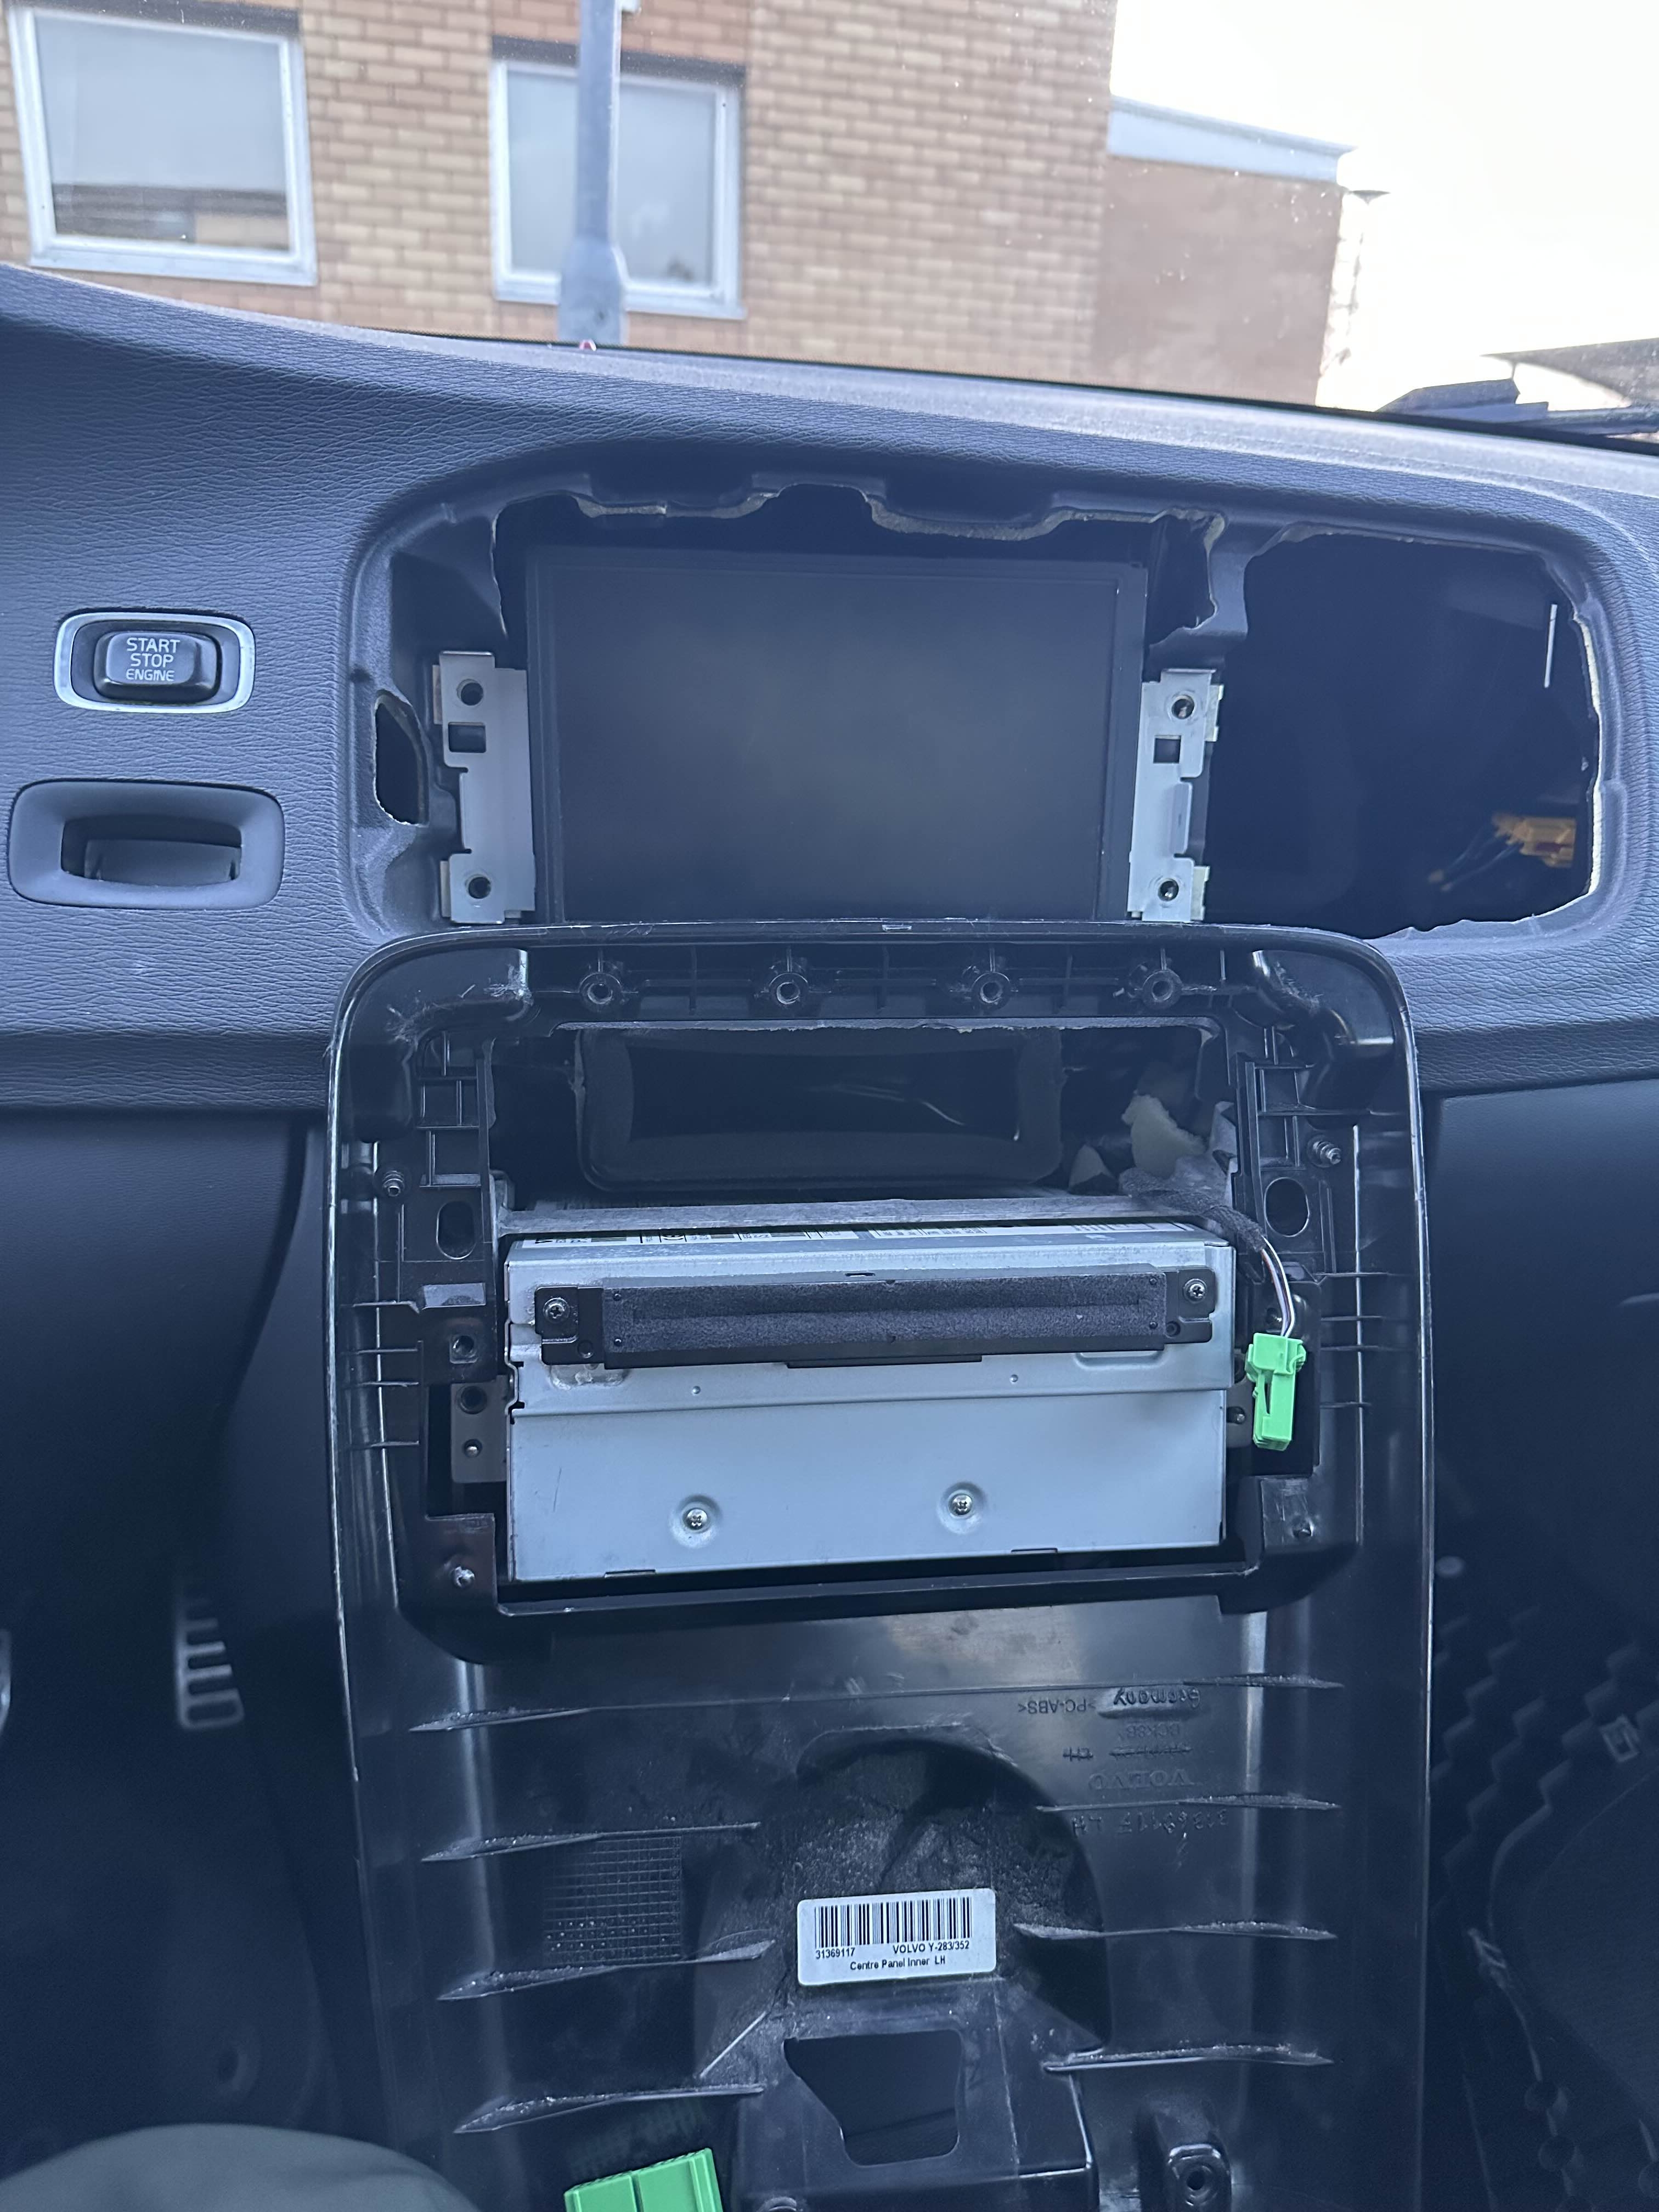
Final part of dissasembly; Remove the 4 screws (marked orange) holding the ICM in place, slide it out and disconnect any connectors.
Images
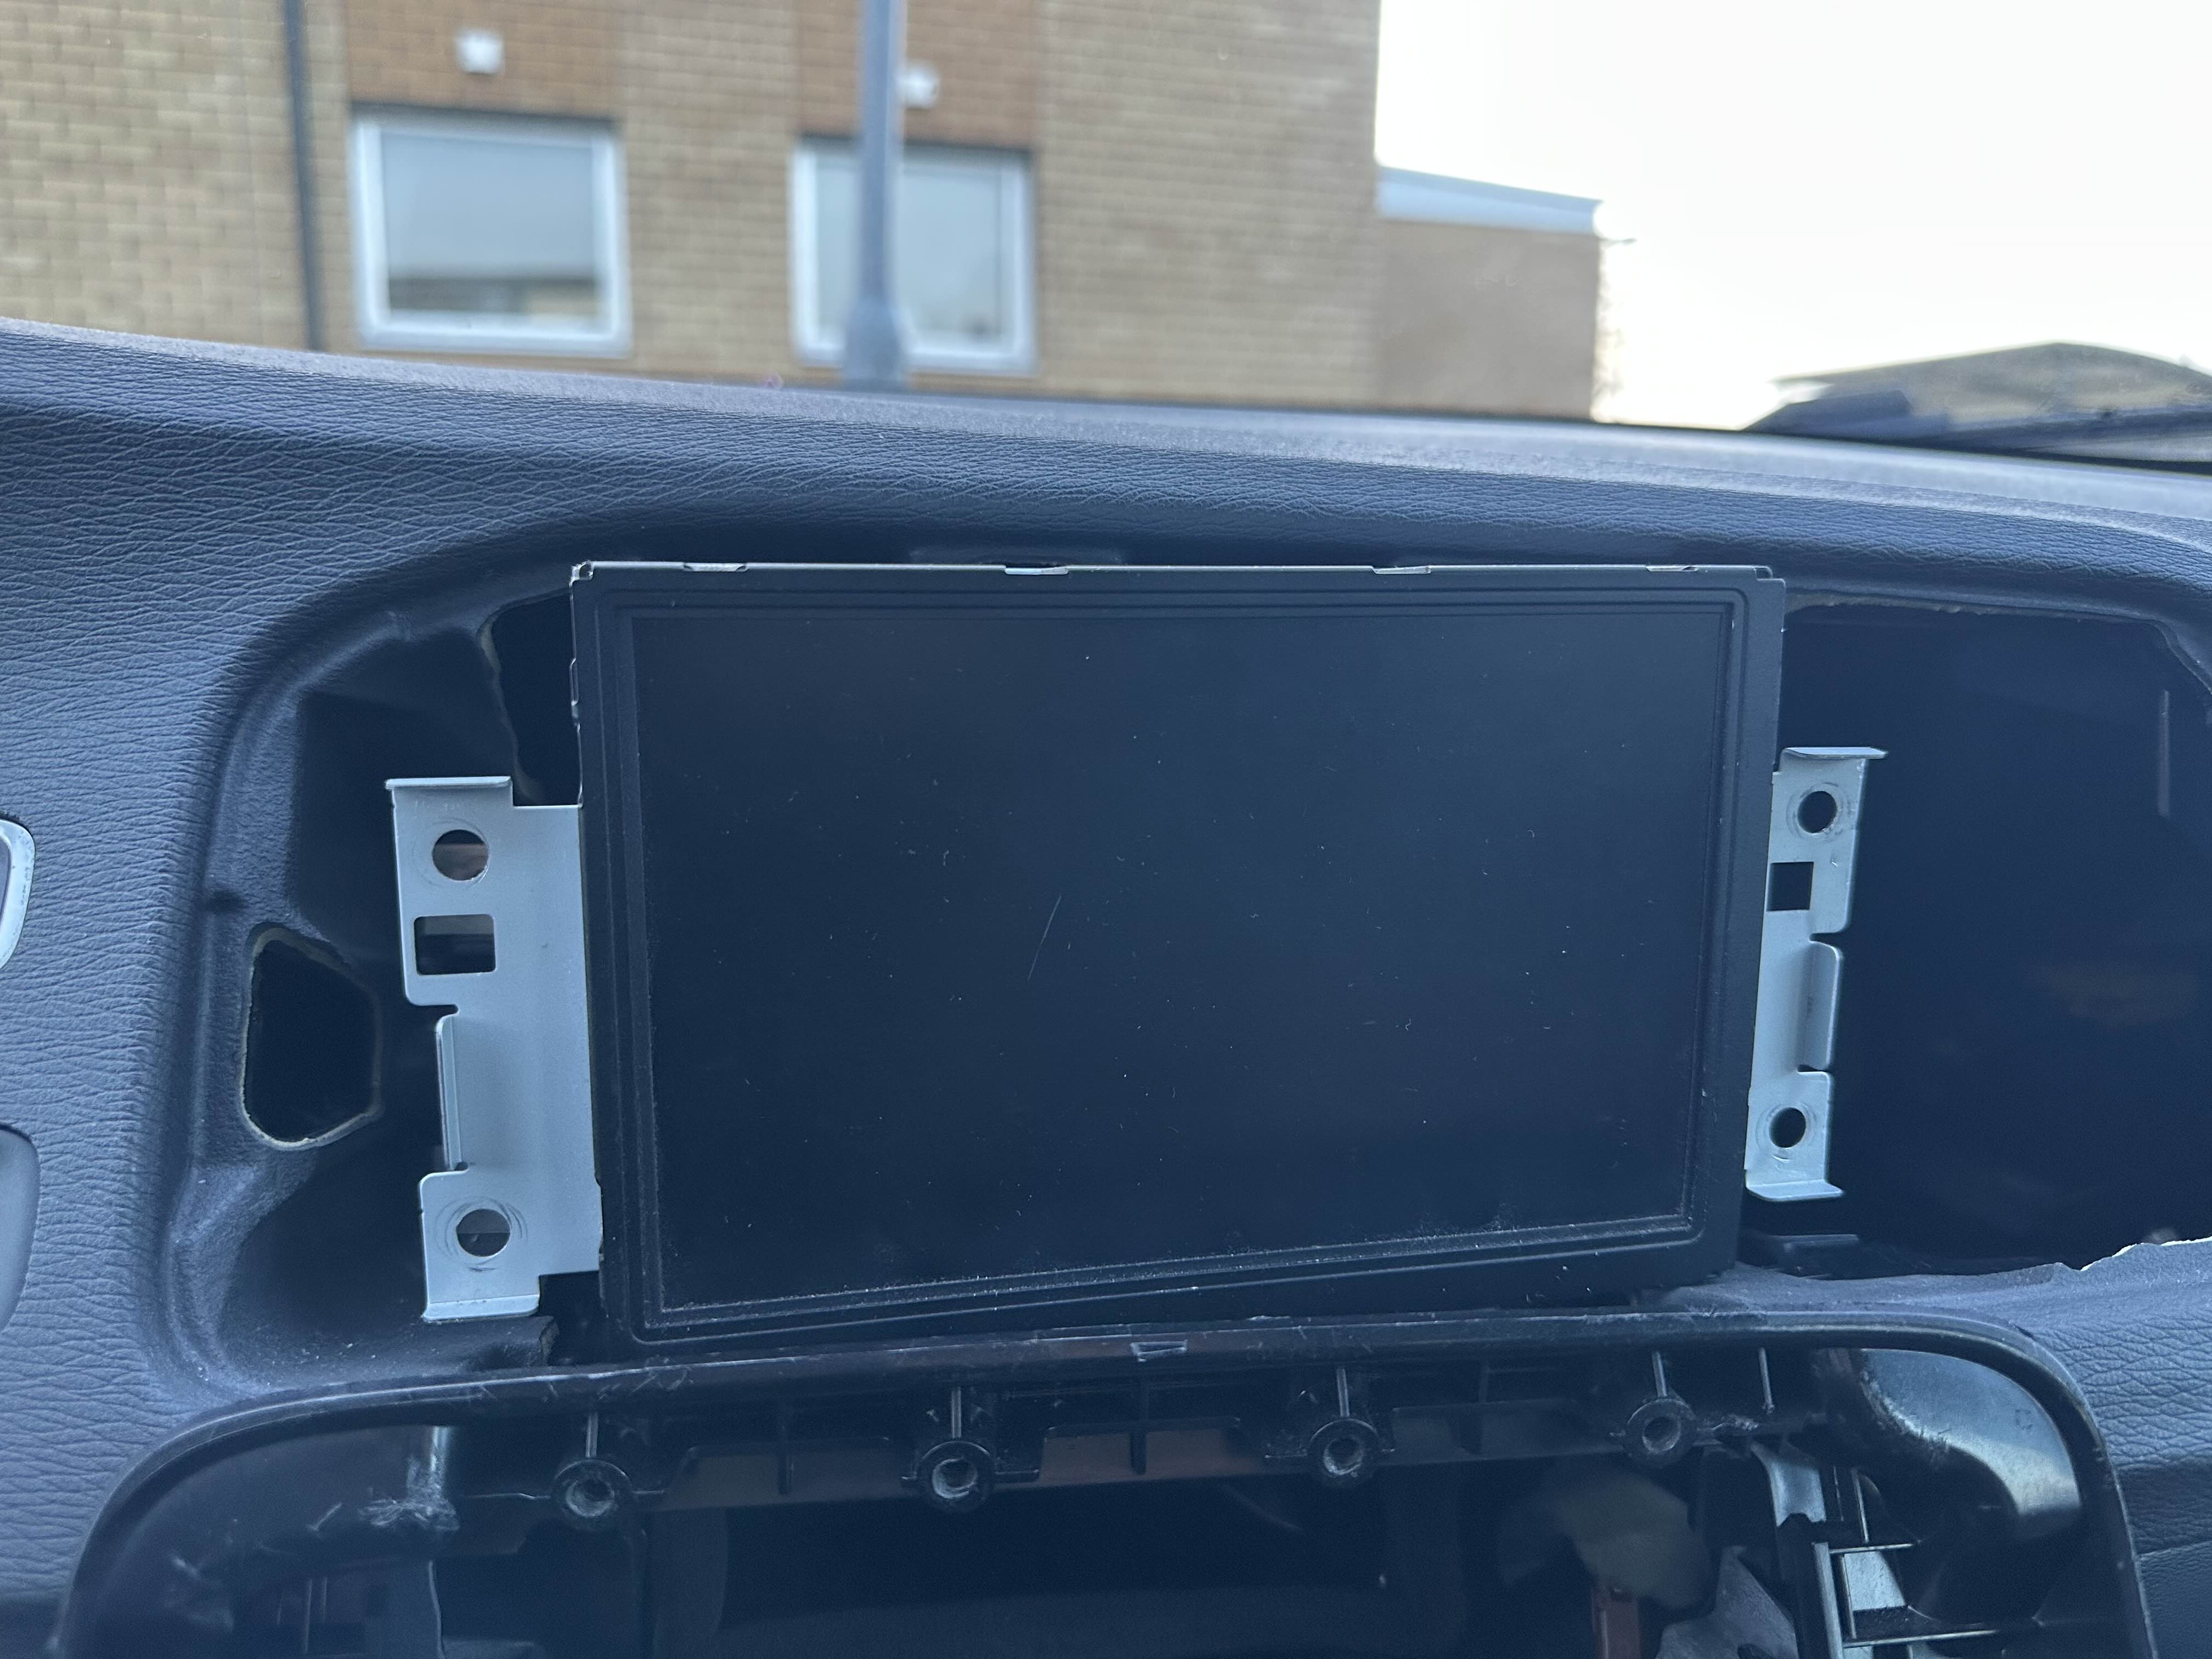
This part wont be reused
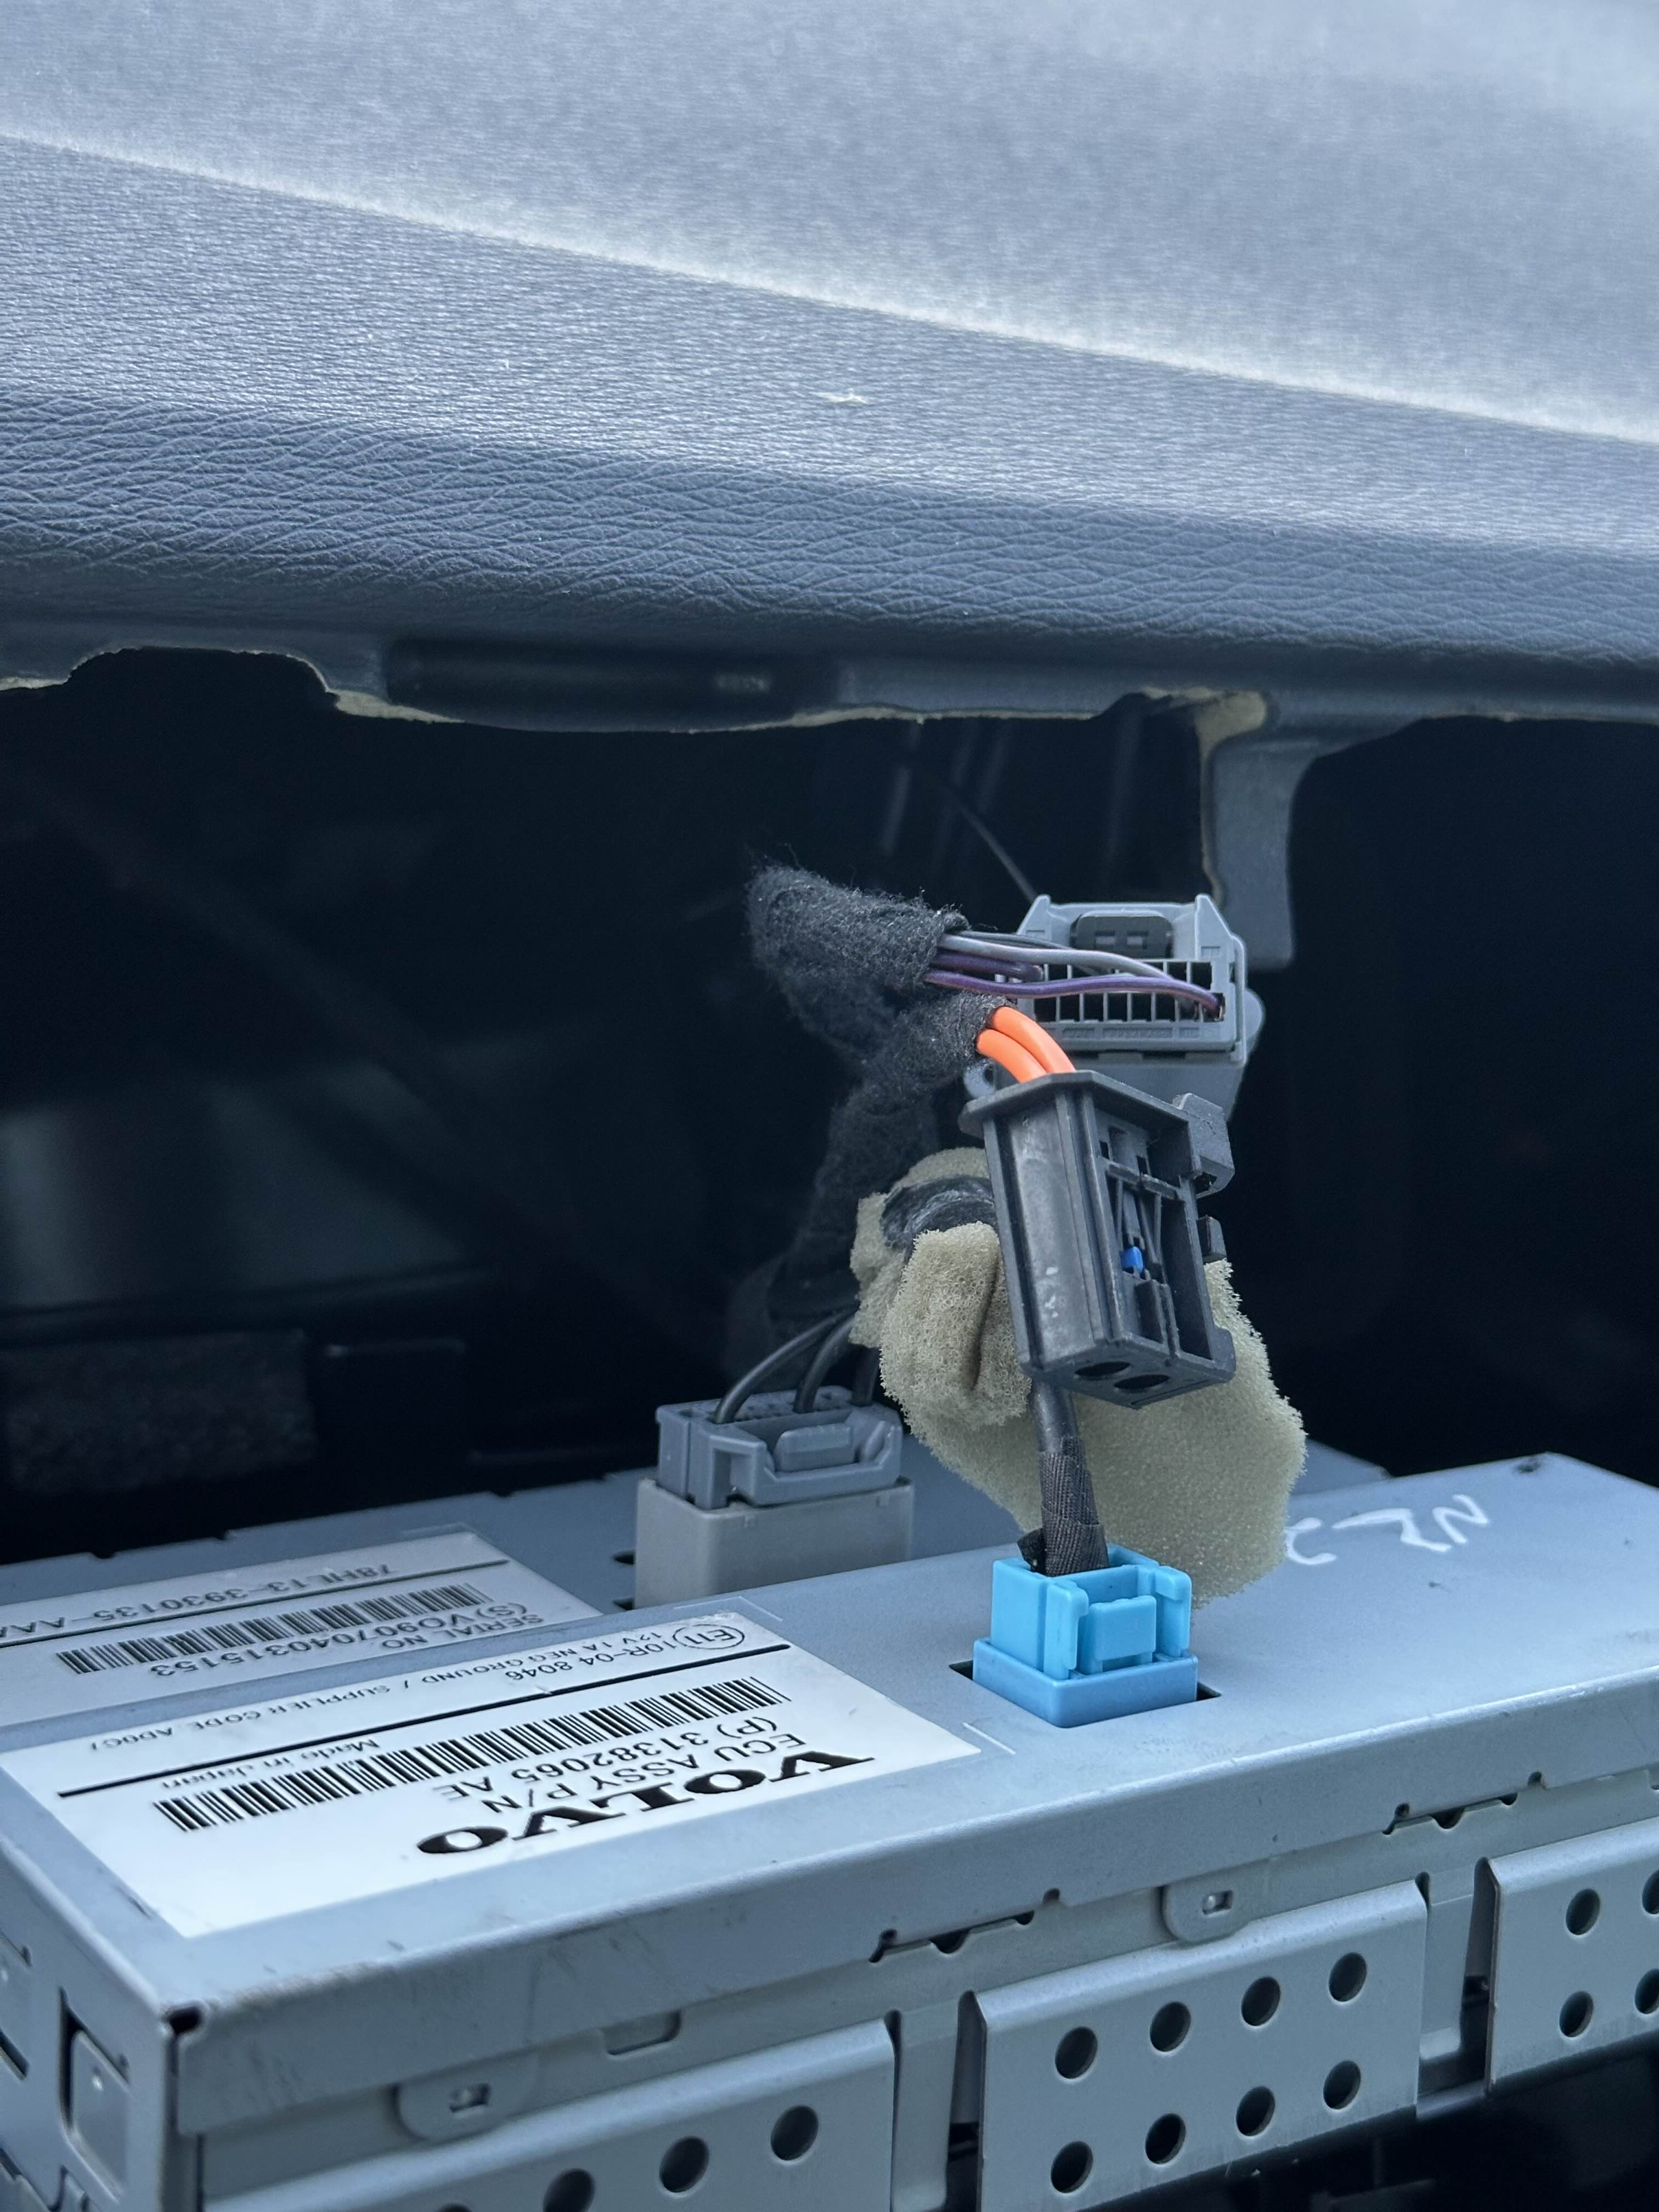
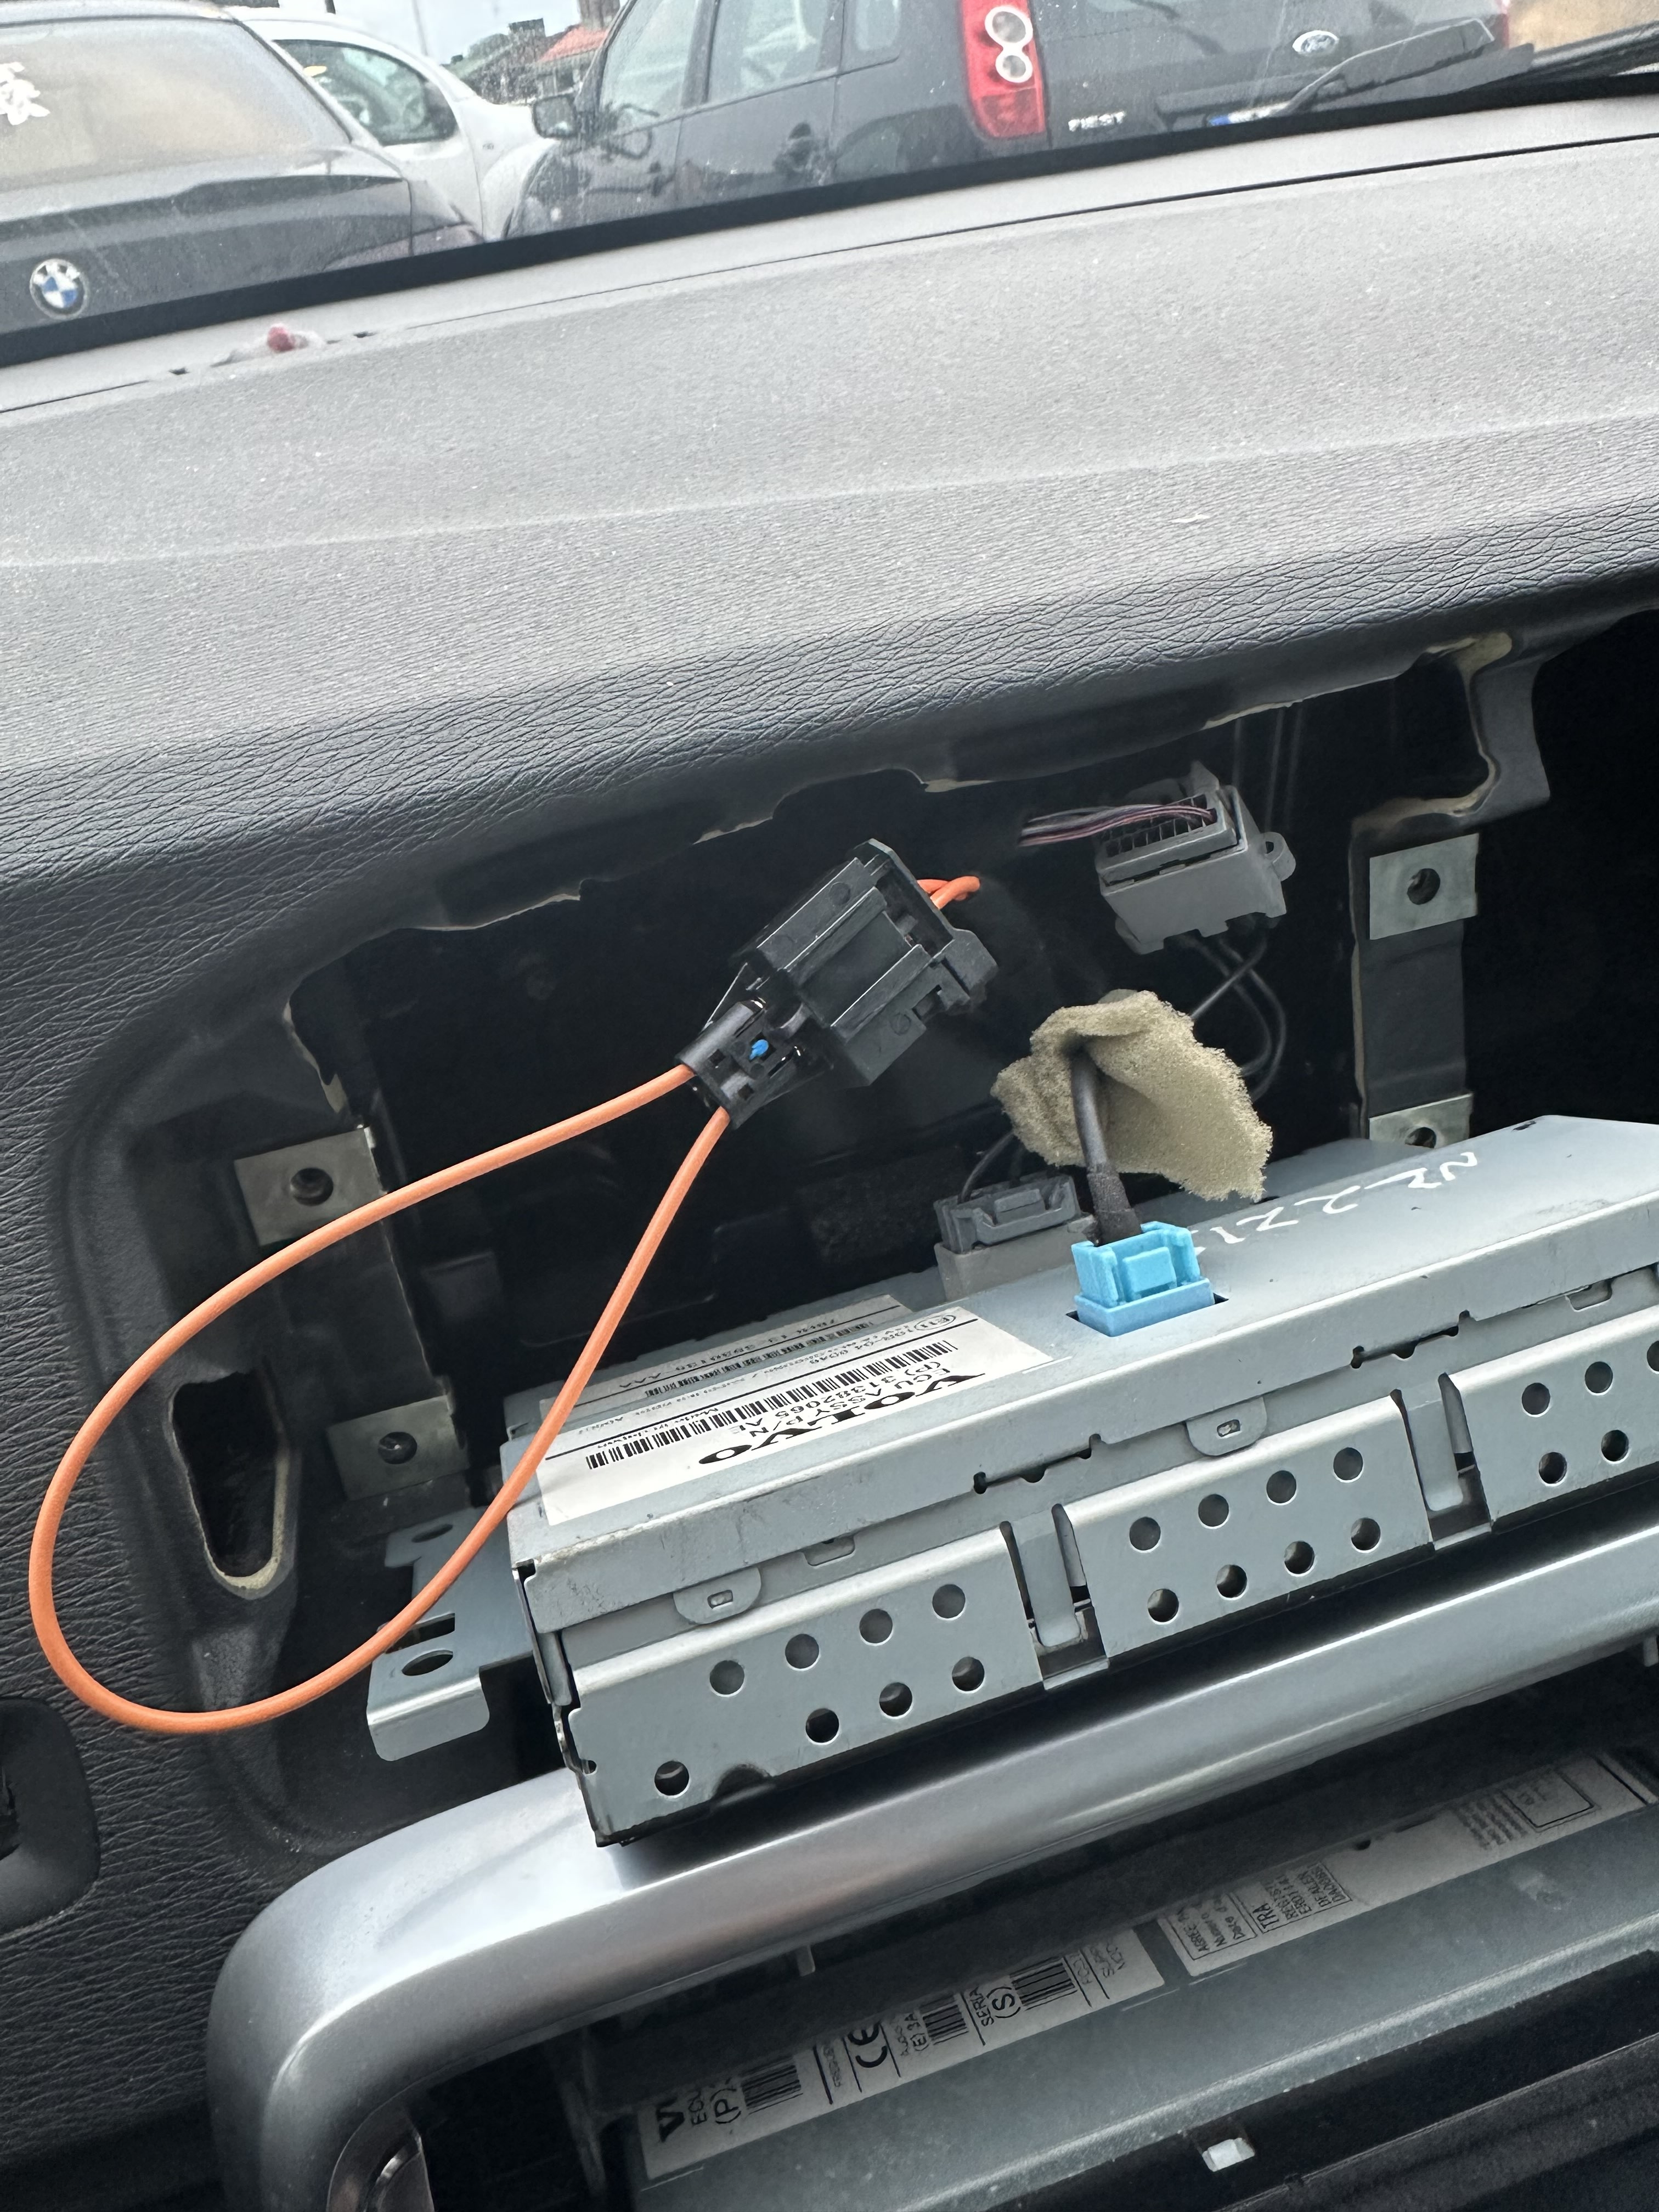
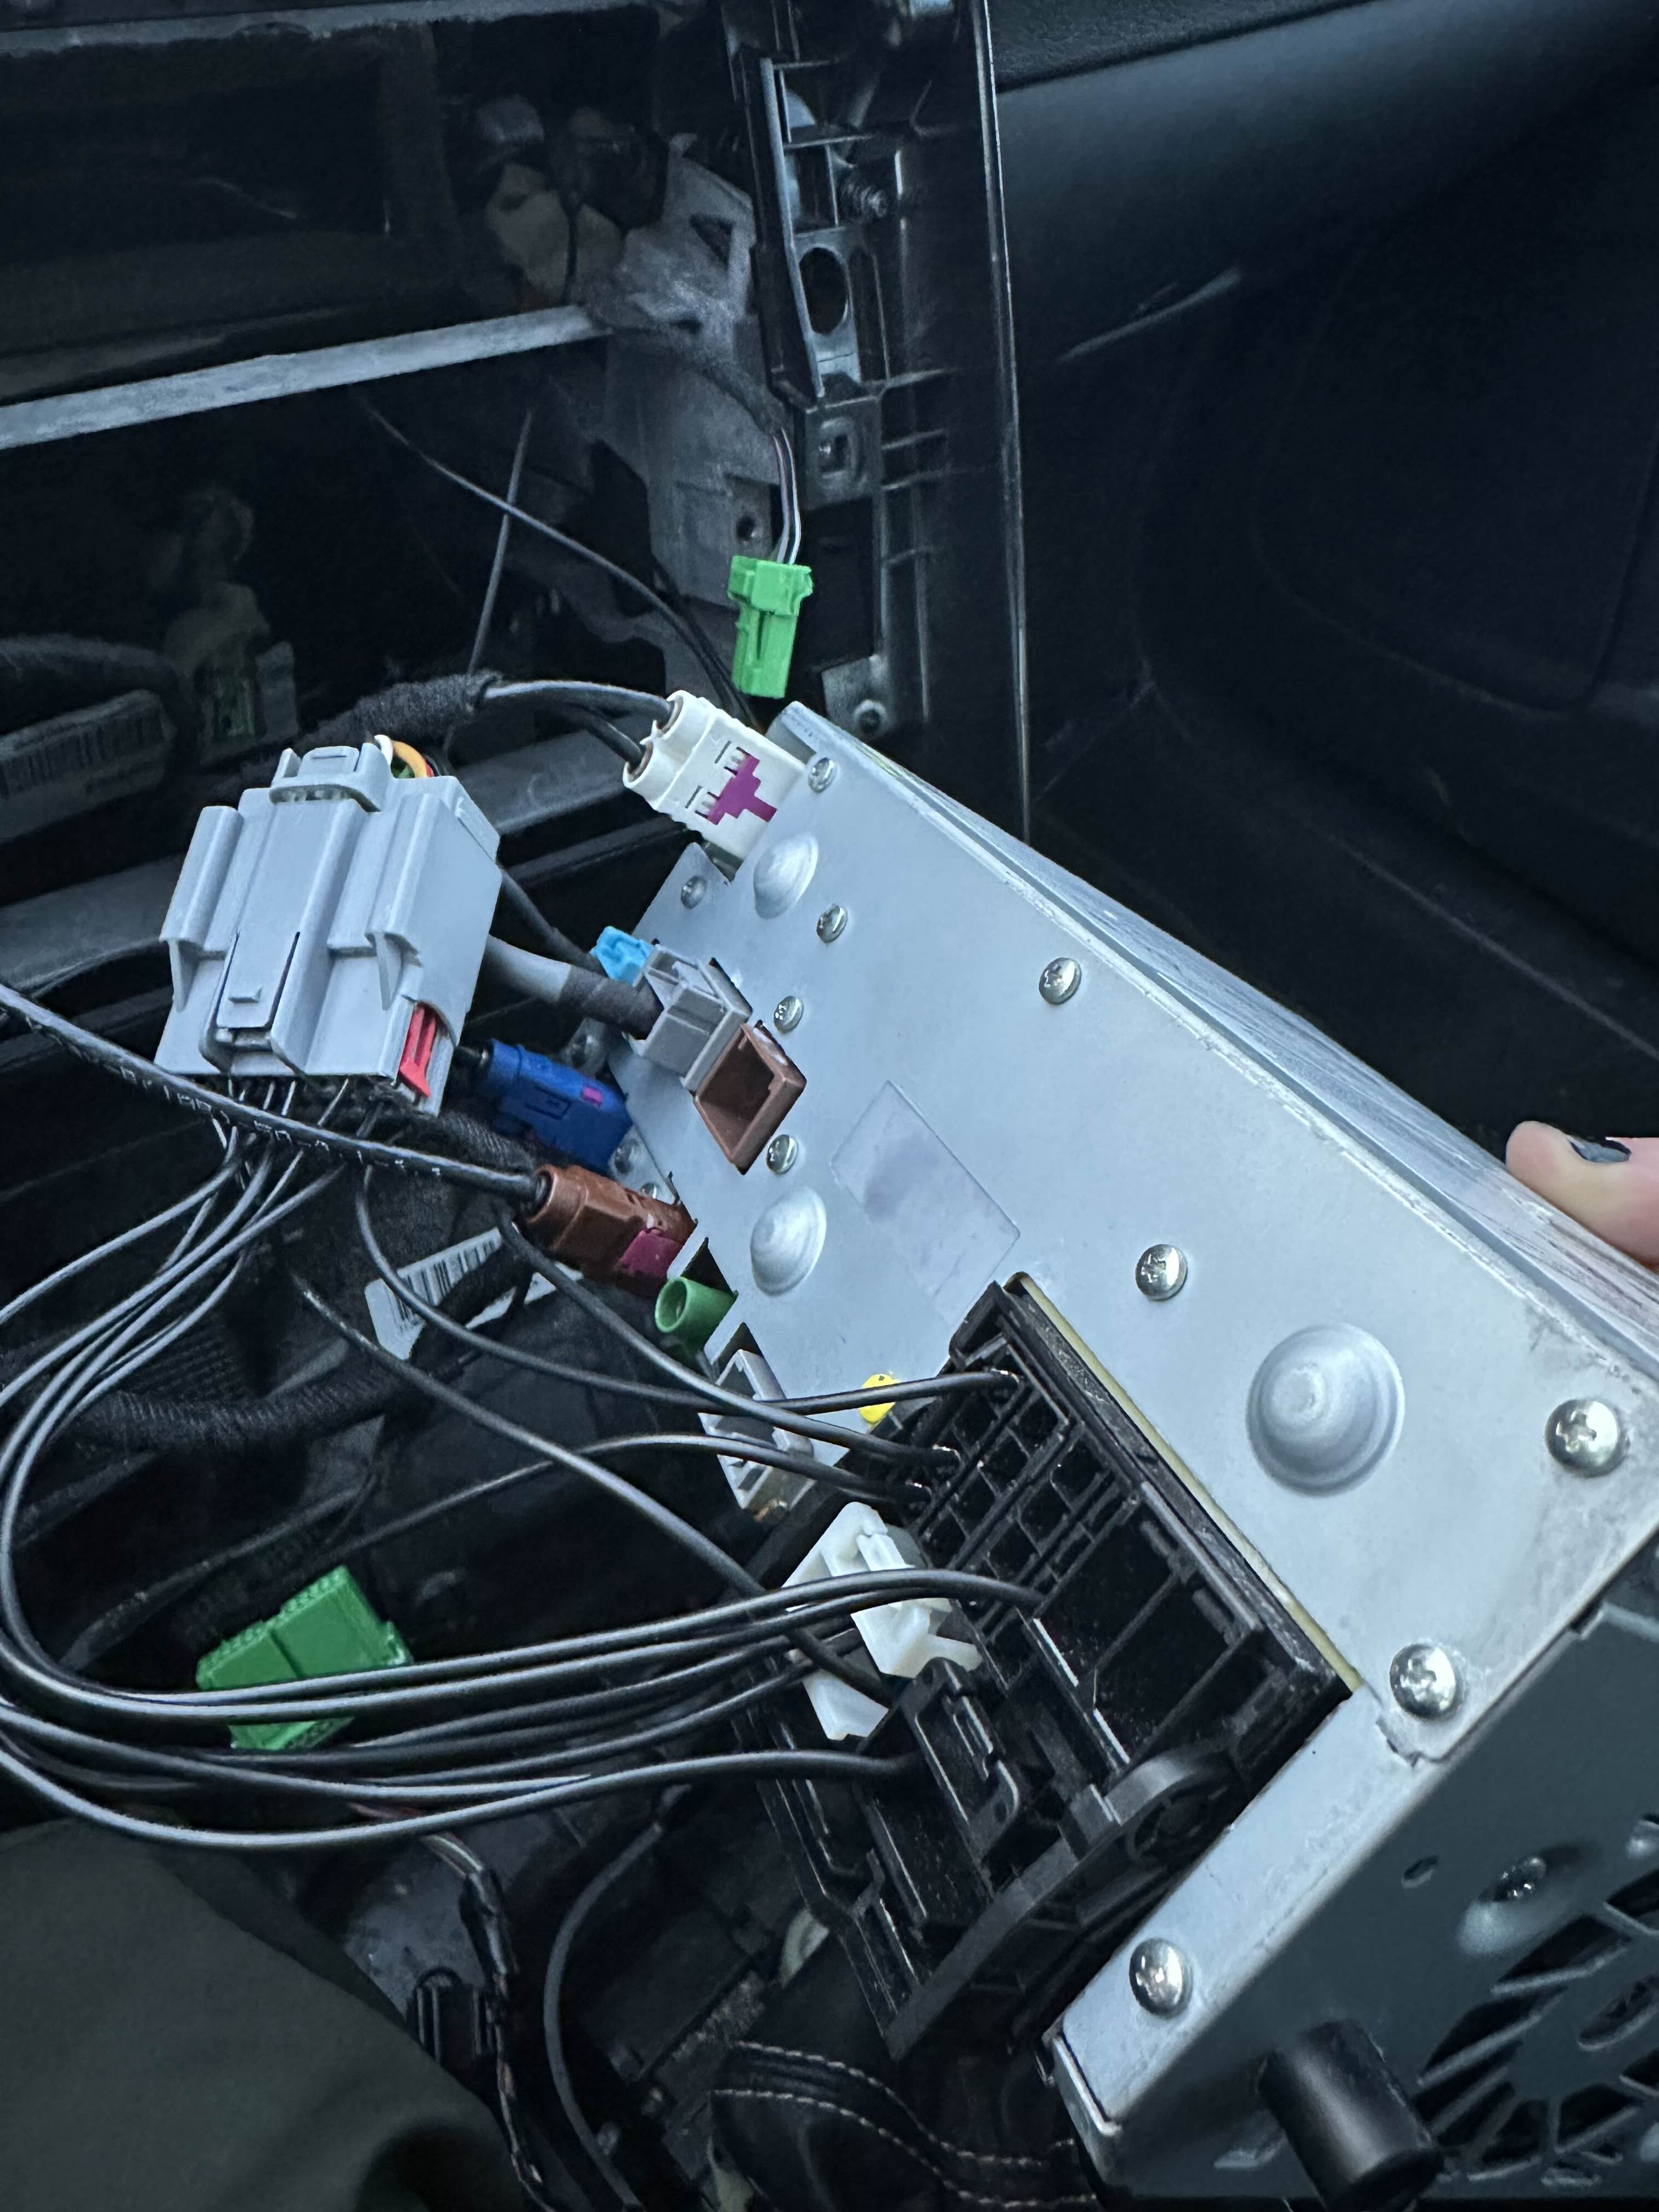
Connecting the new IHU:
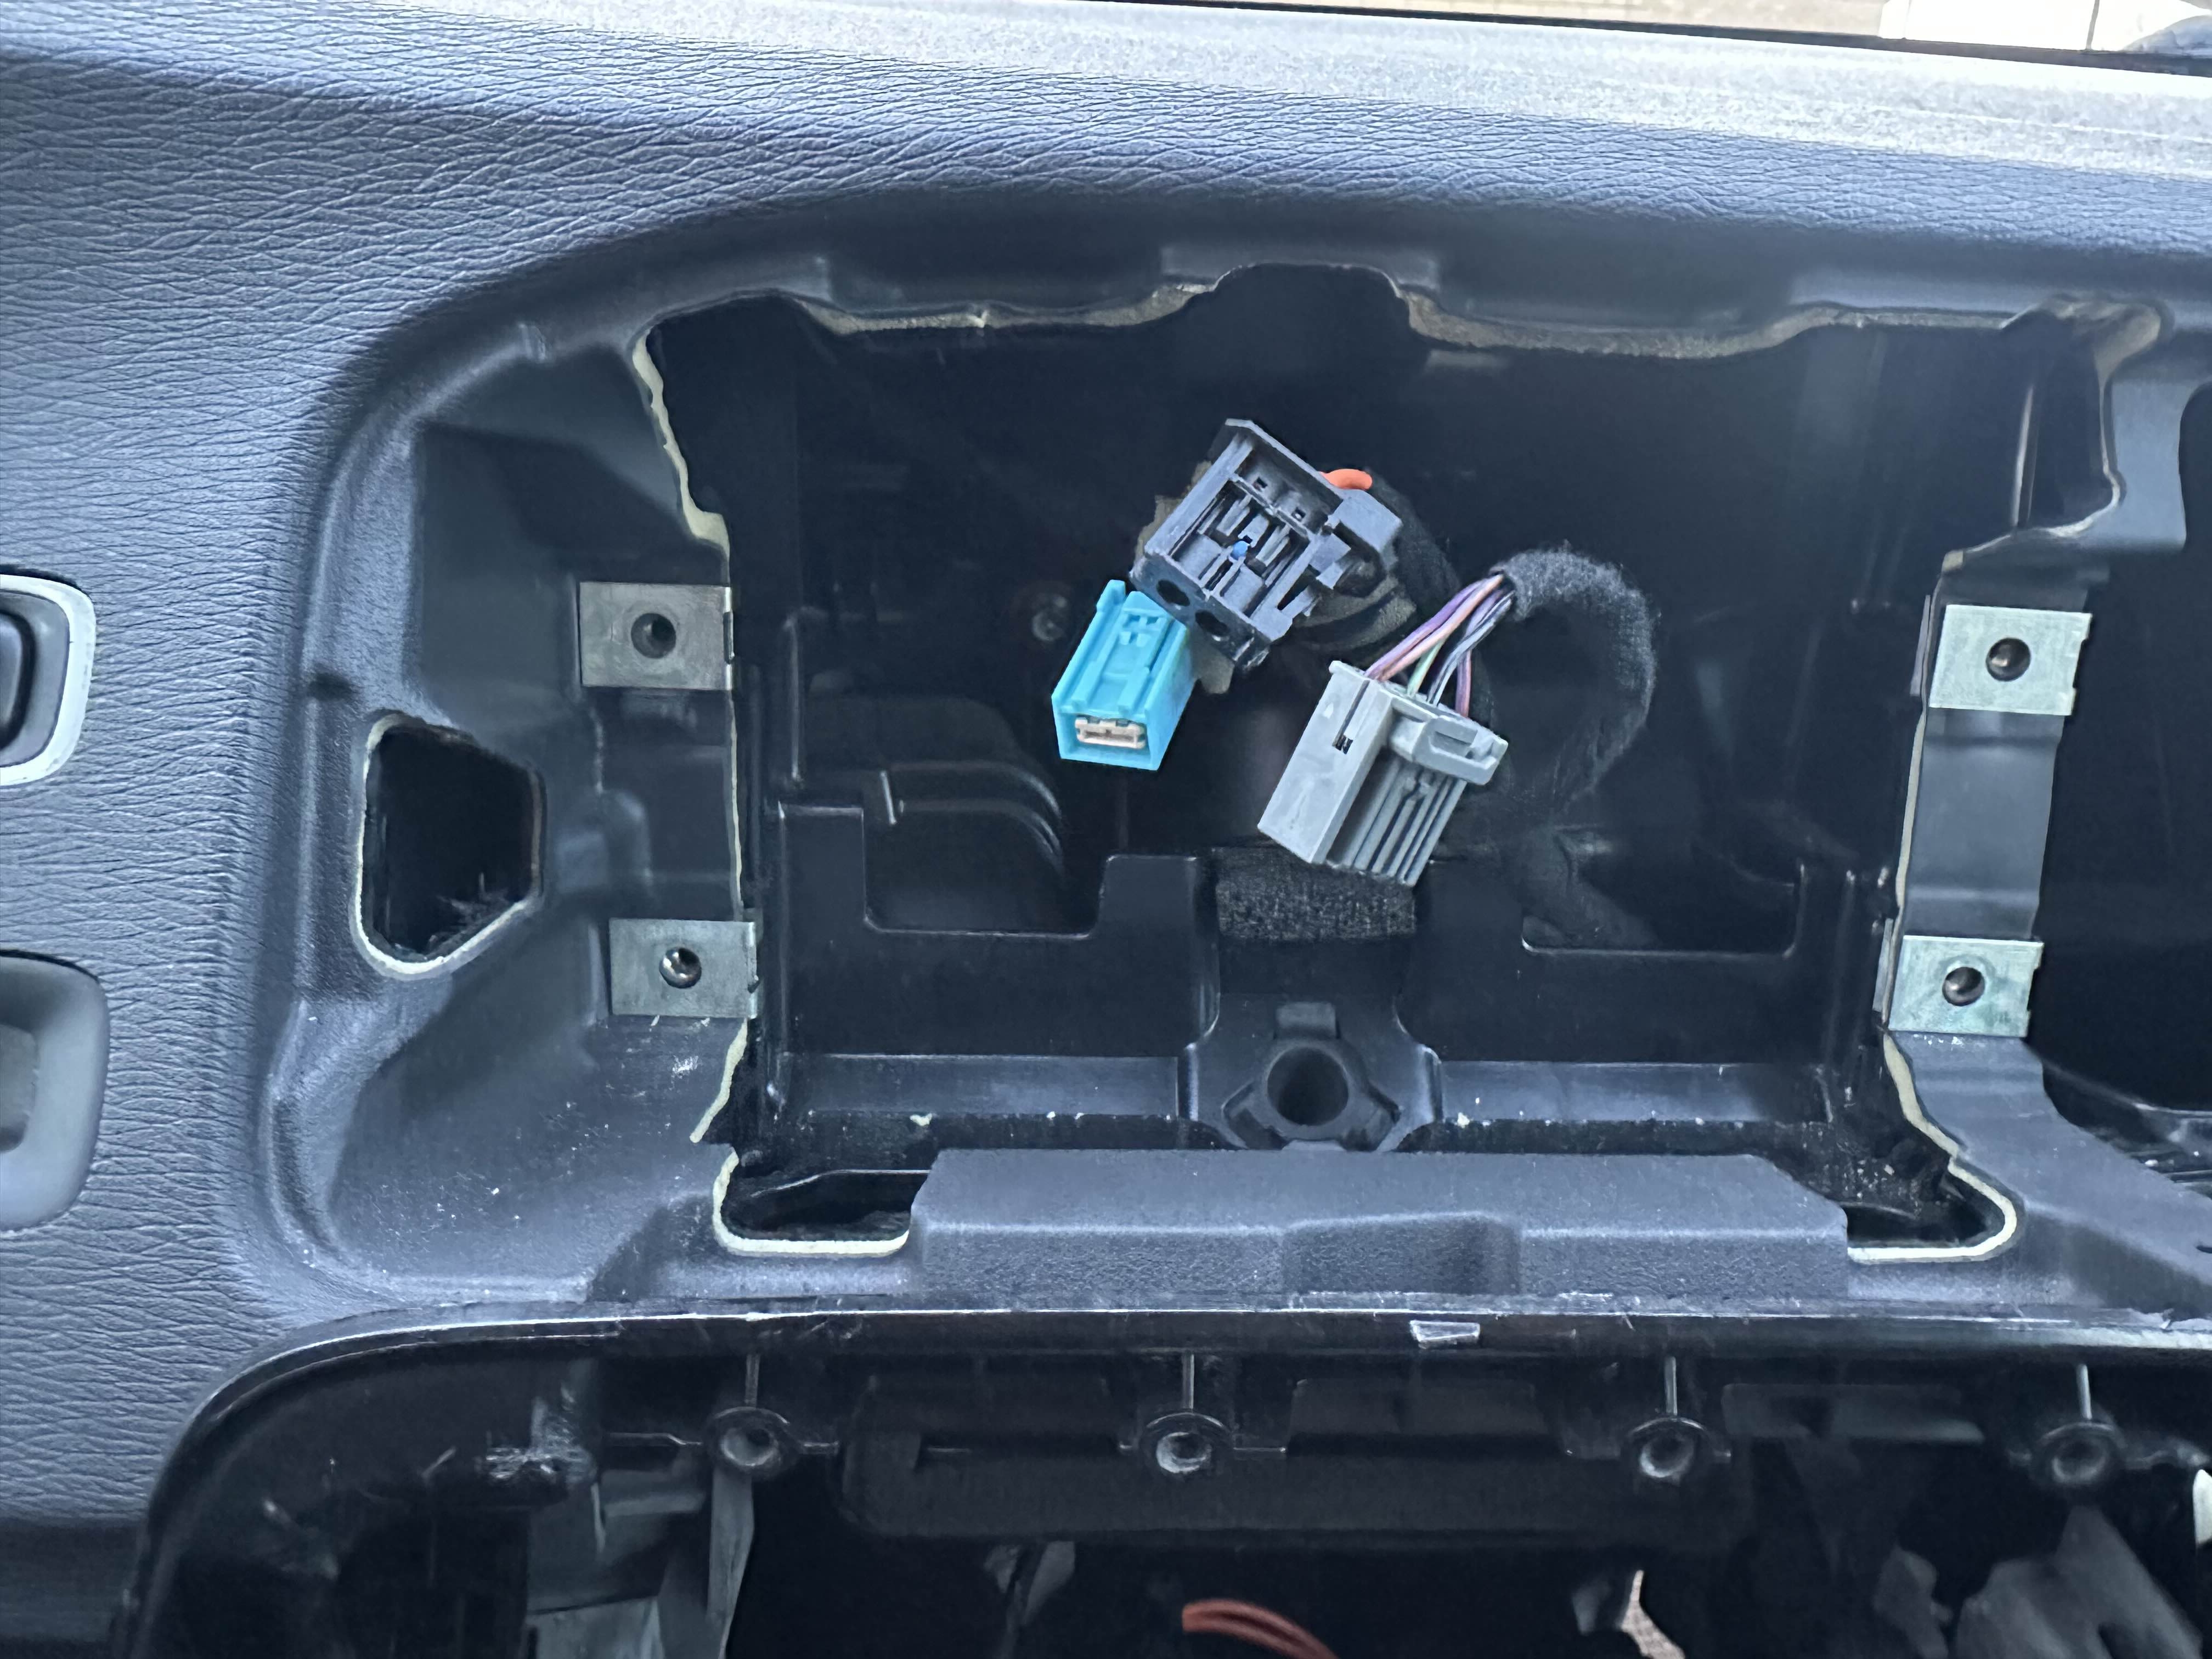
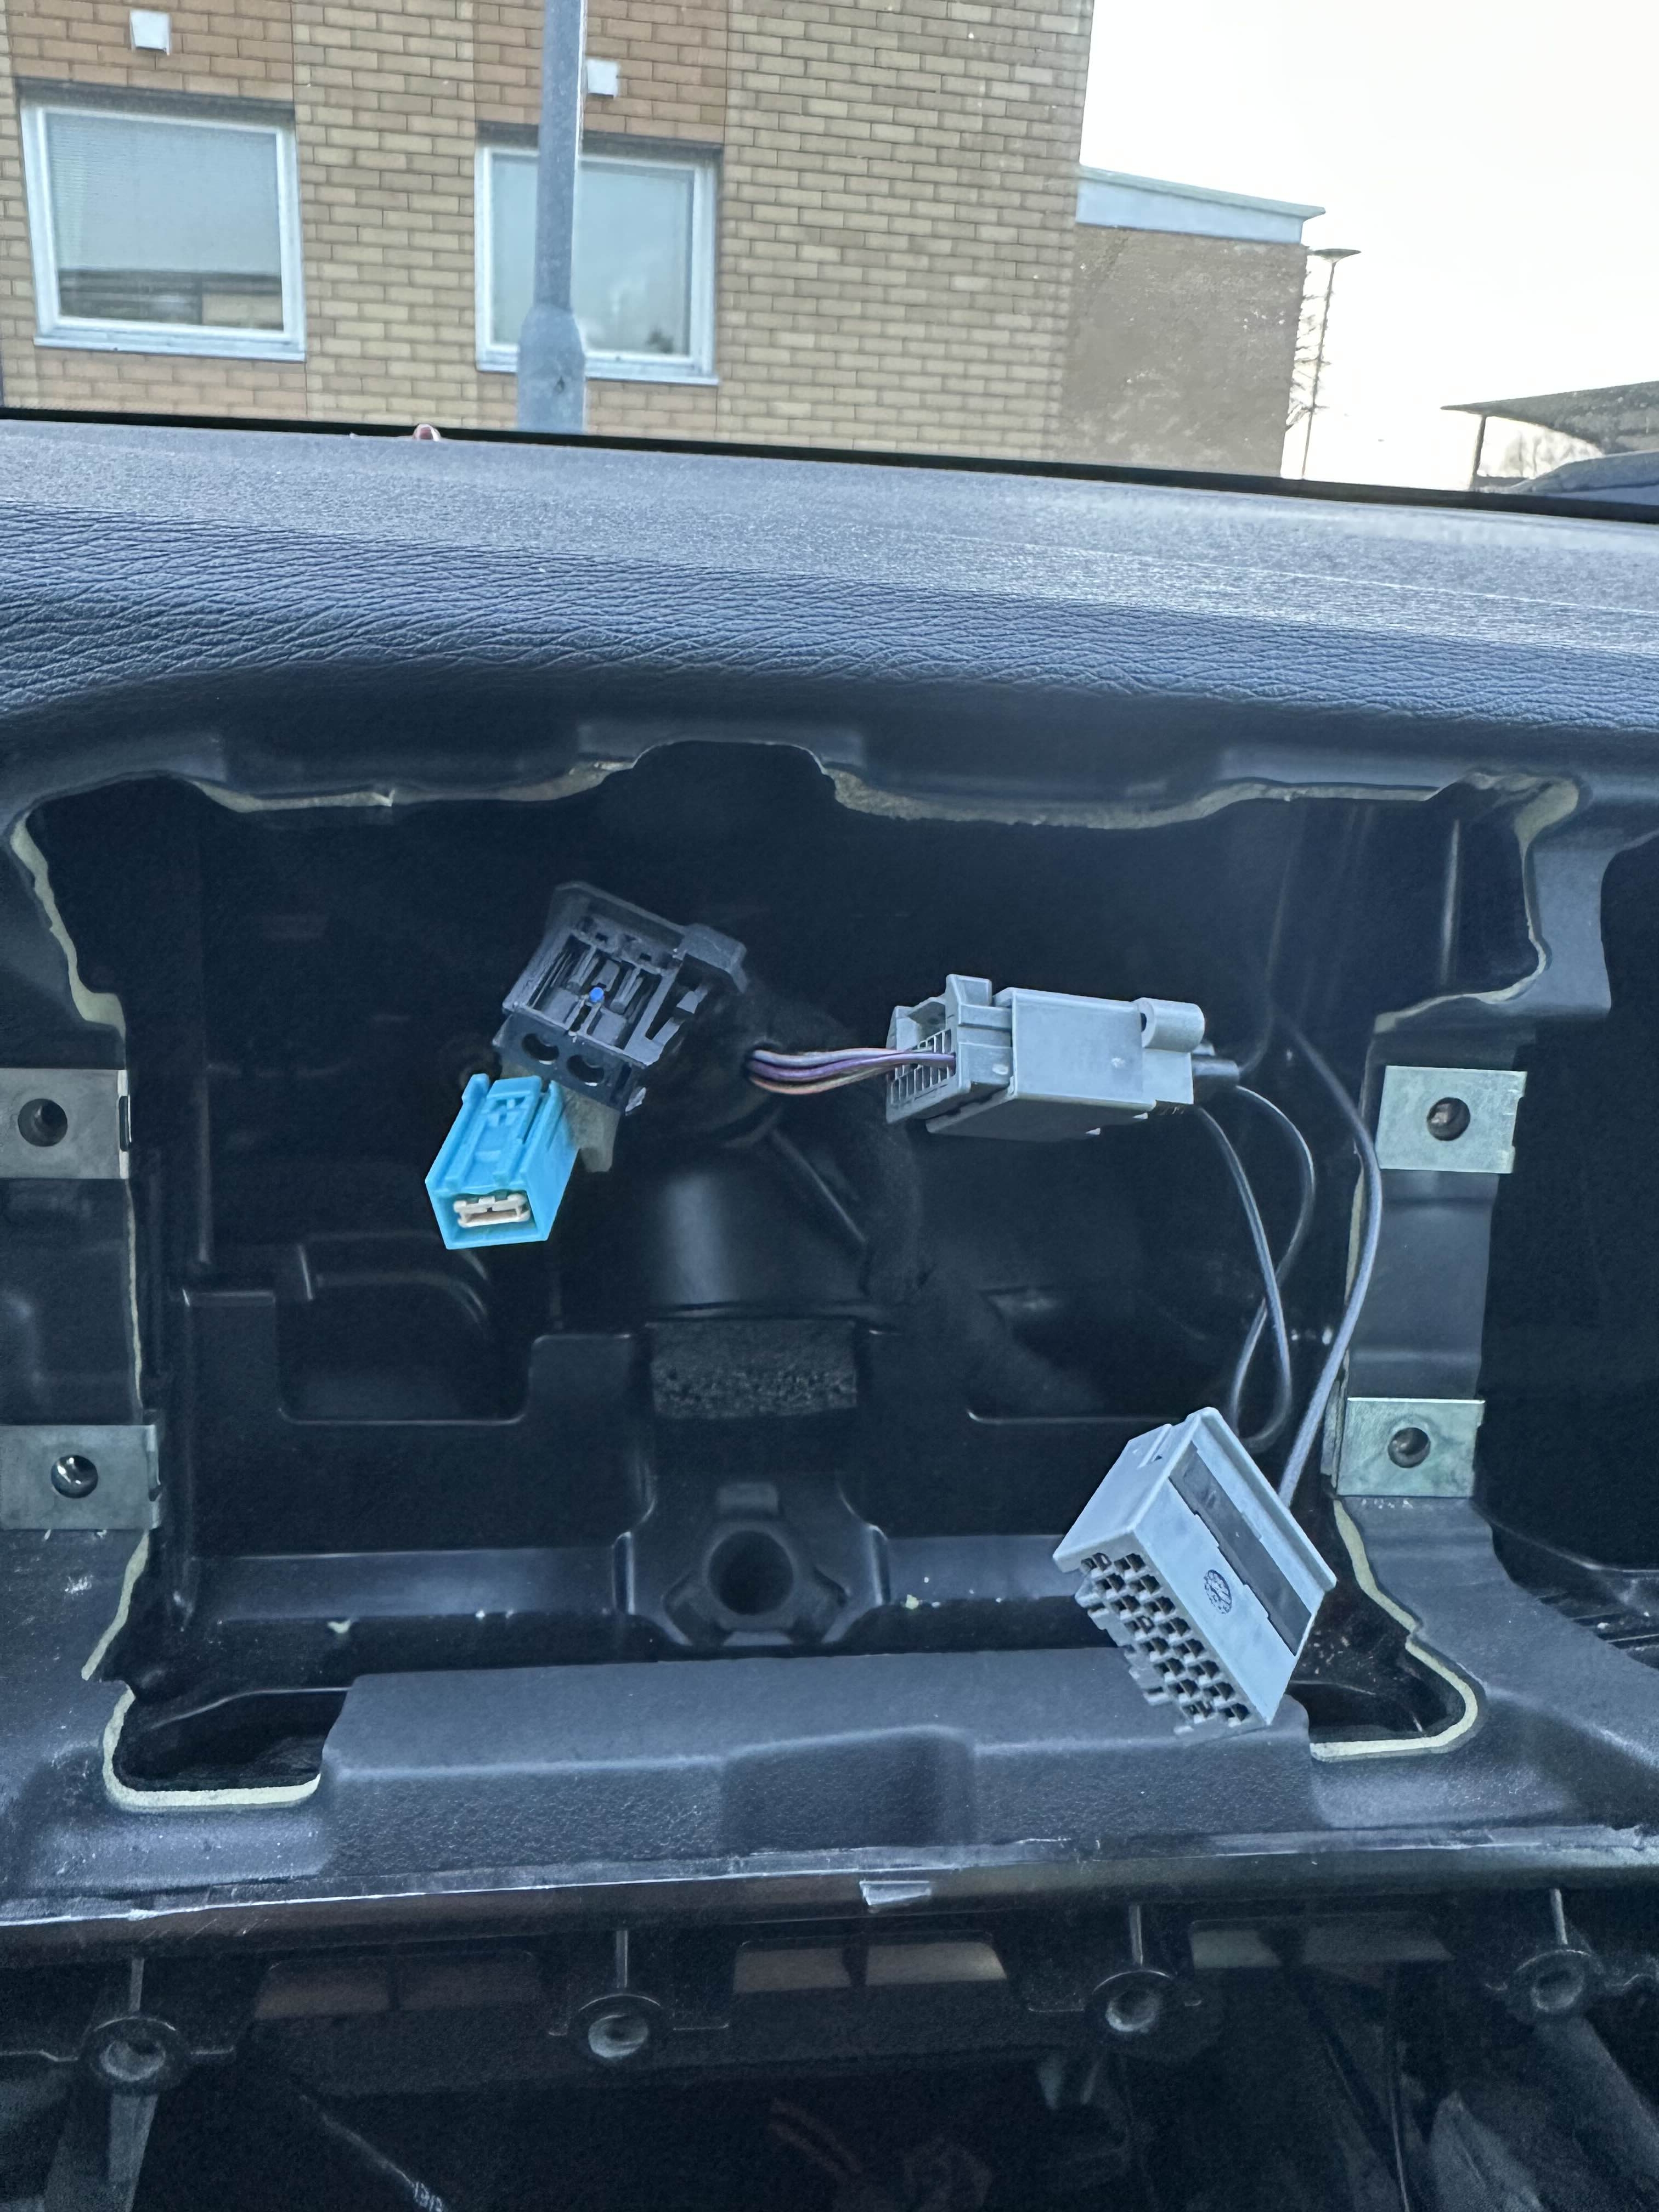
Something to note before re-installing the new headunit and screen is that 1-3 connectors (depending on vehicle spec) have now moved down to the headunit instead of being behind the display.
The green and brown FAKRA connector (rear seat entertainment and rear park assist camera) as well as the smaller gray plug (front park assist camera) will have to be moved down to the IHU.
This is because the old display, known as the ICM was an ECU which handled basically all of the video connections, the display we're replacing the ICM with however is just a display with power and a single video signal, so whatever went into the ICM (excluding the larger gray plug and light blue plug) will have to be handled by the IHU.
This was the end result after having moved all my connectors in my car to their correct places:
Images
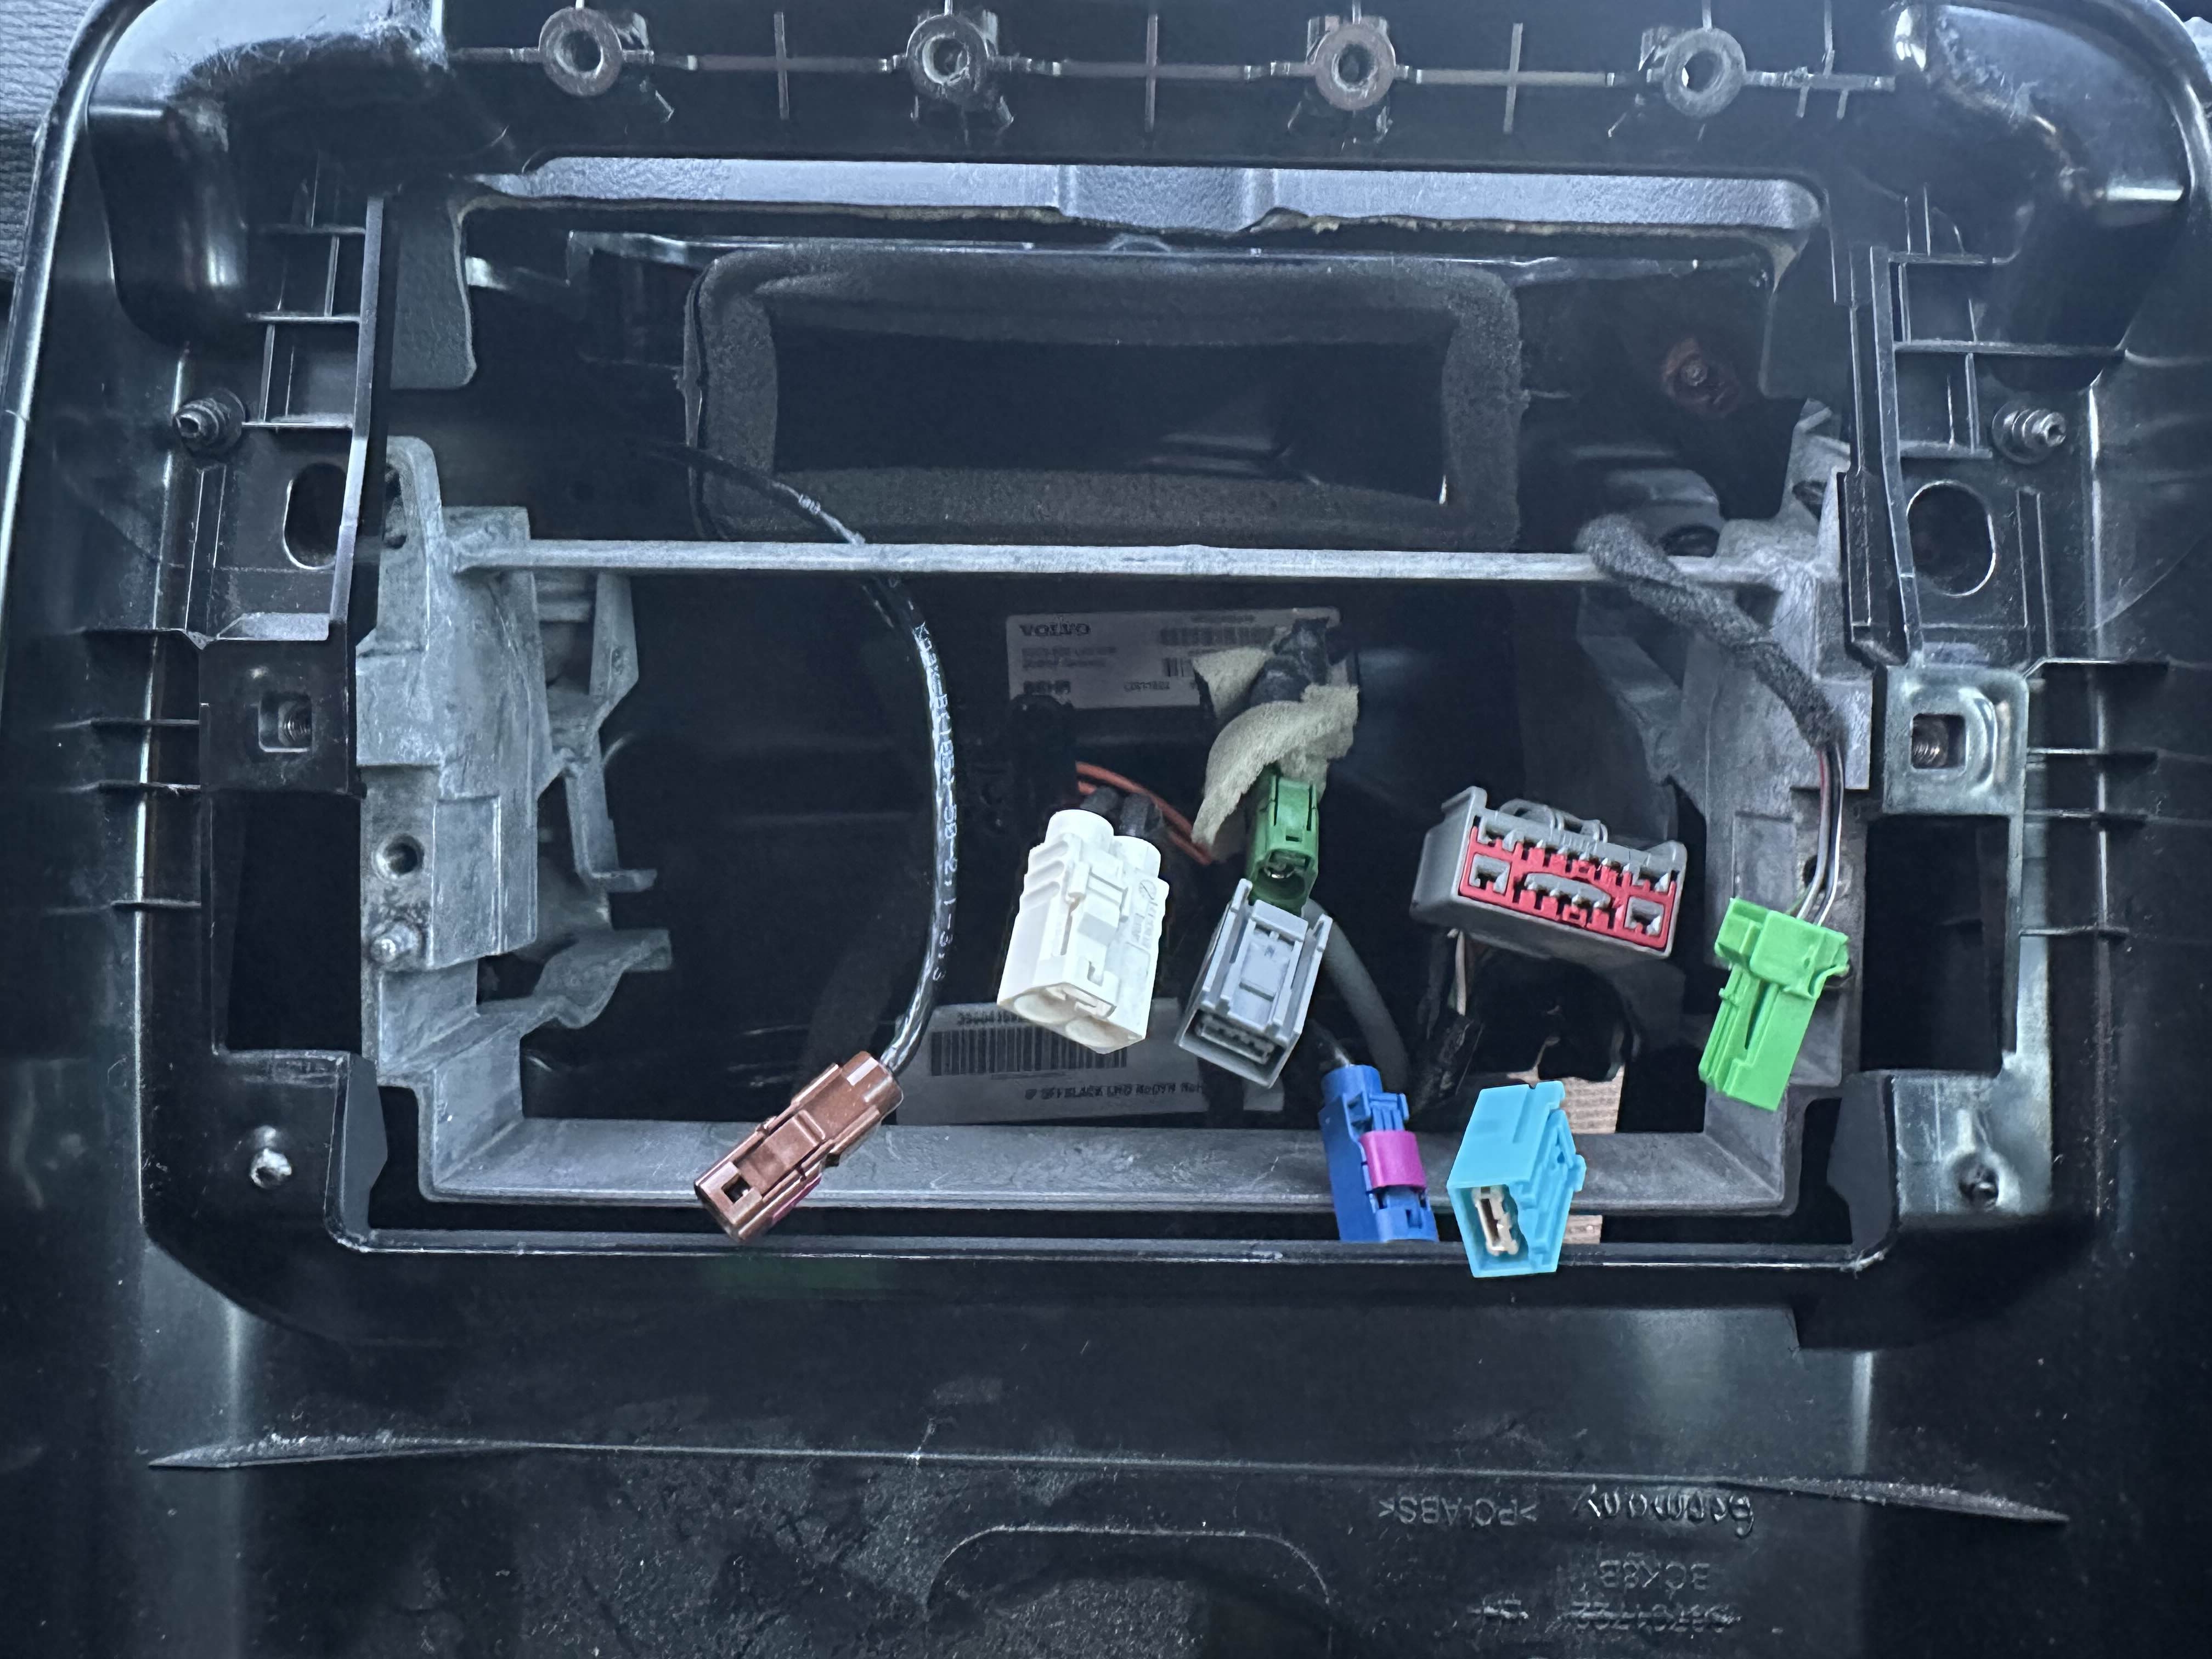
Yours may have less or more cables depending on your vehicle spec.
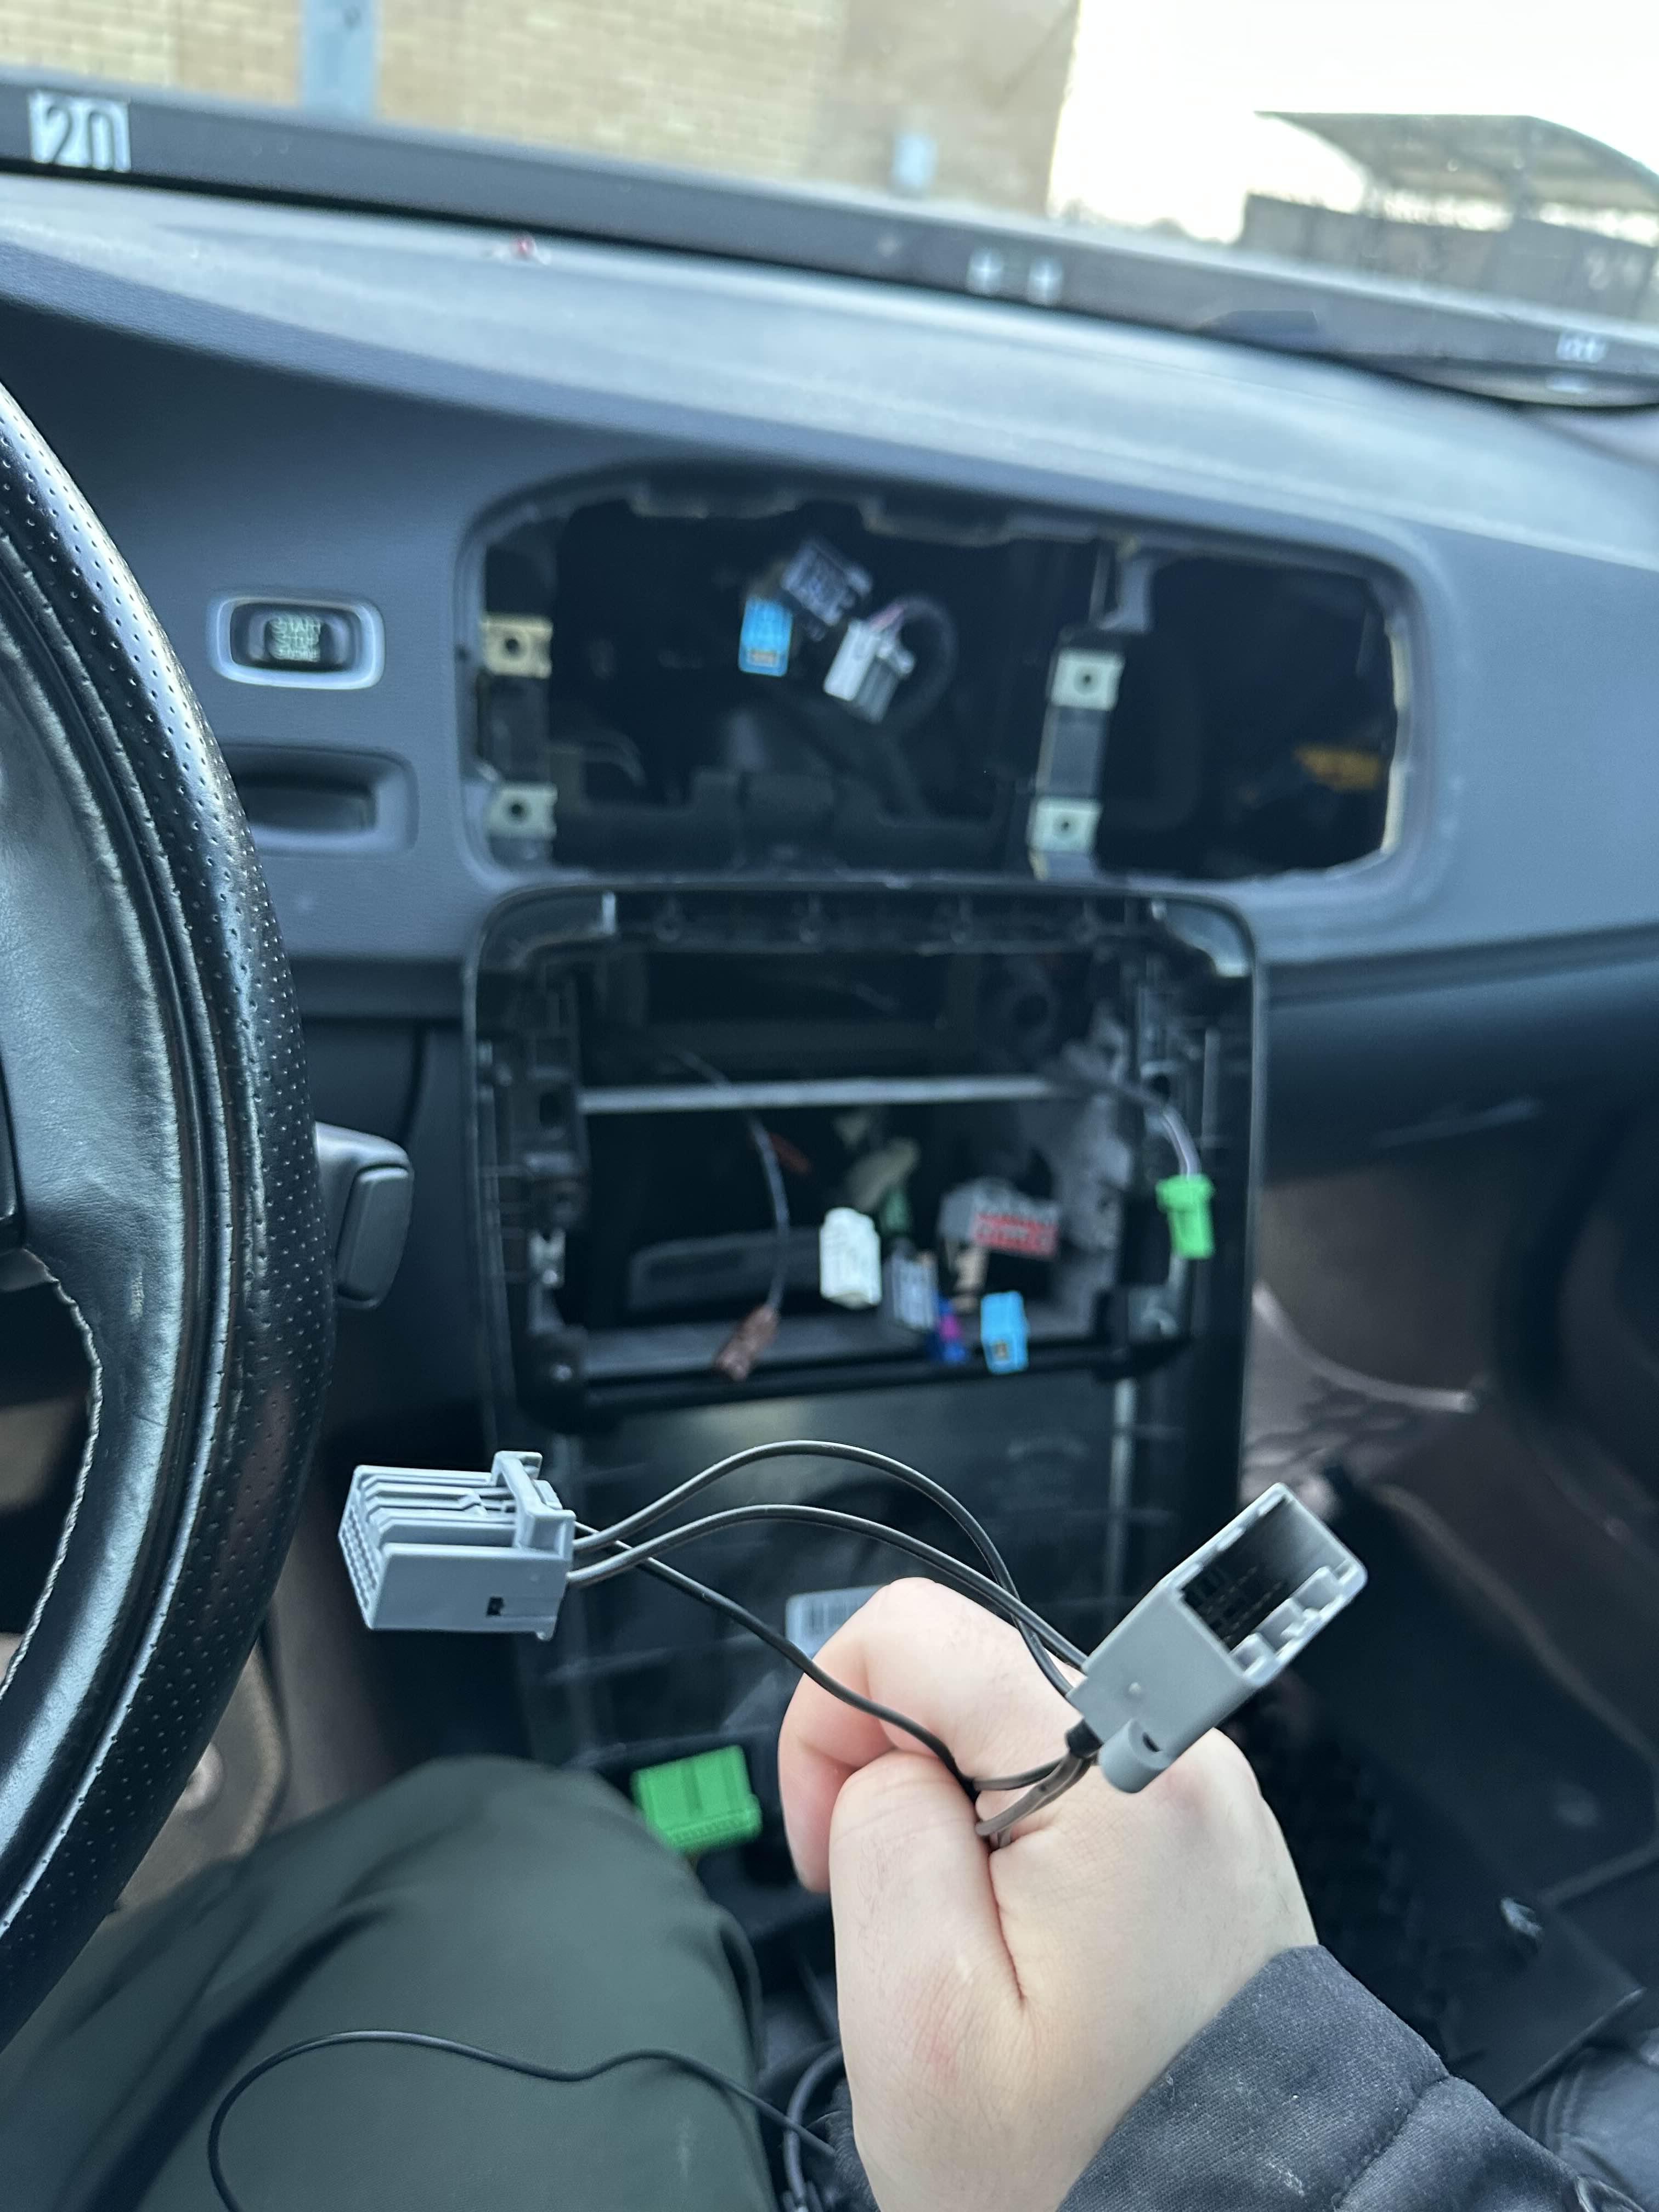
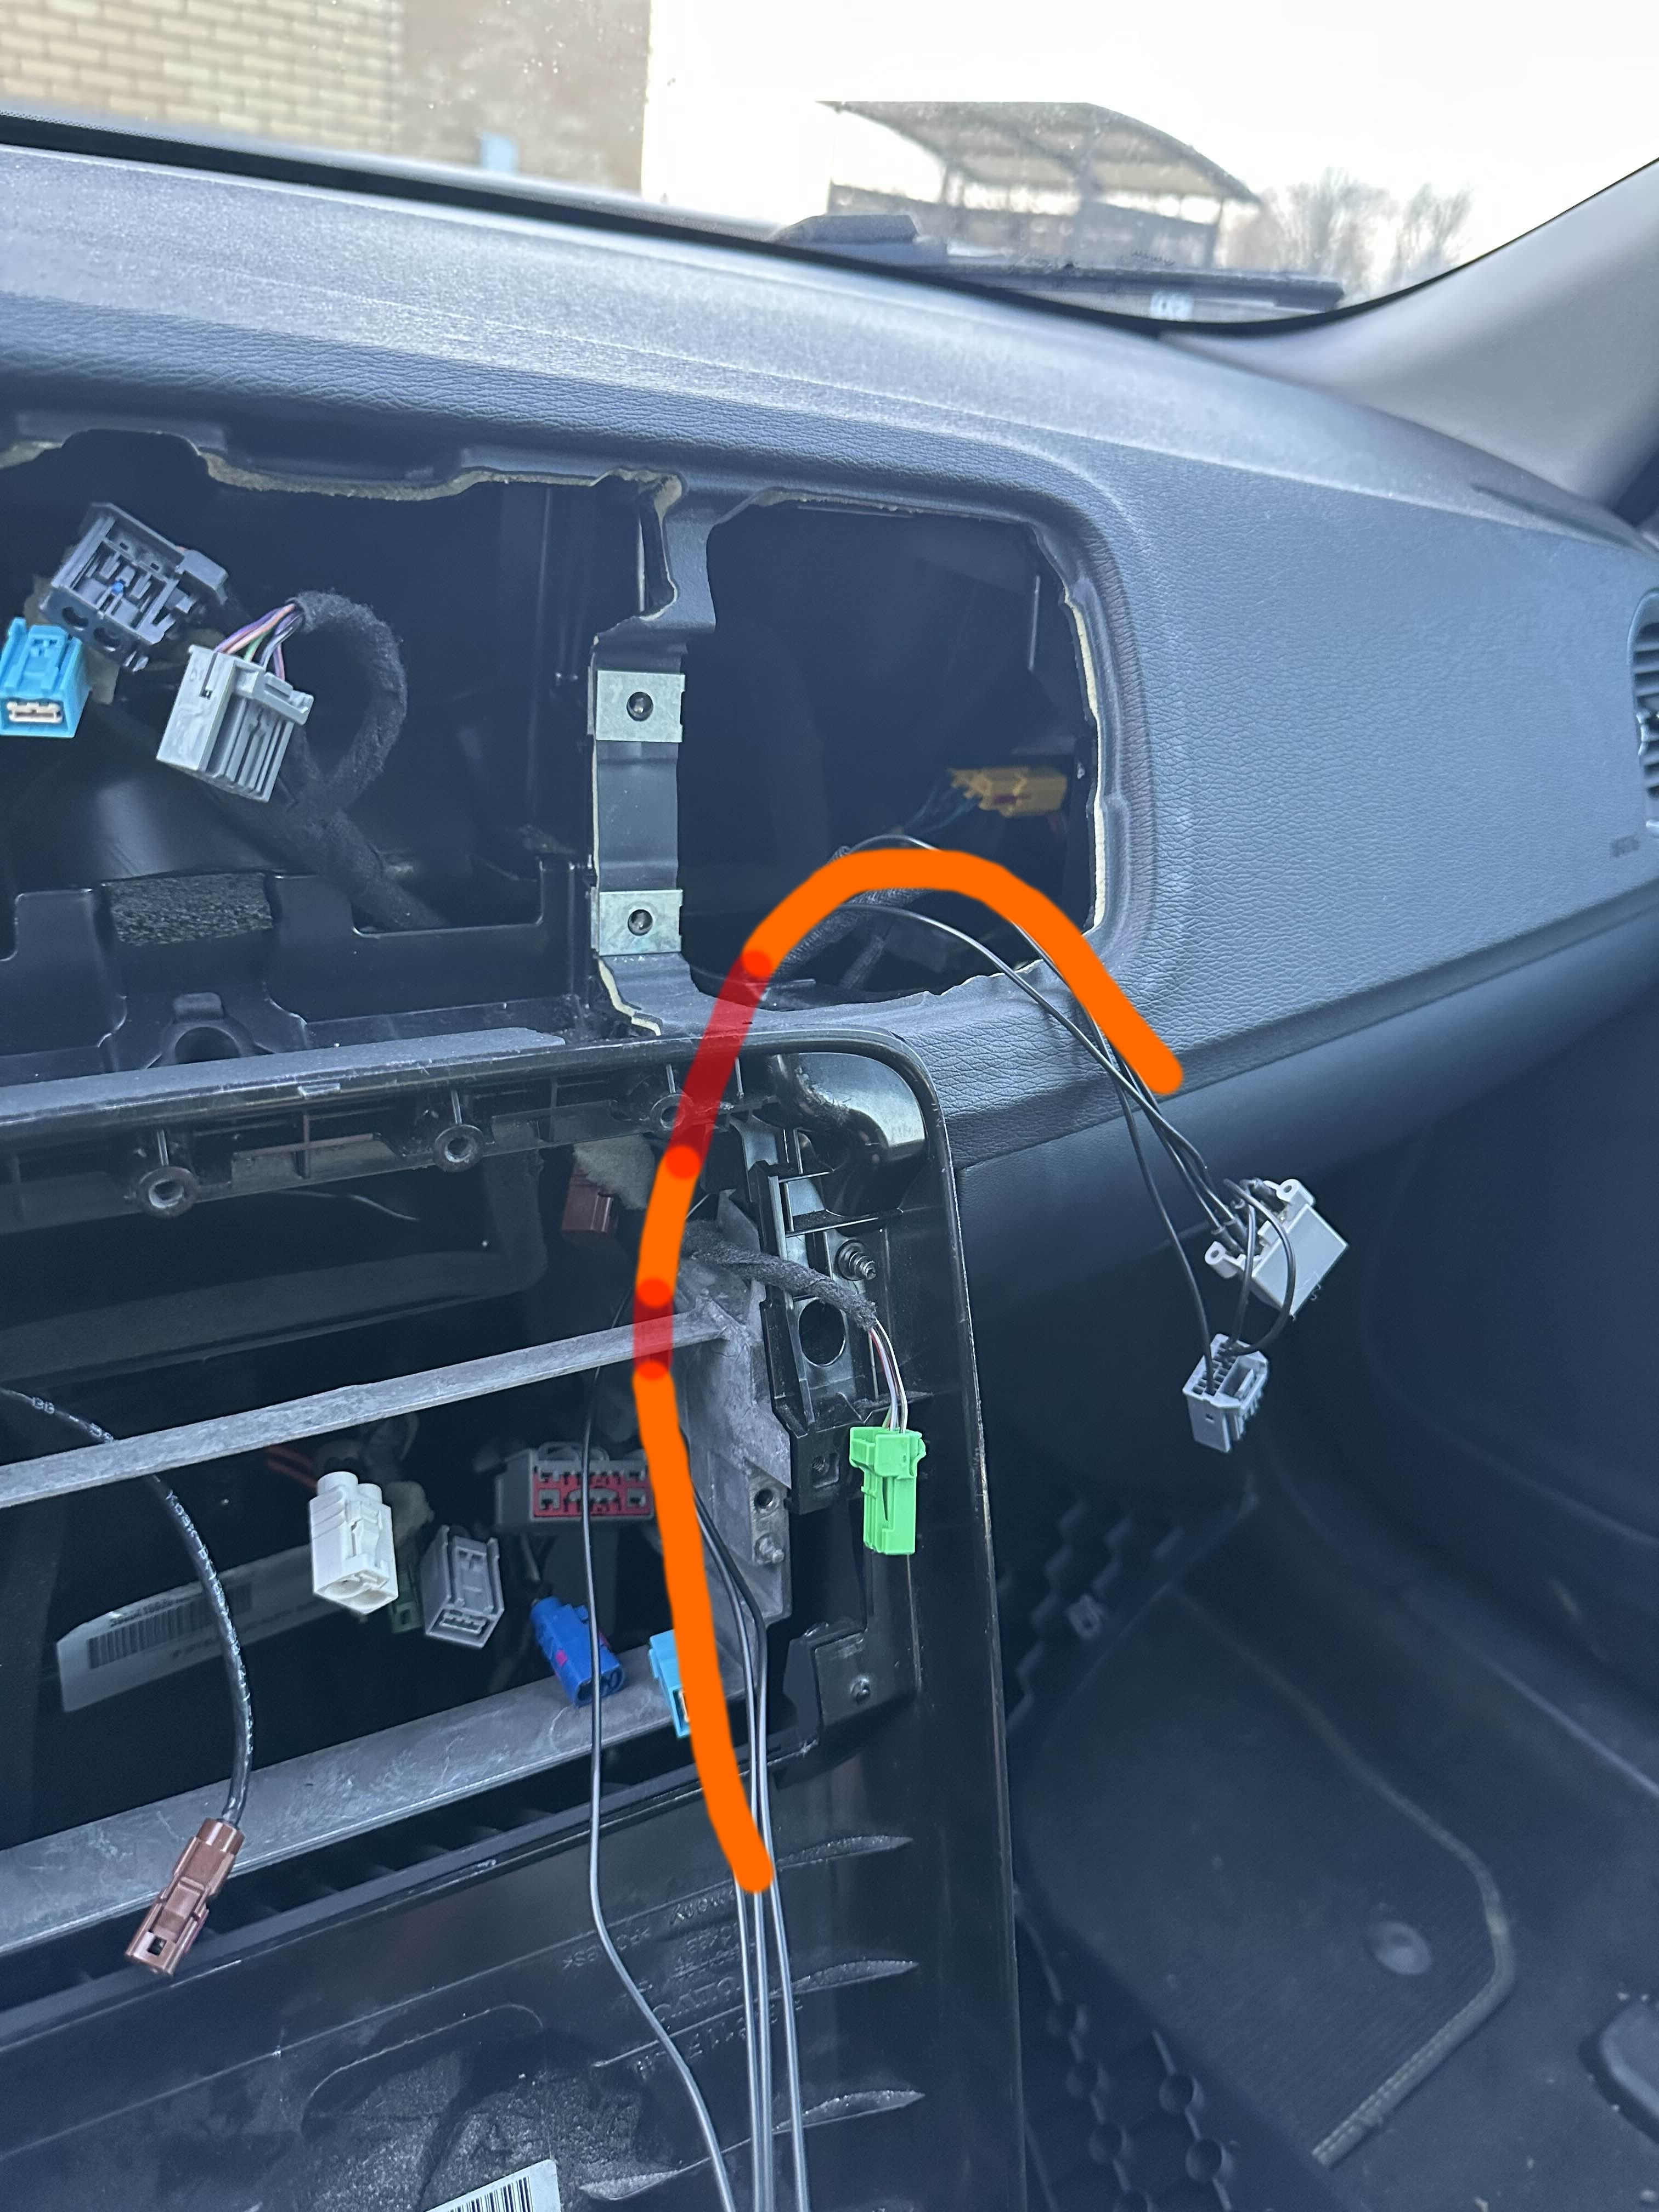
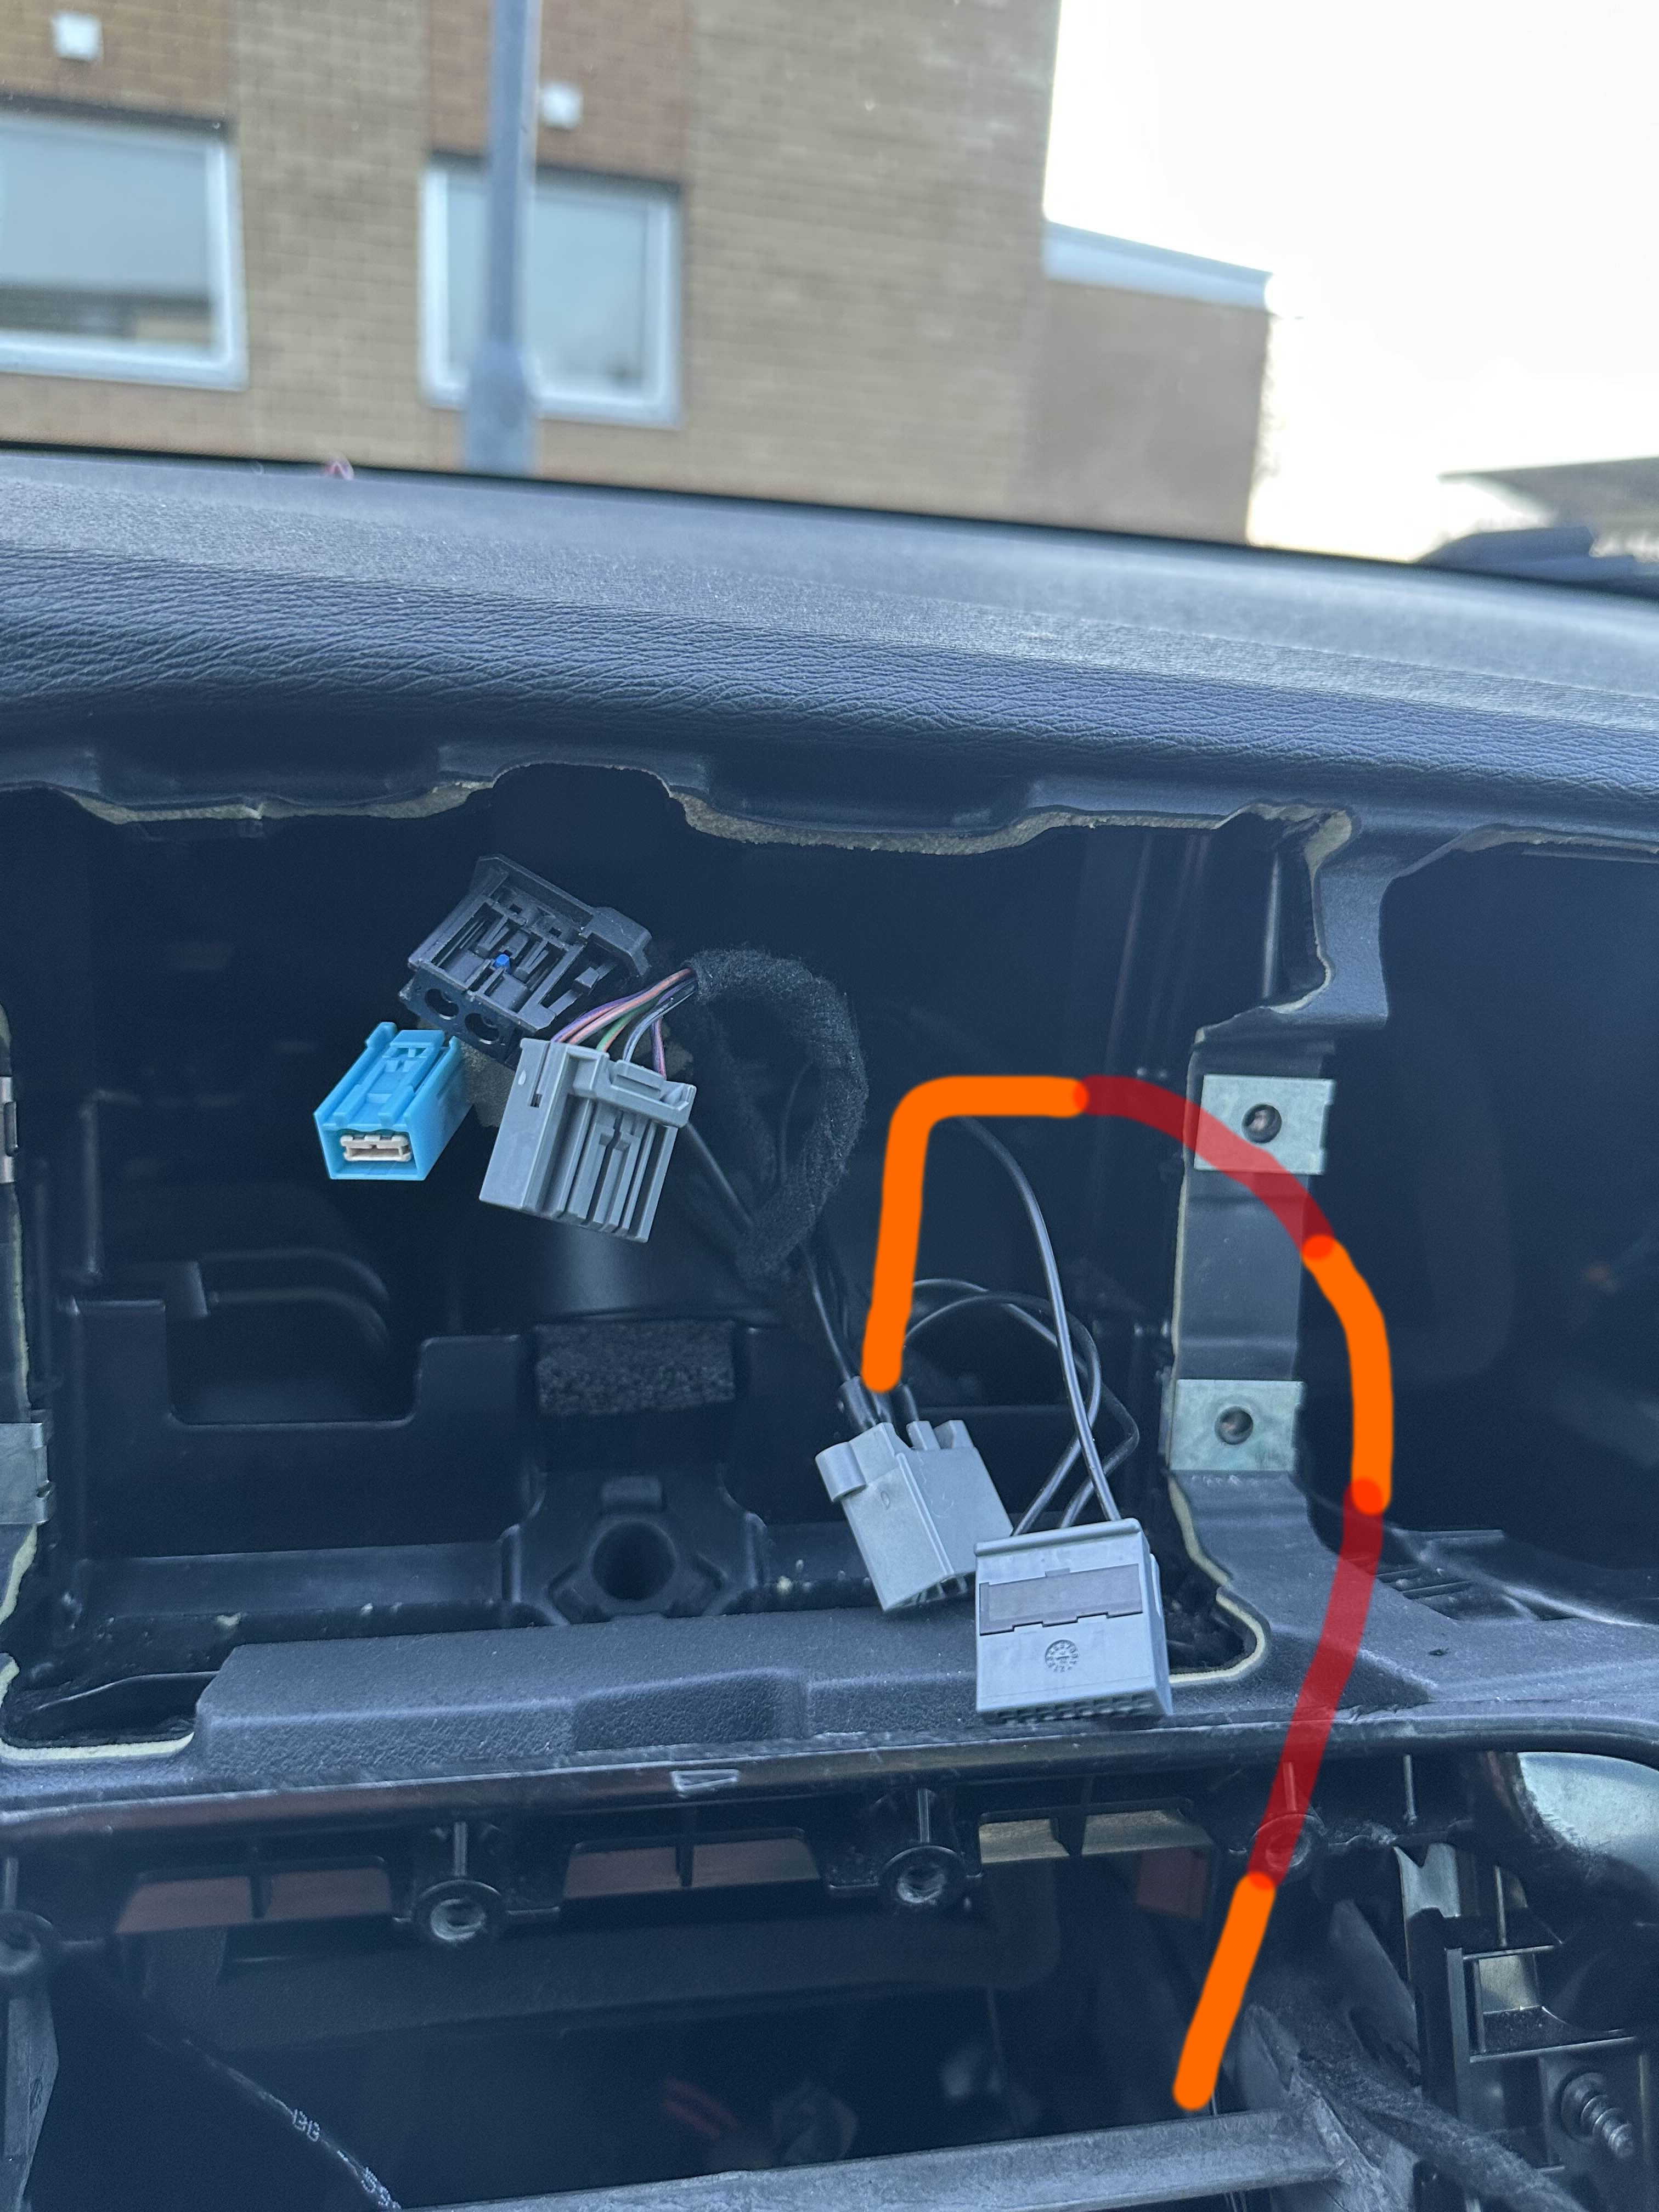
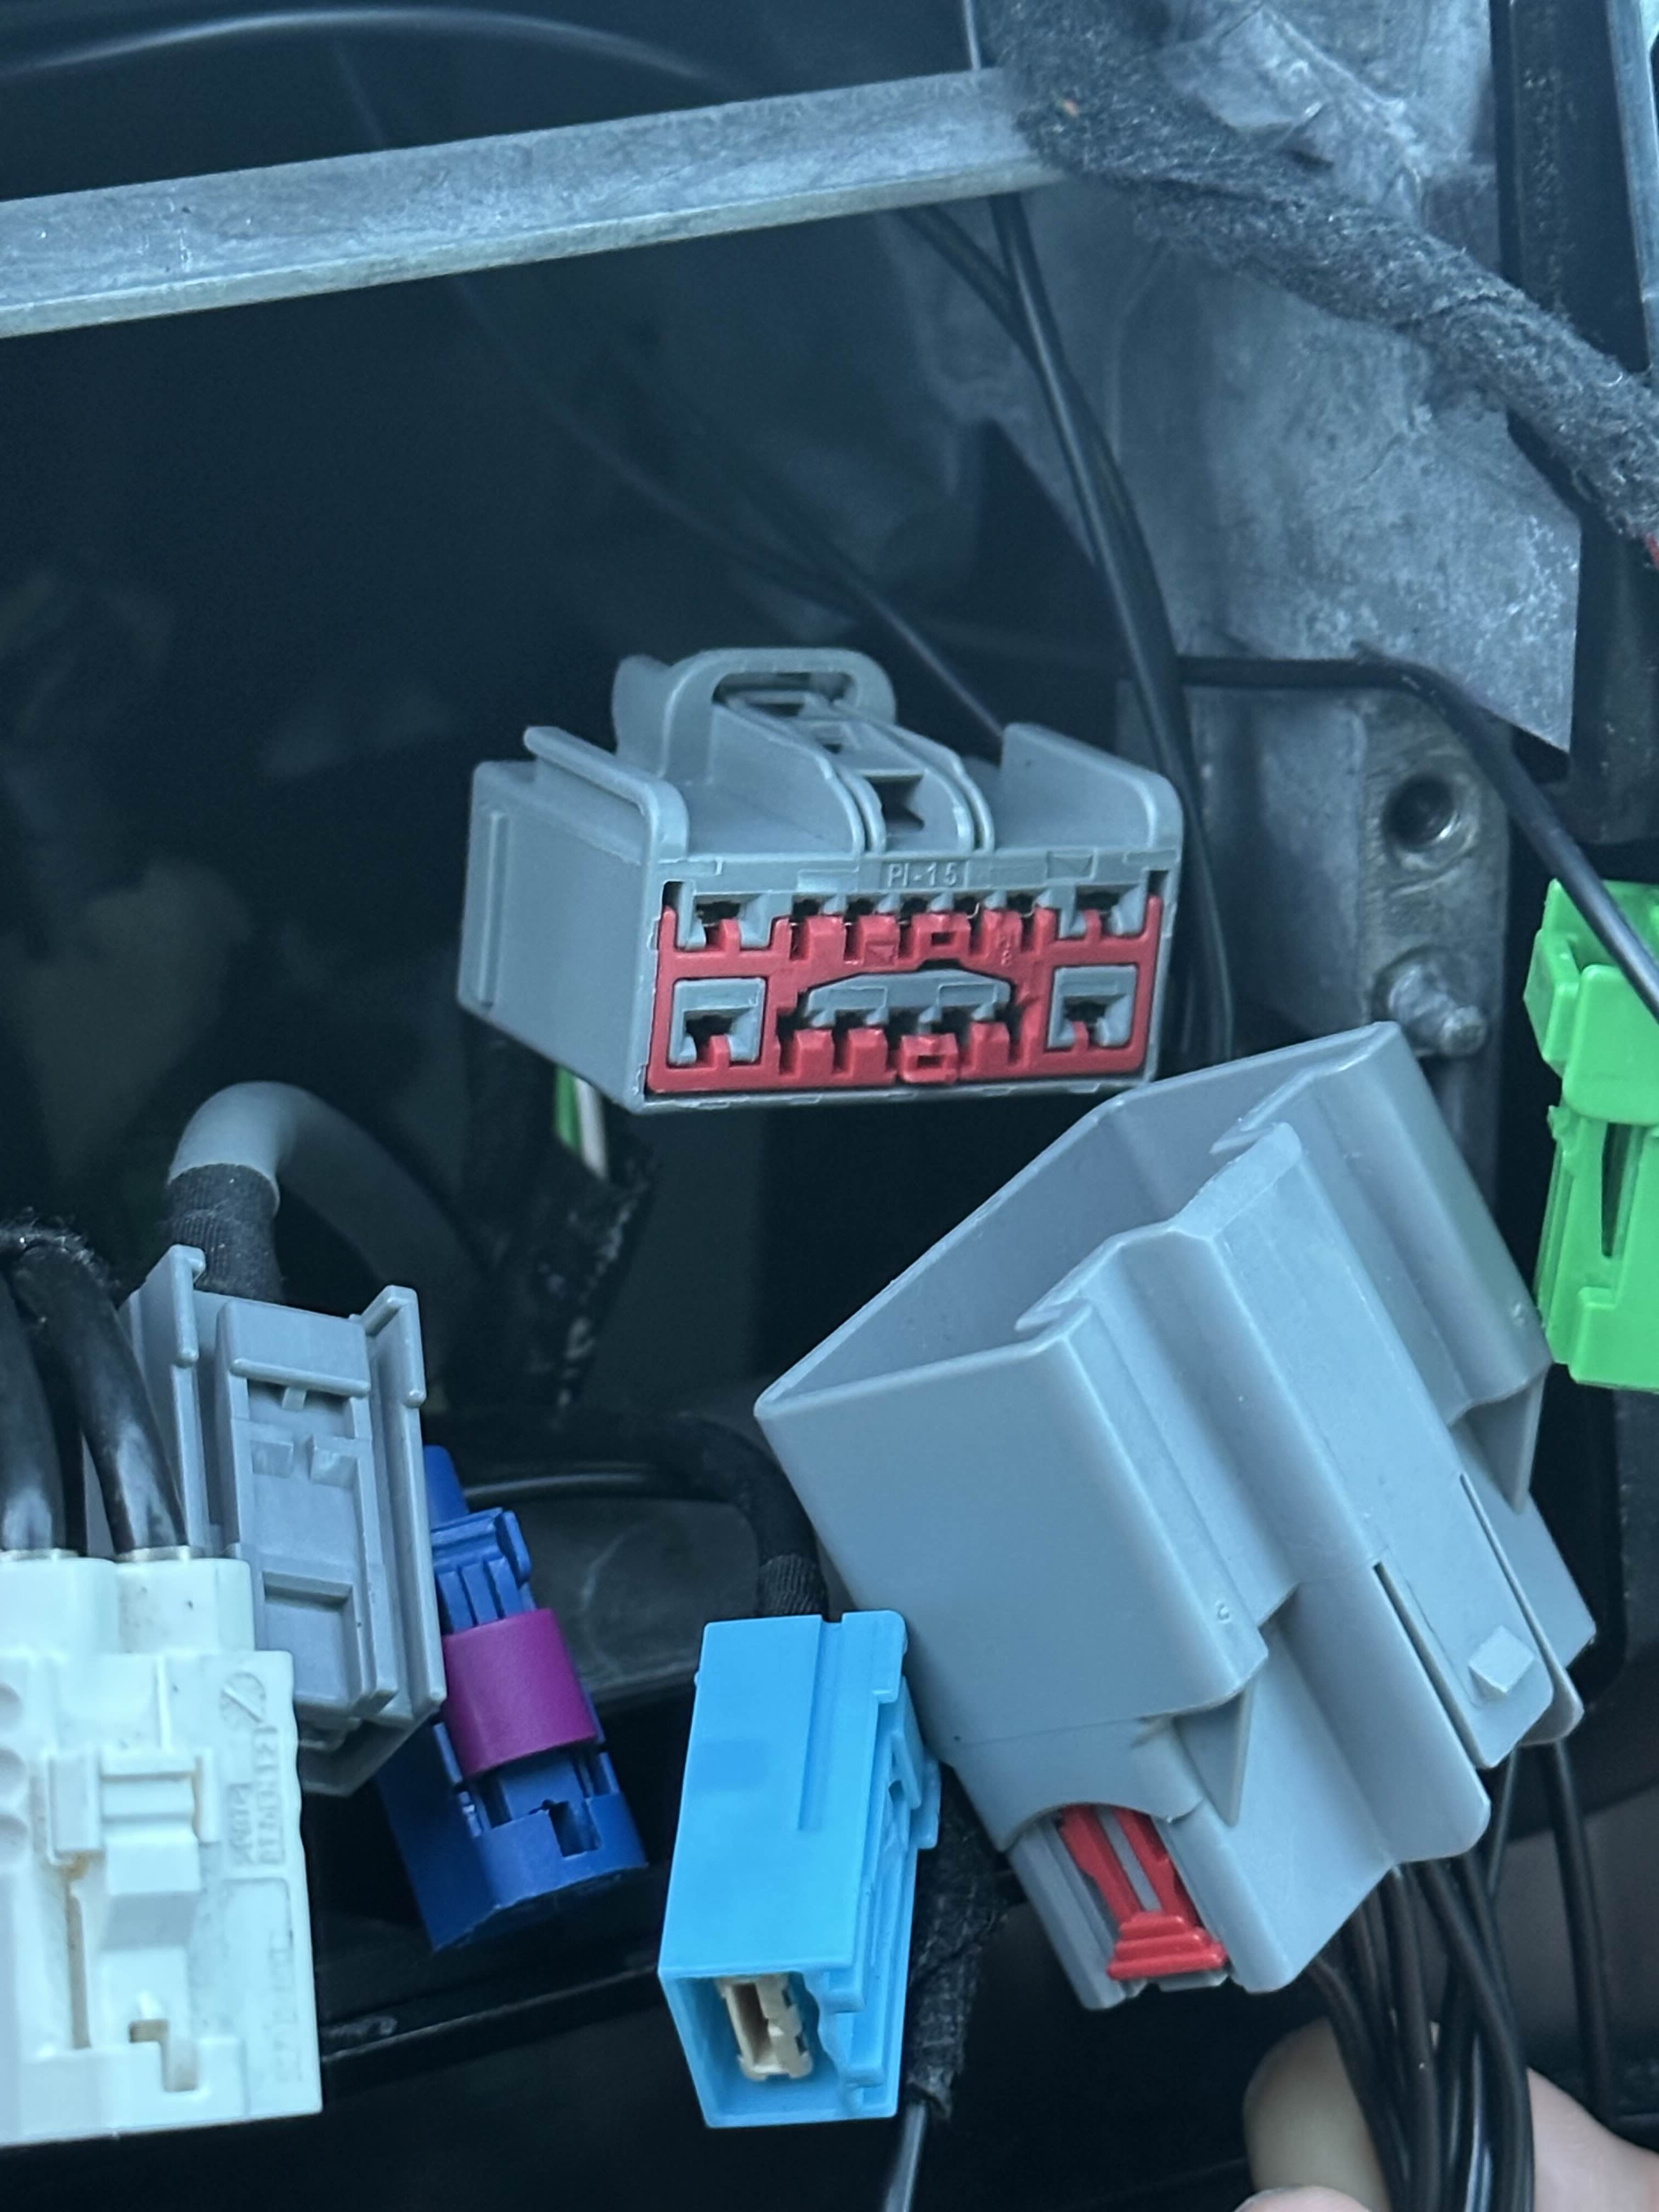
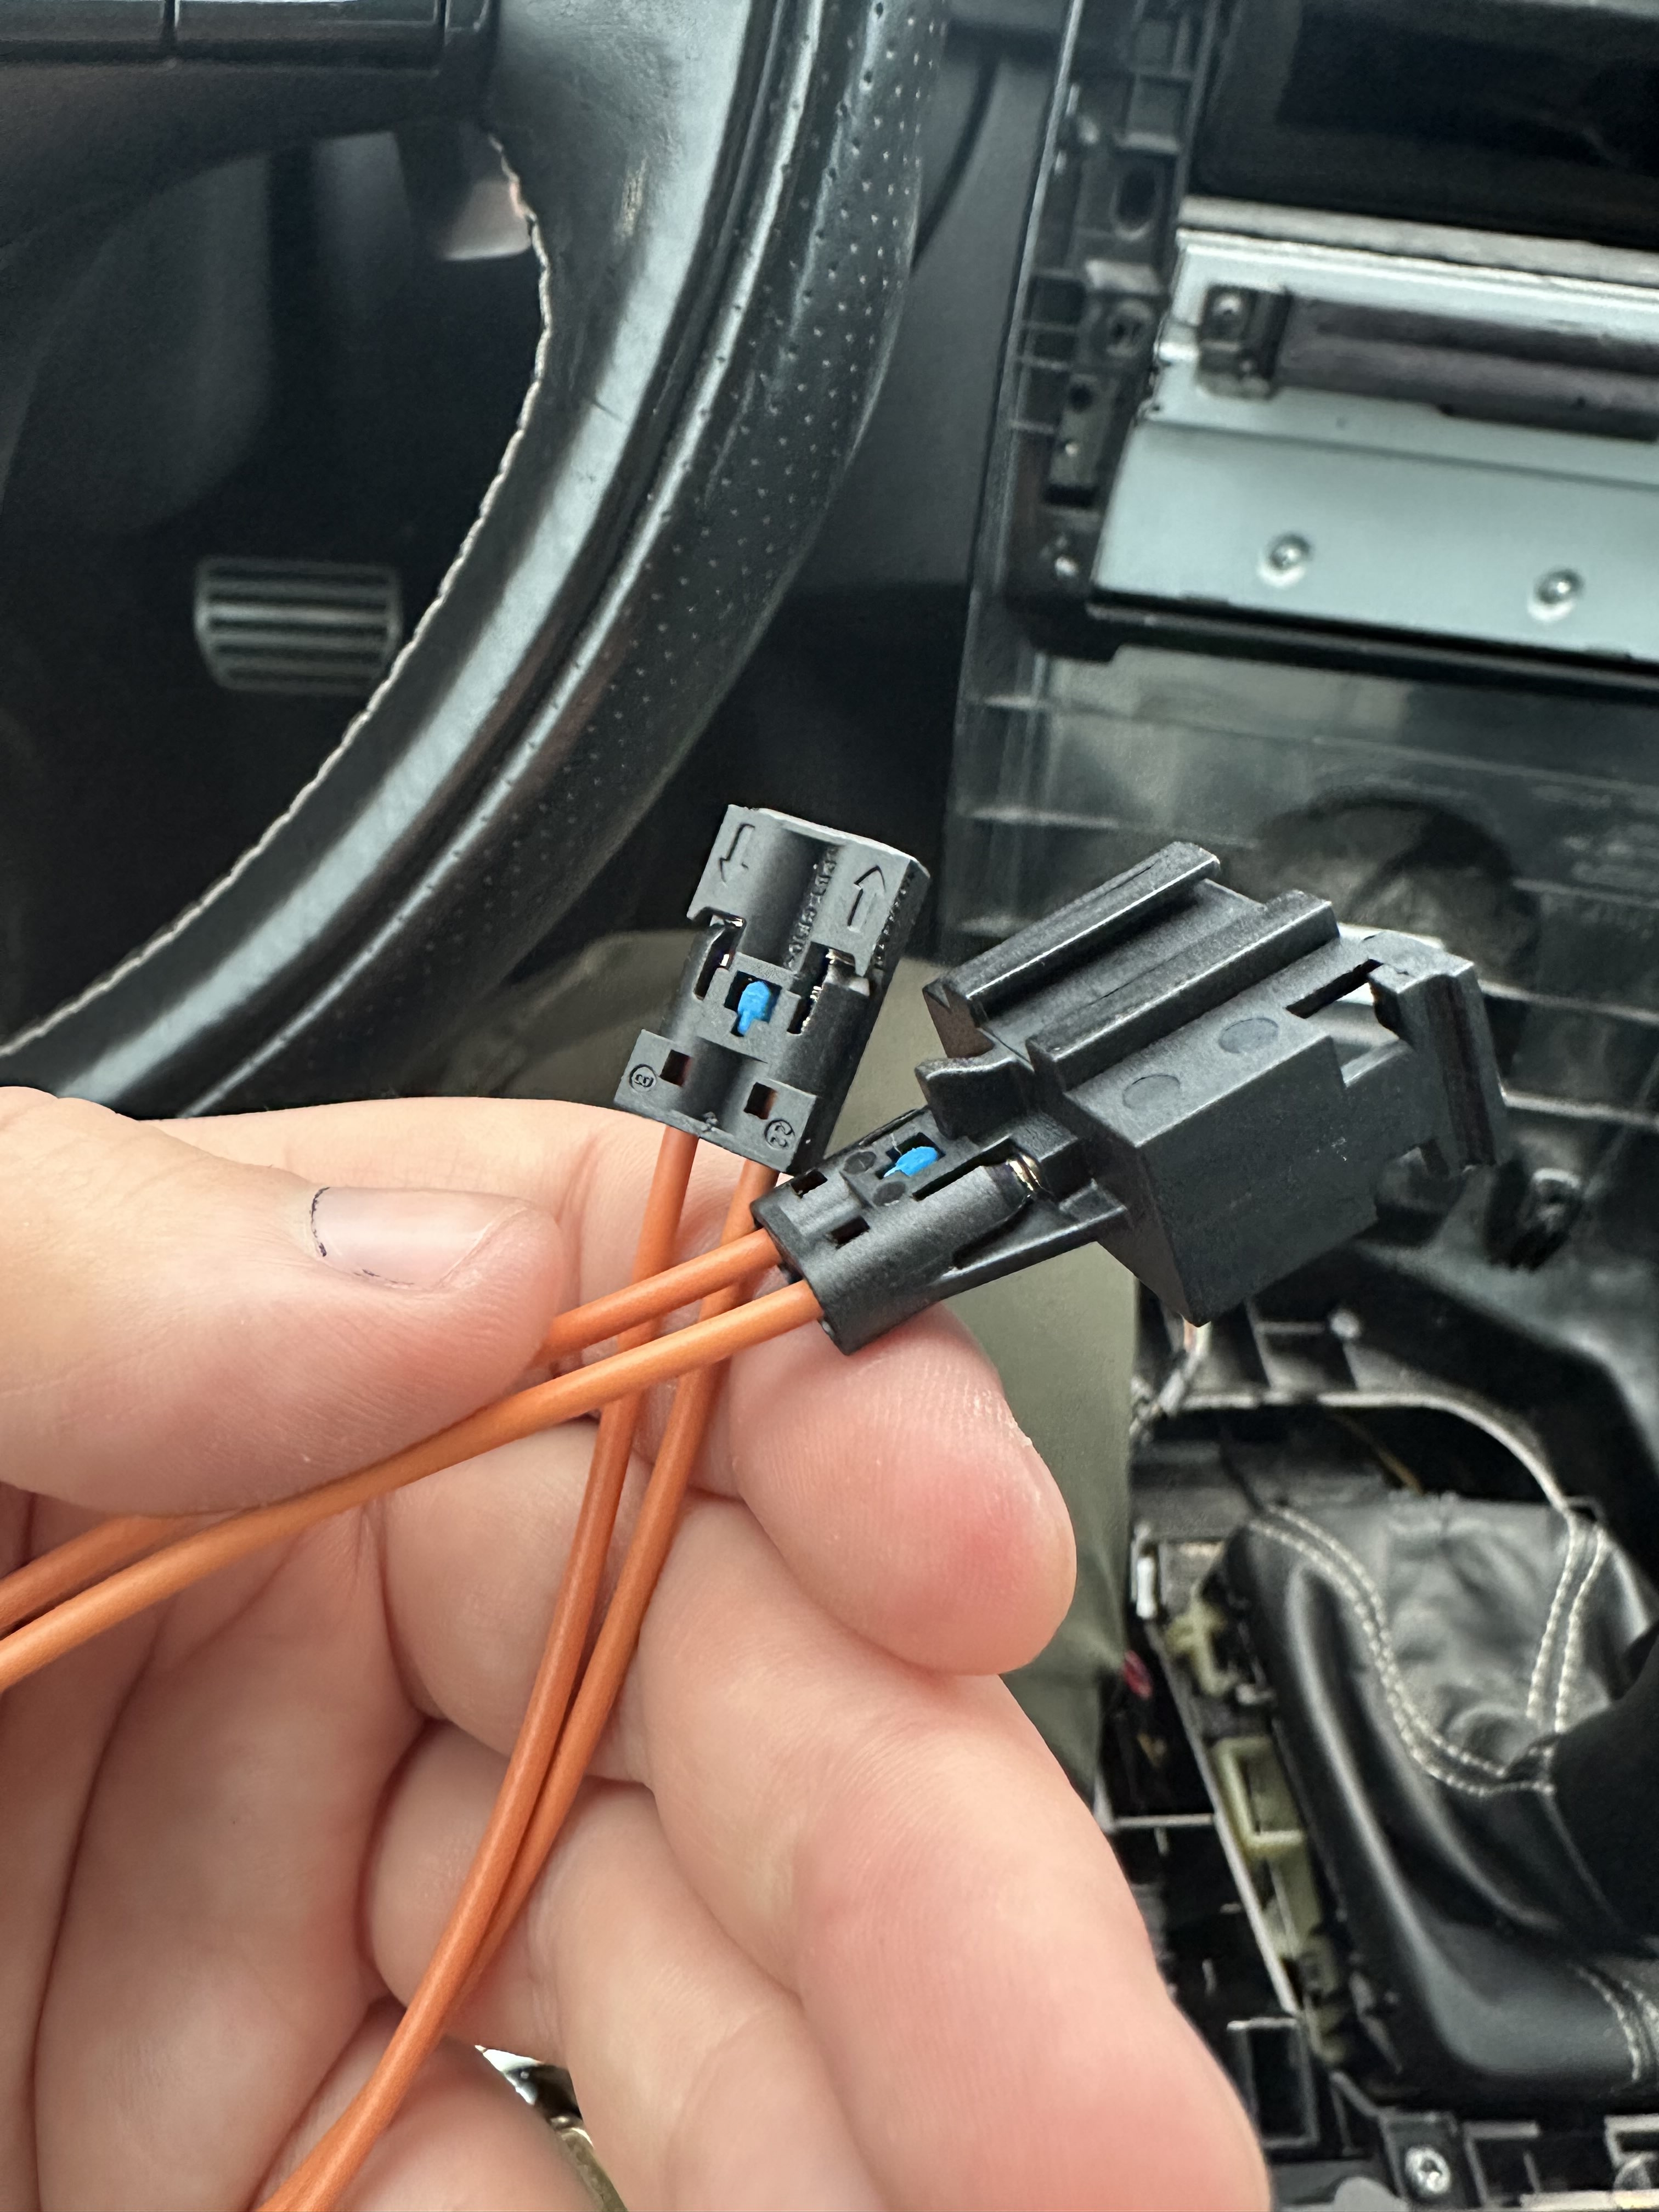
Routing the new adapter harness:
Our next step is routing the new adapter harness that we made ourselves, as well as connecting the MOST loop at the display and the MOST adapter for the IHU.
Take the following end of the wiring harness and route it through the dashboard as shown:
Images
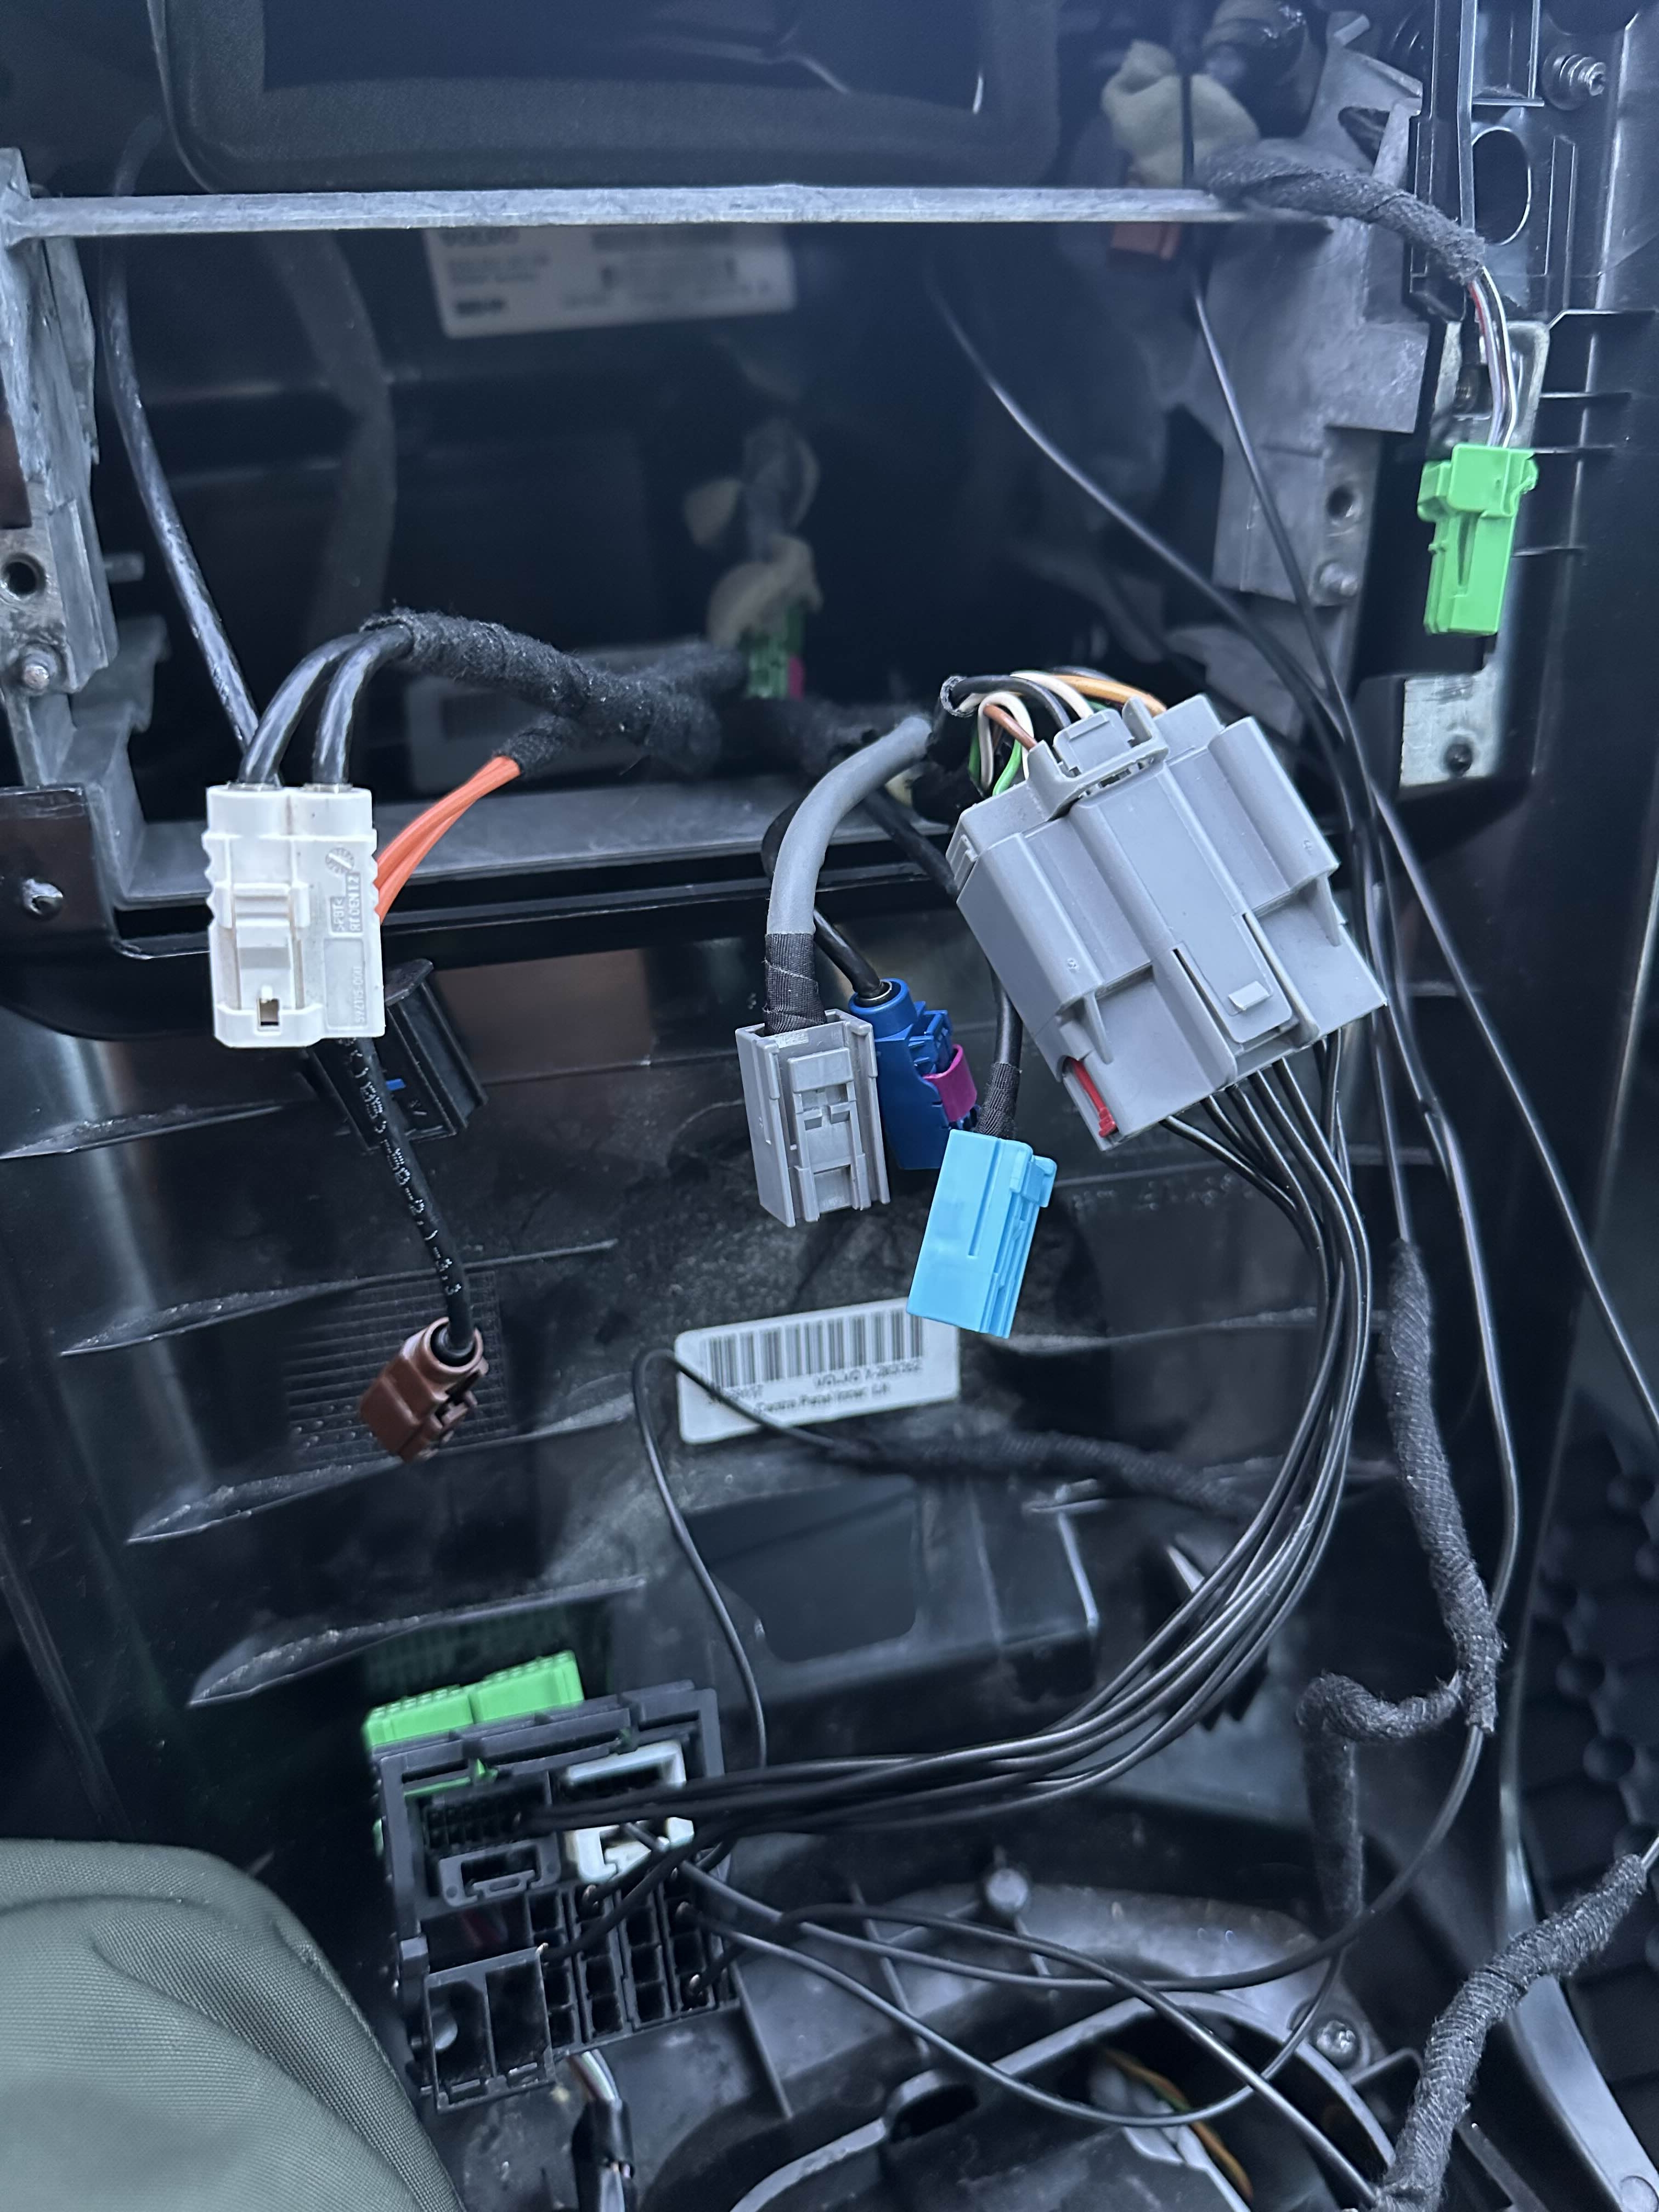
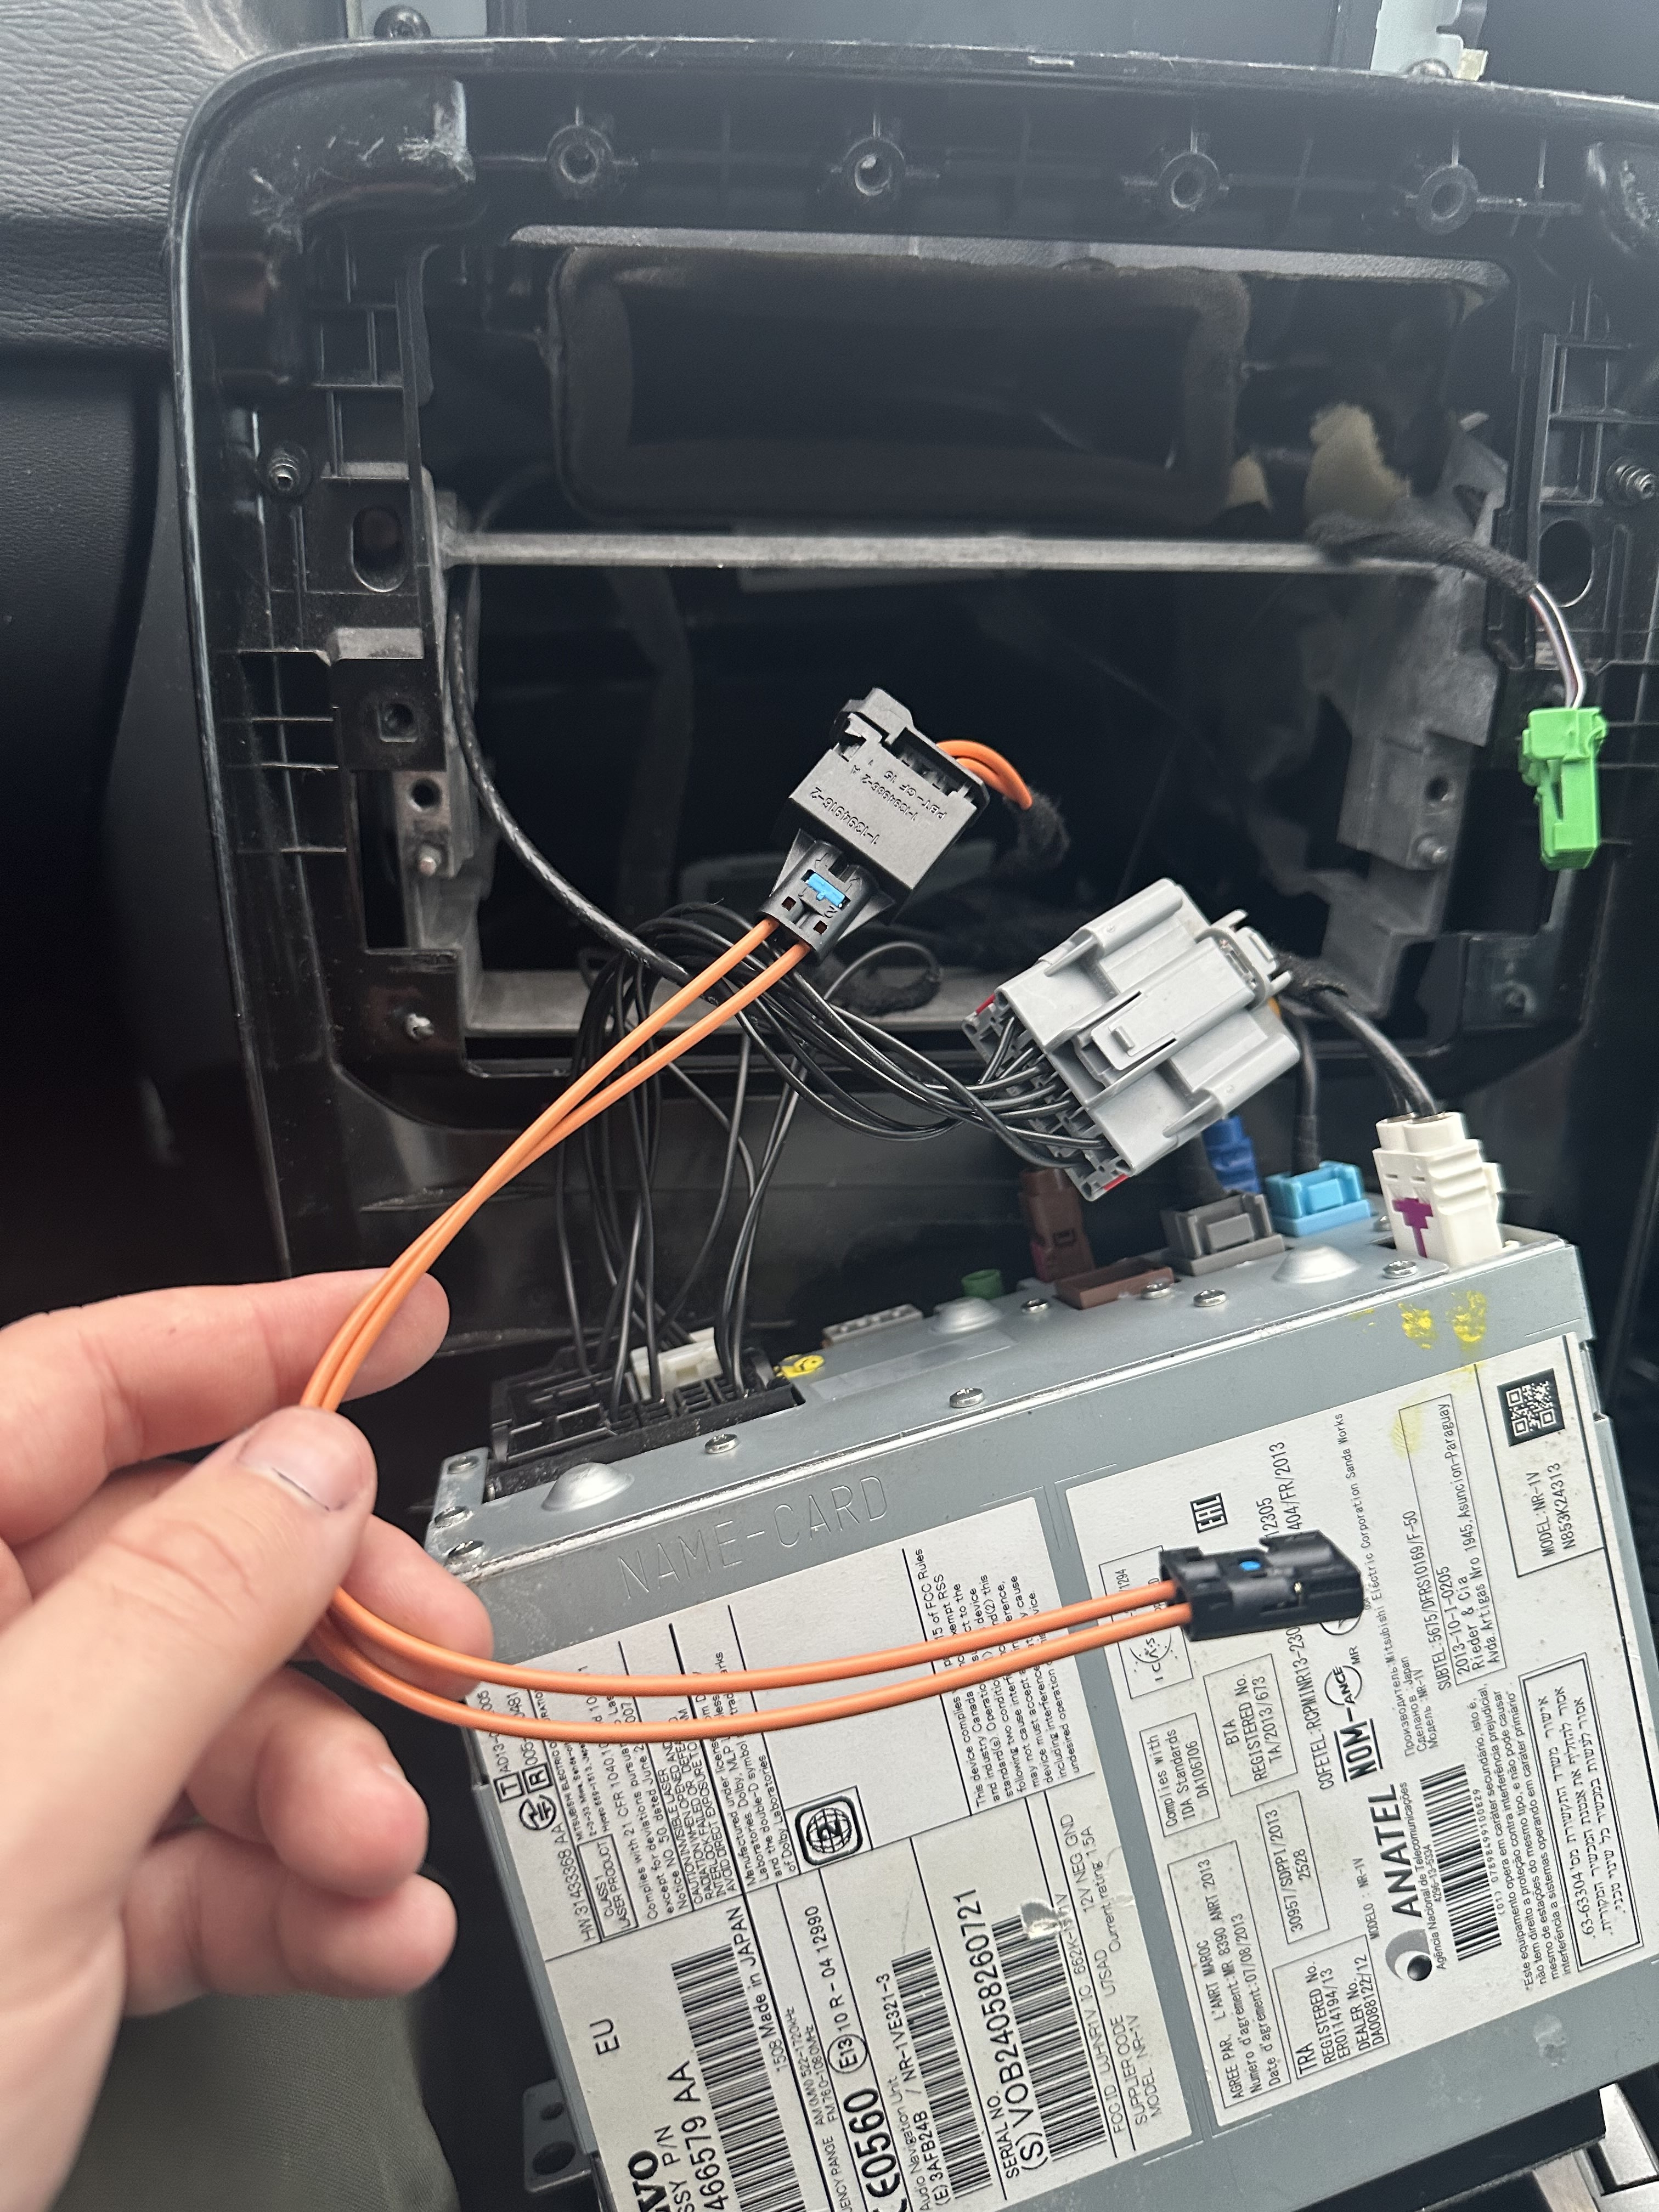
Connect the adapter harness to the old ICM connector, then connect the remaining blue LVDS and gray connector into the new display.
Take your MOST bypass loop and connect that to the remaining black connector.
Images
Connect the large gray plug to the large gray plug on the adapter harness. Then connect any remaining plugs into the IHU.
Images
You'll be left with a remaining black connector which looks the same as the MOST connector behind the display. Connect your MOST adapter to this plug and then the remaining end of the MOST adapter into the quad lock plug on the IHU as such:
Images
Slide the IHU and display into place and screw back in the 2 screws for the IHU and 4 screws for the display which you removed earlier.
Images
Reassembly:
Reassembly is the same as dissasembly but in reverse order, make sure to hand tighten everything when screwing it in, you are screwing into plastic parts, so screwing too tight can break panels! (Which you'll see that I've done in a few of the pictures)
If you lost any of the screws for the display: Six point socket screw, x4, 30640847
If you lost any of the screws for the IHU: Six point socket screw, x2, 986200
If you lost any of the long screws for the CCM panel: Six point socket screw, x2, 986274
If you lost any of the short screws for the CCM panel: Six point socket screw, x4, 986062
Programming:
For the programming part of everything, I decided to go with a program which I think a lot of people are familiar with by now: P3Tool.
Prerequisites to programming is having your vehicles CEM and Security PIN decoded, so that you can change the CarConfig as well as disable Infotainment Theft Protection (ITP).
Before making any changes, I would recommend you save your current config to a file in P3Tool so that you can easily go back in case something goes wrong!
My config changes went as follows:
- P#078 Connectivity Control (IHU): 0x03 = Mirror link, Wifi station active
- P#080 GPS time (IHU): 0x02 = With GPS time and date
- P#092 Music server: 0x02 = Music server copy only
- P#124 Audio Player (IAM or IHU): 0x08 = Player For 1 DVD, IHU MCA Connectable
- P#127 Navigation System (IAM and IHU): 0x07 = With Navigation System (For IHU only!)
- P#170 Digital instruction manual: 0x18 = Digital instruction manual Svenska
- P#171 Connected service booking: 0x02 = With Connected service booking
- P#172 Navigation Mapregion (IHU): 0x02 = Navigation Map Region, Europe
- P#175 Language for navigator: 0x13 = Language Navigator Swedish
Some options are region based, make sure the IHU you buy matches the region you'll be using it in and that the config changes reflect that region as well!
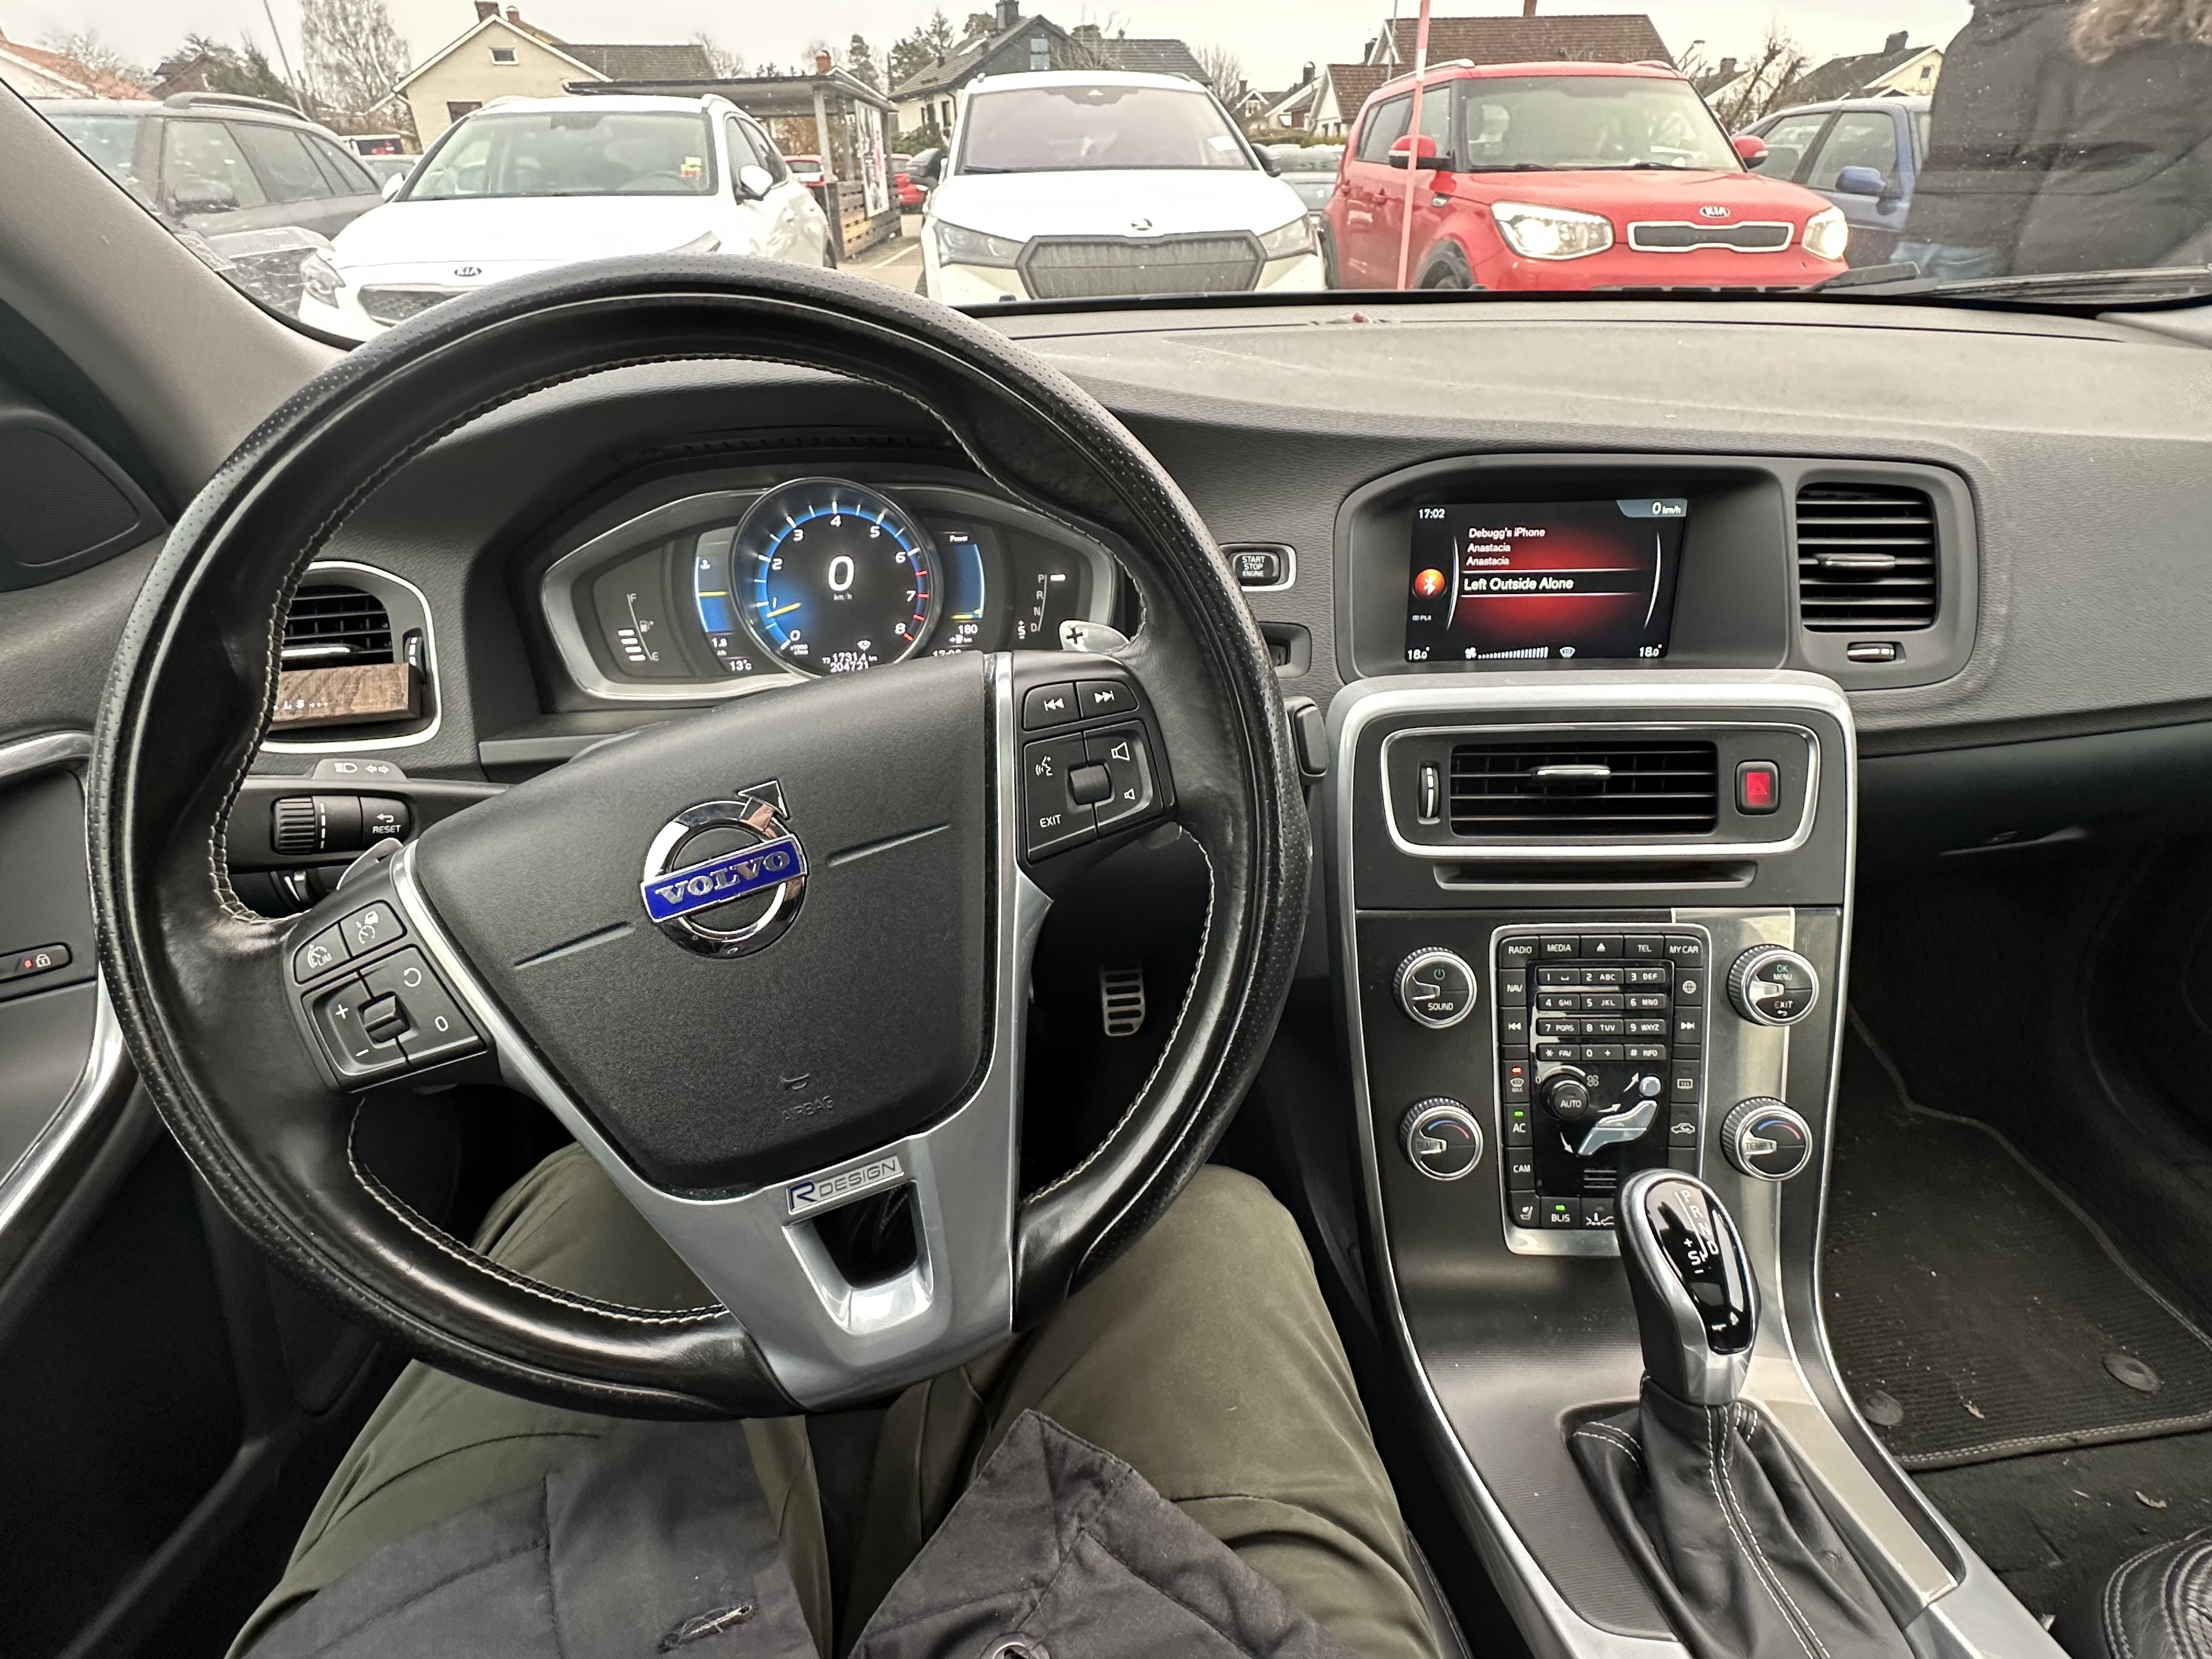
Result:
Here are some pictures of how it ended up looking after the install, I'm pretty proud of that! We made no modifications to the wiring harnesses already present in the car 🤩
Finishing notes:
As I was collecting the parts needed for this project, I wasn't sure if I needed a new CCM too for the new radio to work.
Having read the comments as well as the post on RetrofitP3 it really made it seem like a newer CCM was the way to go.. So in the midst of my uncertainty I ended up buying one used which came from an XC70.
Turns out that out of all the parts in this project, the CCM is the only part which are coded
- To the car but also
- To the model and model year of the car
This basically means that if I'd like the white backlight which is seen in the newer P3 models, then I'd need to do some surface soldering... :/
So in short, that new CCM ended up not working and only causing more problems, however I did quickly notice that my old and green CCM does still work with the new stereo. Only issue I faced was the media controls being disabled this seemed to stem from my DAB/DAB+ tuner (DABM) not being compatible with the radio. However unplugging the tuner and plugging it back in seemed to fix it? However the radio then started lagging... a lot! This is usually caused because of a CarConfig incompatibility or some hardware in the car not being compatible with the IHU, for me it was my DAB tuner.
I checked on Volvo's accessories page and it seems the IHU requires a different tuner from the IAM. So that is something to note when making this retrofit, also check scrapyards for a newer tuner from a 2015.5+ car with Sensus Connect and not the "normal"/old system. What I did in the meantime until I'm able to replace it was just disable it in my CarConfig and that seemed to fix all my issues!
If you've got front park assist on your car you may also have to note that you will loose the visuals on the radio however the beeping will still work. Reason for this basically boils down to how the system communicates in the car (rear park assist will still work the same way it did before though), however I did see that Henke is considering selling his gateway solution which fixes this but I'm not sure what the status is on that yet.
So that's it! The difficult part is creating the wiring harness, after that it's all plug and play. If you've got an older P3 car with the old 5-inch or 7-inch system - especially the 5-inch - then this is an upgrade 1000% worth it in my opinion, this and getting an Android Auto/Apple CarPlay box! (Which I'll be retrofitting a second time with this new IHU soon!)
If you've got any questions, ideas or suggestions to improve this post or just in general that you'd like to see me post about, feel free to send me an email at hello@debugg.co